Add Row
Add Element
Tree Guardian News
update
Tree Guardian News
update
Add Element
  • Home
  • Categories
    • Storm Shield
    • Roots & Routes
    • Disease Detective
    • Insurance Intel
    • DIY Arborist
    • Futureproof Foliage
    • Pro-Partner Spotlight
    • Arborist Stories
    • Tree Care Blog
    • Tree Guardian News Blog
SUBSCRIBE TO NEWSLETTER 
  • update
  • update
  • update
  • update
  • update
  • update
  • update
July 01.2025
1 Minute Read

Tree Watering Tips: Keep Your Trees Thriving This Summer

Did you know that over 50% of newly planted trees die from improper watering within their first year? This surprising fact highlights just how crucial the right tree watering tips can be for your trees’ survival, especially during the summer heat. Healthy trees not only beautify your landscape and provide much-needed shade—they improve air quality, support wildlife, and can even raise your property value. If you want your planted tree or cherished mature giant to thrive, mastering a few key methods for watering is essential. In this comprehensive guide, you’ll discover how to water your trees and shrubs for robust growth from planting day through decades of shade and beauty. Read on to unlock the science-backed secrets to successful tree care, avoid common mistakes, and gain confidence in your watering decisions all year long!

lush green urban park with thriving young and mature trees, vibrant green leaves, families enjoying shade, tree watering tips in healthy tree care, photorealistic

Shocking Truth: Over 50% Of Newly Planted Trees Die From Improper Watering

The survival rate for newly planted trees is shockingly low, with more than half perishing in their first year due to poor or inconsistent watering practices. Many homeowners assume all trees have similar needs, but the watering guide for a young tree is unique compared to established trees. Overwatering can suffocate roots and cause rot; underwatering can quickly lead to drought stress and demise, especially in the critical weeks after planting. Knowing the watering guidelines is your first defense against these preventable losses.

To combat this, it’s essential to check the soil before and after watering and adapt your routine to changing weather and soil conditions. Using a simple garden hose or more advanced options like soaker hoses and watering bags allows you to deliver precise amounts of water directly to the root ball, reducing waste and maximizing absorption. Understanding your soil’s dryness and tailoring your watering accordingly can dramatically boost survival and set your trees up for years of healthy growth.

Why Tree Watering Tips Matter For Plant Health

Growers, landscapers, and certified arborists all agree: A healthy root system is the cornerstone of good tree care. The difference between a thriving landscape and a wilted, struggling one often comes down to how you water your trees and shrubs. Roots act like the tree’s lifeline, absorbing necessary moisture and nutrients to fuel photosynthesis, new growth, and resilience against pests and disease. But if roots stay too wet or dry for extended periods, they weaken and leave the entire tree vulnerable.

By following tried-and-true tree watering tips, you ensure your planted trees and shrubs receive adequate hydration even as temperatures soar. Consistent, deep watering encourages a deeper, more extensive root structure. This makes plants more drought-resistant and less likely to suffer in extreme heat, setting up your landscaping for long-term success.

Proper watering habits offer more than short-term benefits; they help young tree root systems transition into healthy, established giants. This commitment to excellence in tree care not only keeps your garden looking lush but also saves you from expensive replacements and disappointment later on.

Tree Watering Tips For Every Stage: From Newly Planted Trees To Established Giants

Different stages of a tree’s life require different approaches to watering. Understanding the unique needs of newly planted trees versus mature specimens is at the heart of every effective watering guide. During planting, a tree’s roots are typically confined to a small root ball with few extensions; this means it can’t reach distant moisture and relies entirely on you for its survival. In contrast, established trees have a vast root system extending well beyond the drip line and can draw on stored soil moisture during dry spells.

To water your tree effectively, focus on the critical root zone, usually spreading out as far as the canopy’s edge. Use methods like drip irrigation, soaker hoses, or slow-release watering bags to apply water gently and deeply, ensuring moisture reaches the entire root system. As trees mature, their increased root mass allows for less frequent, but still deep, watering. Adjust your methods and volumes as your tree grows to keep its root ball healthy and soil moist, no matter what the weather brings.

Smart, informed watering supports not only growth but also the tree’s ability to withstand disease, drought, and harsh weather. If you want your landscaping to thrive through summer and beyond, learning how to tailor your watering to different life stages is essential.

The Crucial Differences: Newly Planted Tree Versus Established Trees

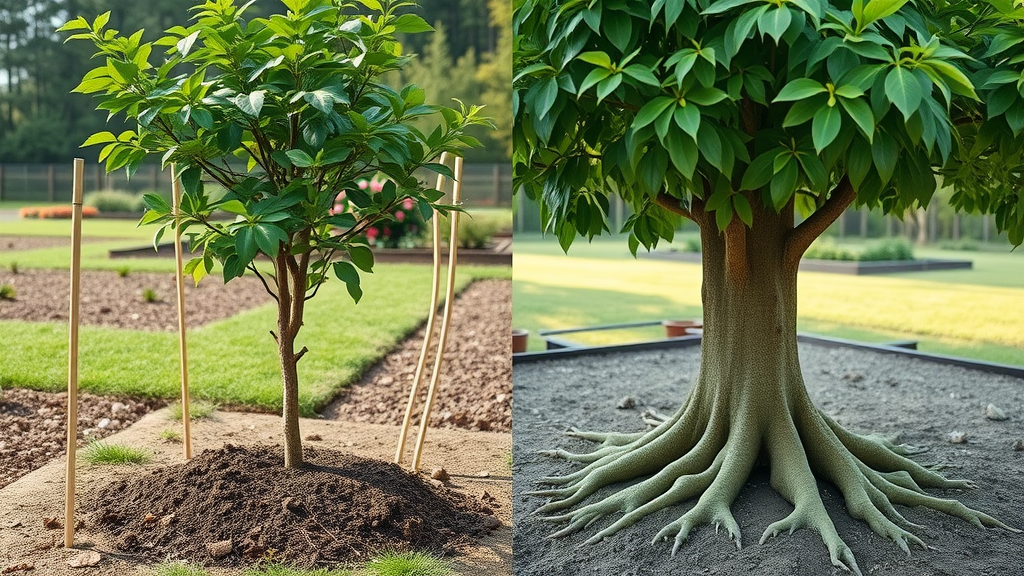
The contrast between a newly planted tree and a mature, established giant is stark when it comes to water needs and root structure. A newly planted tree typically has a compact root ball, which limits its access to water and nutrients beyond the immediate planting hole. Its roots haven’t had time to explore the surrounding soil and are at high risk of drying out if watering is inconsistent or insufficient. Watering guidelines for new plantings emphasize frequent, slow watering to keep the root zone constantly moist—but never soggy.

On the other hand, established trees have an extensive root system stretching beyond the canopy’s drip line. Their needs shift away from frequent watering to deeper, less frequent irrigation that wets the soil several inches deep. Overwatering mature trees, especially on heavy clay soils, can be just as deadly as neglecting them, as waterlogged conditions encourage fungal diseases and root rot. The key is to understand which stage your tree is in and adapt the watering guide to match, always checking the soil before adding more moisture.

By recognizing where your tree sits on the growth spectrum, you’ll avoid one-size-fits-all mistakes and deliver precisely the care your landscape needs to stay vibrant.

side-by-side comparison of newly planted tree with mulch and stakes and a mature established tree with deep roots, showing healthy tree watering tips and growth stages

How Young Tree And Young Trees Need Unique Watering Care

Young trees demand special attention during their first three years in the ground. During this critical establishment period, their limited root systems make them more vulnerable to rapid drying, especially during hot spells or windy days. Unlike established giants, a young tree should be watered more regularly—sometimes every day during periods of high heat. Watering should focus on saturating the root ball and surrounding soil, encouraging roots to reach outward and downward in search of moisture.

Because young trees are sensitive, it’s important to use gentle methods, such as soaker hoses or watering bags, to minimize runoff and ensure gradual absorption. Mulching with organic mulch helps keep the soil moist and cool, further protecting delicate root tissue and maintaining an optimal microclimate. Avoid shallow watering that only dampens the top few inches of soil, as it encourages roots to stay near the surface, increasing heat stress risk.

Monitoring the soil moisture with a probe and adjusting the watering guide as your tree grows helps ensure continued root development and reduces transplant shock. By providing consistent but not excessive care, you’ll help your young trees transition into robust, self-sufficient members of your landscape.

Watering Guidelines: Crafting A Personalized Watering Guide For Your Trees And Shrubs

Creating a personalized watering guide for your trees and shrubs isn’t a one-size-fits-all endeavor. Factors that influence proper watering include species, age, soil type, weather conditions, and site layout. To strike the right balance, consider how sandy or clay-heavy your soil is (sandy soils dry out quickly, while clay soils retain moisture longer), as well as whether your plants are located in sunny or shady spots.

For most planted trees , a general rule of thumb is to deliver 5-10 gallons of water per inch of trunk diameter per week. For newly planted trees or shrubs, this water should be applied slowly, in several intervals, over the course of the week to ensure deep penetration into the root ball and surrounding soil. Checking soil moisture down to 6-8 inches helps determine if you’re applying enough, too much, or too little water. Soil should be moist, not soaked or bone-dry, to keep roots healthy and oxygenated.

Use this guideline as a starting point and adapt throughout the growing season. During periods of high heat, wind, or drought, increase frequency and volume. When rainfall is plentiful, scale back to prevent waterlogging. By staying observant and flexible, you ensure your landscape receives exactly what it needs without waste.

Comparison Of Tree Watering Schedules And Water Volumes
Tree Type / Stage Frequency (per week, growing season) Water Volume (per session) Application Method
Newly Planted Tree 2-4 times 5-10 gallons / inch trunk diameter Soaker hose, watering bag, slow garden hose, drip irrigation
Young Tree (1-3 years) 1-2 times 10-15 gallons / session Soaker hose, deep root watering probe, drip irrigation
Established Tree Every 1-2 weeks (as needed) 10-20 gallons / inch trunk diameter Slow garden hose, soaker hose, sprinkler system (infrequently)
Large Mature Tree Every 2-4 weeks (drought only) 20-30 gallons / inch trunk diameter Drip irrigation, multiple garden hoses, slow soak

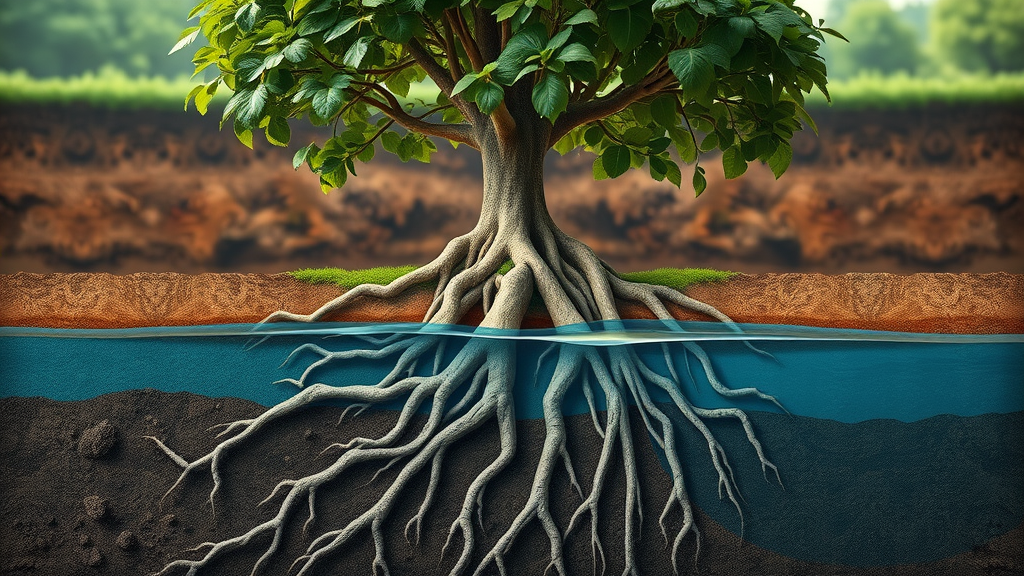
Tree Root Health: Understanding Deep Versus Shallow Watering

A crucial concept in any tree watering guide is the difference between deep watering and surface, shallow watering. Roots naturally grow where they find consistent moisture and oxygen—ideally 6-24 inches below the soil surface. Shallow, frequent watering encourages roots to stay close to the top, making your tree root system more susceptible to drought, temperature swings, and physical injury.

Deep watering, in contrast, involves applying water slowly over an extended period so that moisture soaks through multiple inches of soil, reaching the entire root zone. This not only supports vigorous, healthy growth but also increases drought tolerance and natural stability. Targeting the drip line (the area below the outermost branches) ensures even large root systems have access to hydration, especially during the most stressful periods of the summer.

Avoid watering too quickly or lightly, as much of this moisture will evaporate or run off, never reaching your desired root depth. Instead, focus on applying water with soaker hoses, drip irrigation systems, or slow garden hose methods. These approaches guarantee the water is moving down, not out, resulting in a healthier tree care routine for all your trees and shrubs.

cross-section diagram showing deep-rooted tree absorbing water versus shallow watering, highlighting tree root health and soil moisture retention

How To Keep Soil Moist: Tricks For Reliable Soil Moisture

Keeping soil moist without causing root diseases or wastage is an art. The foundation is regular monitoring—use a soil moisture probe, a screwdriver, or simply dig down 6-8 inches to check the soil. It should feel cool and moist, but not soaked or sticky. If it crumbles or feels dry, water; if it’s soggy, wait. Adjust your schedule as needed, especially during the growing season’s hottest months or after heavy rainfall.

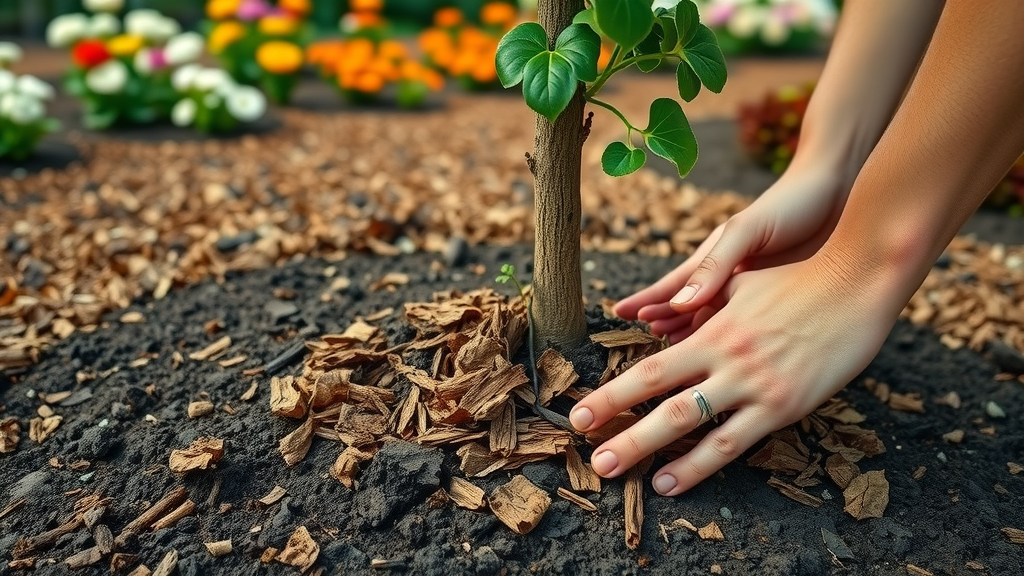
Mulching is among the most effective ways to boost soil moisture retention. A layer of two to four inches of organic mulch insulates roots, prevents evaporation, and keeps temperatures even. Just keep mulch a few inches from the trunk to prevent rot. Other tricks include watering only in the early morning or late evening to reduce evaporation and grouping young trees or shrubs together so each application of water benefits multiple plants.

For particularly sandy or quick-drying soils, consider amending with compost or adding slow-release hydrogel granules to enhance moisture holding. By combining these practical soil strategies, you will keep your trees hydrated and thriving even during extended dry spells.

Best Practices For Tree Care And Watering During Summer Heat

Summer is the ultimate stress test for your landscape. Adopting the best tree care and watering practices is crucial for tree survival during periods of high heat and drought. The most robust action you can take is to prioritize early morning or evening watering. Lower temperatures reduce evaporation, allowing your water your tree efforts to reach roots, not just sizzle off the surface.

Moisture conservation starts with proper mulching—always use organic mulch and keep it away from trunks. Shielding the root zone stabilizes soil temperature and cuts down on weed competition. Next, avoid watering lawns around trees at the same time, as turf roots compete aggressively for moisture, leaving tree root systems thirsty.

Finally, always be alert to signs of drought stress, such as wilting, curling, or scorched leaves, and adjust your watering guide quickly to meet increased demand. With the right seasonal strategy, your trees will remain lush and full despite even the hottest conditions.

  • Monitor soil moisture regularly with a soil probe
  • Water your tree early in the morning or late in the evening
  • Adjust watering guide during extreme heat or drought
  • Mulch around trees and shrubs to conserve moisture
  • Prevent water runoff with soaker hoses and slow-release bags
“Even established trees can succumb to drought stress if neglected for extended periods—consistent care is vital.”

Learn the precise techniques for watering a newly planted tree. See how to use soaker hoses, soil probes, and watering bags to keep the root ball moist and boost survival rates. Follow close-up demonstrations of proper application, finishing with a guide to effective mulching for extra protection.

Water Your Trees Wisely: Tools, Techniques, And Technology

Choosing the right tools can transform your watering efforts. Modern tree care combines traditional knowledge with smart technology, making it easier to water your trees with precision. From simple garden hoses and soaker hoses to smart sensors and irrigation apps, there’s a tool for every landscape and experience level. Understanding the differences between these watering methods can save you time and water—ensuring thriving, not merely surviving, trees.

As you learn to use these devices and adjust to changing soil moisture, you’ll develop a reliable, effective routine that grows alongside your landscape.

Which Method Is Best? Comparing Drip Irrigation, Soaker Hoses, And Water Bags

Each watering technique has its strengths and weaknesses. Drip irrigation delivers constant, slow moisture ideal for large landscapes and established trees, but may require professional setup. Soaker hoses are perfect for winding around young trees and shrubs, offering flexibility and deep watering where it counts. Watering bags—especially for a newly planted tree —provide hands-off, effortless slow-release moisture directly to the root ball.

Your choice should depend on your tree’s age, your soil type, and your available time. Combining methods can maximize benefits; for example, a watering bag for new trees plus drip irrigation for mature specimens. Experiment and monitor results to perfect your watering guide .

Pros And Cons Of Watering Techniques
Technique Pros Cons Best For
Drip Irrigation Efficient, automated, delivers water slowly to root zone, ideal for large areas Higher setup cost, may require a professional Established trees, large gardens
Soaker Hose Flexible, easy to install, encourages deep watering, minimal evaporation May not be precise, can clog over time Young trees, shrubs, mulched beds
Watering Bag Uniform, slow percolation, hands-off, reduces evaporation Limited to small/medium young trees, must be refilled Newly planted tree, transplanting
Garden Hose Accessible, flexible control, no setup needed Can easily overwater or underwater if left unattended All stages, temporary solutions

Smart Watering Guide: Apps And Sensors To Track Soil Moisture

The latest wave in tree care is digital: Soil moisture sensors and smartphone apps help take the guesswork out of watering. Insert a sensor near the root zone to monitor soil moist ure levels in real time; many apps give you alerts when the soil drops below an optimal threshold. This technology is especially useful in large landscapes or absentee situations, allowing you to ensure consistent hydration throughout the growing season.

These tools combine convenience and accuracy—ideal for modern gardeners looking to maximize efficiency and avoid overwatering or waste. Review sensor readings before watering, and use data trends to adjust your schedule across seasons. With these smart tools in your toolkit, your watering guide becomes automated, targeted, and reliably effective.

modern gardener using soil moisture sensor app near a young tree, showing digital tree watering guide for soil moisture and root health, detailed landscape in background

Troubleshooting Common Mistakes: Avoiding Overwatering And Underwatering

Even well-intentioned caretakers make mistakes. Overwatering suffocates roots—especially in young trees —leading to yellowing foliage, root rot, and potentially death. Underwatering causes wilt, leaf scorch, and slow growth, particularly with newly planted trees with limited root systems. To stay on track, watch for key signs: Waterlogged soil that smells sour or sloughing bark can signal excess moisture, while dry, crumbly soil, premature leaf drop, and stunted growth signal thirsty roots.

If you notice pooling water after irrigation, check your soil’s drainage and amend if needed. Mulch can help, but never let it pile against the trunk. Always allow the soil to dry slightly between watering, especially for established trees; this encourages deep root systems and healthy growth. Remember, myths persist—watering daily is not necessary or smart for most trees!

  • Signs of overwatered vs. underwatered young tree
  • How to correct poor soil drainage
  • Common myths about watering newly planted trees

Watch and learn: This quick demonstration shows how to use a soil probe or screwdriver to check soil moisture at the root ball and drip line. See the ideal soil consistency and learn how to spot when your trees and shrubs truly need more water, helping avoid the hazards of both overwatering and drought stress.

Key Tips For Year-Round Tree Care And Watering Success

Consistency and adaptability are vital for thriving landscaping all year. As the seasons change, so does your watering guide . Spring brings new growth and increased thirst; summer calls for vigilant heat protection; autumn is prime time for root strengthening; and winter, while dormant, still requires occasional watering during dry spells or in snowless climates. Adjust frequency, volume, and technique to fit each season and weather pattern for sustained tree care success.

Remember: No matter how advanced your technology or detailed your guide, regular observation and soil checks remain unbeatable for keeping all trees and shrubs vigorous across the calendar.

Seasonal Reminders: Adapting Tree Watering Tips For Each Month

Spring: Begin slow, deep waterings as trees break dormancy; monitor rainfall and supplement only as needed. Summer: Increase checks, mulch meticulously, and boost frequency during heatwaves or drought. Water early or late to maximize absorption. Autumn: Gradually decrease frequency but maintain deep watering to encourage root growth before first frost. Young trees can especially benefit from October hydration. Winter: If soil isn’t frozen, water during dry spells, especially for young or recently planted trees in areas with little snow or winter rain.

Always adjust your guide based on current weather, soil type, and stage of tree maturity for the healthiest landscape possible.

annual cycle illustration with trees in each season and correct tree watering tips for each month, showing watering guide in spring, summer, autumn, winter
“Correct watering at planting sets a tree up for a lifetime of health.”

People Also Ask: Expert Answers Based On Tree Watering Tips

What is the best method of tree watering?

The best method involves deep, infrequent watering using soaker hoses or drip irrigation to deliver moisture to the tree root zone without causing surface runoff. For newly planted trees , water bags offer efficient, slow-percolation watering directly to the root ball, ensuring roots receive continuous hydration.

How many minutes should you water a tree?

Most planted trees require about 5-10 gallons of water per inch of trunk diameter weekly. This typically equates to 20-40 minutes per session with a slow soaker hose or drip irrigation, depending on your soil’s texture and daily weather conditions. Adjust duration based on actual soil moisture readings for best results.

Is it better to overwater or underwater trees?

Slight underwatering is generally safer than overwatering. Excess moisture promotes root rot, disease, and poor oxygenation, especially in young trees and newly planted trees . Allow roots to dry slightly between waterings—this encourages deep, healthy root growth. If in doubt, check the soil before applying more water.

How long to leave water bags on trees?

For newly planted trees , fill water bags at least once weekly, letting them empty fully over 4-8 hours to ensure deep, even root hydration. Check soil moisture after each application to determine whether a second session is needed during very hot or dry weeks.

Frequently Asked Questions: Expanding On Tree Watering Tips

  • Can you water your trees with reclaimed water? Yes, but only if your reclaimed water is approved for landscape use; some recycled sources contain salts or contaminants that may harm sensitive trees and shrubs. Always check local regulations and test water quality before widespread use.
  • Do trees and shrubs need more water in sandy soil? Absolutely. Sandy soils dry out rapidly, so both young and established planted trees require more frequent deep watering and possibly more mulch or compost to help retain soil moist.
  • How far does the root zone extend from a planted tree trunk? The root system of a mature tree often extends 1.5–3 times the width of the canopy (“drip line”). For a planted tree , focus watering just beyond the root ball for the first year, then expand outward as roots grow.
  • What are signs of drought stress in established trees? Symptoms include wilting, curled, or brown-tipped leaves, early leaf drop, slowed growth, and brittle twigs. If you spot these signs, adjust your watering guide and apply water deeply and gradually to restore tree root health.

See expert mulching in action: Watch this detailed guide on spreading organic mulch around the base of a young tree. Learn why mulch thickness and distance from the trunk matter, and see how the right mulch materials make a difference in retaining moisture for your tree’s best summer ever.

close-up of applying fresh organic mulch around base of young tree, showing moisture retention and correct technique for tree watering tips

Grow Your Landscaping Expertise For Thriving Trees All Year

Grow your landscaping expertise—call 203-271-7991 or visit TreeGuardianNews.com to subscribe.

Implement these tree watering tips with confidence—monitor, adapt each season, and stay proactive for lush, shade-filled gardens throughout the year!

To further enhance your understanding of effective tree watering practices, consider exploring the following resources:

  • “How to Properly Water Your Trees” by the Arbor Day Foundation offers comprehensive guidelines on watering techniques tailored to different tree ages and species. ( arborday.org )

  • “How to Water Trees and Shrubs” by The Home Depot provides practical advice on deep watering methods and the importance of watering at the drip line to promote healthy root systems. ( homedepot.com )

These resources will equip you with the knowledge to ensure your trees receive optimal hydration throughout the summer months.

Tree Care Blog

21 Views

0 Comments

Write A Comment

*
*
Related Posts All Posts
10.01.2025

Don’t wait—emergency tree removal can save your property

Did you know? Every year, fallen trees and branches result in millions of dollars in property damage and thousands of preventable injuries across the United States. Quick action with emergency tree removal is not just a precaution—it’s often the only way to protect your home, loved ones, and neighborhood from disaster. In this comprehensive guide, you’ll discover the facts, tips, and urgent insights every property owner needs. Why Emergency Tree Removal Matters: Startling Statistics and Little-Known Facts Falling trees are more dangerous—and costly—than many people realize. According to the National Arborist Association, property owners lose millions of dollars each year due to tree fall accidents, ranging from damaged roofs and vehicles to lost power and even bodily harm. What’s most alarming is that countless injuries and incidents could have been prevented with fast, professional emergency tree removal. The risks extend beyond the obvious. Severe weather events, hidden tree diseases, and unnoticed root instability all contribute to a growing threat in residential and urban areas. Studies show a significant rise in emergency tree service requests after major storms, highlighting just how vital rapid response can be for property safety and community well-being. Quick action doesn’t only save dollars—it saves lives. "Each year, falling trees and branches cause millions in property damage—and countless preventable injuries. Acting fast with emergency tree removal is critical for safety and costs." – National Arborist Association What You’ll Learn About Emergency Tree Removal How to identify a tree emergency The cost factors of emergency tree removal What emergency tree service involves and why it’s essential Insurance and free removal options How to ensure safety during tree removal services Understanding Emergency Tree Removal: The Fundamentals What qualifies as an emergency tree? Not all trees in distress call for emergency intervention, but certain conditions should never be ignored. A tree becomes an emergency risk if it threatens immediate danger to people, property, or infrastructure. This includes trees that are leaning severely after a storm, show visible cracks in the trunk, have large dead or hanging branches, or are uprooted and threatening structures or powerlines. Other signs an emergency tree removal may be needed are when a tree’s roots are lifting sidewalks, creating a hazard for neighbors, or if the canopy is entangled in electrical wires. Situations involving hazardous trees, especially after high winds, ice, or heavy rain, can escalate fast. Even a large sick tree might not seem urgent—until it starts to split or fall near places where families gather. If you ever suspect a tree emergency, it’s best to consult a certified arborist for expert advice. Signs your property needs immediate emergency tree service Recognizing the early warning signs of tree failure can prevent devastating consequences. Look out for freshly exposed roots, a leaning trunk after severe weather, deep cracks appearing in the bark, or a sudden downward shift in a tree’s position. Other red flags for needing emergency tree removal include: The presence of mushrooms or fungus growing around the base—a possible sign of internal decay. Noticeable splitting or snapping sounds, which indicate structural failure. Freshly fallen large branches, especially on healthy-looking trees. Proximity to your home, vehicles, or active play areas. Immediate action is vital if you observe these issues. Experienced tree experts or professionals offering emergency tree services can quickly assess and safely remove hazardous trees before they cause serious property damage or injury. If you’re looking for a straightforward, step-by-step approach to handling urgent tree hazards, you may find this practical guide on emergency tree removal made easy especially helpful. It breaks down the process and offers actionable tips for homeowners facing sudden tree emergencies. Why professional tree services are crucial in a tree emergency Attempting to handle a tree emergency without specialized training and equipment can be dangerous. Professional tree removal services use advanced climbing gear, cranes, and chainsaws designed for safety and efficiency. Certified arborists undergo rigorous training to diagnose tree health, assess structural integrity, and execute removals under high-risk conditions. By relying on certified tree experts, you ensure the safety of your household and property without risking personal harm. Professionals are also familiar with local regulations, have proper insurance, and follow industry best practices to minimize risk. After all, when every minute counts, you want a team that knows exactly how to handle the most complex emergencies smoothly and safely. Watch: Step-by-step overview of the emergency tree removal process. Identifying a Tree Emergency: Urban Forest Risks and Warning Signs Common causes for emergency tree removal Understanding what leads to an emergency tree removal can help you spot trouble before it escalates. The most frequent reasons include: Storm damage: High winds, lightning strikes, or heavy snow can break branches, split trunks, or uproot entire trees overnight. Disease or infestation: A sick tree infested with insects or affected by a fast-spreading fungus may deteriorate rapidly, putting your property at risk. Leaning or uprooting: Trees that start to lean or pull away from the soil, especially after rainstorms or soil erosion, are at high risk of falling. Obstruction near structures or power lines: Trees that grow too close to homes, garages, or utility lines present immediate hazards if they begin to fail. In urban environments, where space is tight and tree roots compete with pavement, these risks are amplified. Routine tree care and fast emergency response are both necessary to protect your home and neighborhood. Urban forest vulnerabilities and their impact on emergency tree services The health of your trees is often challenged by the unique pressures of the city. Urban forests face stressors such as compacted soil, limited root space, pollution, and frequent construction activities. These conditions can weaken even mature, healthy-looking trees and increase the need for expert emergency tree services. Moreover, aging city trees are sometimes overlooked until a sudden failure occurs. Municipalities and property owners must be vigilant—vulnerable trees not only threaten private property but can disrupt traffic, damage power lines, and endanger public safety. Proactive inspection and a relationship with a reputable emergency tree removal service are essential to minimizing preventable urban risks. Emergency Tree Removal vs. Routine Tree Service: What’s the Difference? It’s easy to confuse regular tree care with urgent, high-stakes emergency tree removal, but the differences are substantial. Routine tree services include scheduled pruning, seasonal inspections, trimming dead branches, and maintaining landscape health. These tasks can be planned at your convenience and scheduled in advance with a local tree expert. In contrast, emergency tree removal is a round-the-clock service triggered by unpredictable dangers. Storm-damaged, fallen trees, or hazardous branches require immediate, skilled intervention. Unlike routine jobs, emergencies are handled with specialized equipment, present higher inherent risks, and often demand greater urgency, affecting both cost and safety protocols. Types of tree service and emergency services available Professional tree services cover a broad spectrum, including routine maintenance, monitoring, and health assessments. During an emergency, tree removal specialists handle critical issues such as: Immediate removal of hazardous or fallen trees Storm cleanup and debris clearance Securing compromised trees near homes and infrastructure 24/7 on-call assistance for urgent threats Choosing a provider capable of both routine and emergency response guarantees year-round tree safety and health, no matter what nature throws your way. Emergency Tree Removal vs. Routine Tree Service: Quick Comparison Factor Emergency Tree Removal Routine Tree Service Response Time Immediate (often 24/7 availability) Scheduled in advance Removal Cost Higher—due to urgency, complexity Lower; predictable rates Equipment Specialized, heavy-duty (cranes, lifts, large saws) Standard maintenance gear Safety Considerations Urgent hazard mitigation—ensure safety for people and property Focus on tree care and healthy growth Navigating the Emergency Tree Removal Process Step-by-step guide: What happens during an emergency removal service When you call for emergency tree removal, a reputable service follows a structured, proven approach for safety and efficiency: Assessment: Certified arborists or tree experts inspect the site, identifying immediate hazards, the health of your tree, and the scope of work needed. Planning: The team creates a detailed action plan, selecting the right tools and discussing risk mitigation for nearby structures. Execution: Specialists employ cranes and rigging equipment to safely remove the hazardous tree or branch piece by piece, keeping bystanders and your property out of harm’s way. Cleanup: All debris is removed promptly, and, if possible, the area is restored to its original state or readied for further landscaping. Having a clear idea of these steps ensures peace of mind and allows you to prepare accordingly when every second counts. Critical safety measures to ensure safety for your property and family Safety is the top priority during any emergency tree service. Always ensure children and pets are kept well clear of the work zone. Alert your neighbors if the removal may affect their property or access. Let the experts handle the process—attempting DIY tree removal can lead to severe injury or further property damage. Reputable removal services employ strict safety protocols, including barricades, clear communication with homeowners, and comprehensive insurance to cover any possible accidents. These teams use only certified arborists and ensure every job site is equipped with cones, harnesses, helmets, and first aid kits. Effective coordination between you and your chosen professionals guarantees the safety of your family, your neighbor’s property, and the wider community. Emergency Tree Removal Cost Breakdown: What to Expect Factors that determine removal cost: Size, access, urgency, and location What can you expect to pay for emergency tree removal? Costs vary depending on a few key elements: Size of the tree: Larger trees or those with extensive limbs require more time and specialized equipment. Location: Trees close to power lines, buildings, or overhanging pools present extra challenges and raise the removal cost. Accessibility: Difficult terrain or tight spaces can demand cranes, more workers, and extra hours. Urgency: Emergency after-hours callouts or hazardous weather events typically increase pricing. On average, you might pay anywhere from $500 for a small tree to over $2,500 for a large tree or a high-risk scenario. The best way to get an accurate number is always an on-site assessment and quote from a qualified removal service. Sample Emergency Tree Removal Cost Estimates Tree Size/Complexity Average Price Range Cost Factors Small (under 30 ft) $500–$900 Curbside, few obstructions Medium (30–60 ft) $900–$1,800 Close to buildings, moderate obstacles Large or Hazardous $1,800–$2,500+ Height, power lines, storm damage, limited access Insurance, Free Options, and Community Emergency Services Does insurance cover emergency tree removal? Many homeowner’s insurance policies cover emergency tree removal if the fallen tree damages a covered structure, such as a house, garage, or even a fence. However, coverage often excludes trees that fall harmlessly in a yard. It’s crucial to review your specific policy documents and speak with your insurance agent for clarity. Detailed, timely documentation—including photos and written descriptions—will expedite any claims process if your property suffers storm or tree fall damage. Remember, insurer policies may require you to act swiftly to prevent further loss. This means contacting a professional removal service as soon as possible when you spot or suspect hazardous trees after a storm. How can you get emergency tree removal for free or at reduced cost? If emergency tree removal costs are a concern, several options exist. Some municipalities provide free or reduced-cost services if the tree in question threatens public property, blocks roadways, or jeopardizes power lines. Utility companies may offer tree removal when hazardous trees endanger their equipment. Community volunteer programs sometimes step in after major storms for the elderly or those without resources. Always start with a call to your city’s public works office or local utility company to see what relief may be available. Neighborhood associations and disaster relief organizations may also provide assistance, especially after natural disasters. Don’t forget to ask your homeowner’s insurance about claim eligibility for emergent tree services as well. Municipal and volunteer urban forest emergency services Urban forest health is increasingly a priority for city governments and nonprofits. Many metropolitan areas maintain dedicated teams for hazardous tree response and cleanup, focusing on public safety and transportation corridors. Community-funded volunteer crews may organize storm response with power saws, heavy-duty trucks, and certified arborists prepared for crisis situations. Contact your local parks and recreation department, urban forestry division, or municipal emergency hotline to report dangerous trees on city property. By identifying risky trees early and reporting them, you contribute to a safer, more resilient neighborhood after storms or severe weather events. Choosing a Reputable Emergency Tree Removal Service What to look for in a professional tree removal service Certification and insurance: Choose companies whose experts are certified arborists and carry comprehensive liability insurance. 24/7 emergency services: Emergencies don’t wait—your provider shouldn’t either. Client testimonials: Genuine online reviews and personal recommendations help ensure reliability and professionalism. Transparent pricing: A reputable service offers clear, upfront estimates and explains the removal cost structure. Ask for detailed written proposals and request proof of insurance. Trustworthy tree experts should be willing to discuss past emergency jobs and demonstrate a commitment to both rapid response and safety. Questions to ask your emergency tree removal company Before hiring for urgent tree removal, clarify these points: Are your team members certified arborists? What type of insurance do you carry? How quickly can you dispatch a crew in case of a tree emergency? Do you provide written estimates and documentation for insurance claims? What equipment will you use, and how will you ensure safety during removal? A qualified company answers these questions clearly and should give you honest insight about timelines, risks, and costs involved in your specific scenario. People Also Ask: Common Emergency Tree Removal Questions Answered What is considered emergency tree removal? Emergency tree removal requires immediate action due to an imminent risk to life, property, or utility lines—such as trees compromised by storm damage, age, or disease. Emergency situations involve trees or branches that pose a clear, urgent hazard—such as a tree splitting after strong winds, uprooted trees threatening your home, or limbs entangled in power lines. Emergency tree removal should always be handled by professionals to minimize risk. How much does emergency tree removal cost? Costs vary widely but can range from $500 to $2,500+, depending on size, access, and urgency. Always request an on-site quote for accuracy. Pricing is influenced by tree size, complexity, location, and the emergency’s urgency. Additional charges may apply for after-hours response, use of specialized equipment, or hazardous conditions. The best way to budget is to consult a local tree service for a transparent estimate. How can I get a tree removed for free? Some municipalities and utility companies will remove dangerous trees at no cost if they threaten public property or power lines. Check local government and community assistance programs. Free or reduced-cost emergency tree removal may be available through city programs or public utilities—especially for trees posing risks to streets, sidewalks, or electrical infrastructure. Reach out to local government offices and inquire about eligibility requirements. Does insurance cover emergency tree removal? Homeowners insurance often covers emergency tree removal if the tree damages covered structures. Always review your policy and consult your insurer. Typically, policies cover removal after damage to a home, garage, or other insured property. Dead or fallen trees that do not cause damage may not be covered. Review your coverage details and submit claims promptly when needed. FAQs: Emergency Tree Removal and Emergency Tree Service How fast can emergency tree services respond? Most reputable emergency tree services can respond within hours, sometimes minutes, depending on the severity and location of your call. Many operate 24/7 so you’re never left waiting in a crisis. What equipment is used in emergency tree removal? Professionals use specialized equipment such as cranes, bucket trucks, chainsaws, ropes, rigging tools, and safety harnesses—ensuring the efficient and safe removal of even the largest or most complex hazards. Can emergency tree removal prevent future risks? Absolutely. Prompt removal of hazardous trees can prevent extensive property damage, power outages, injuries, and secondary storms or wind events causing further crises. What should I do before the removal team arrives? Keep family and pets indoors, clear your driveway for access, mark any underground utilities, and, if possible, notify neighbors of planned work—especially if the tree overhangs their property. Key Takeaways: Emergency Tree Removal Protects Your Property Immediate response can prevent costly damage. Understand costs and insurance coverage. Select skilled, certified emergency tree services. Preparation and safety are paramount. Secure Your Property and Learn More Grow your landscaping expertise—call 203-271-7991 or visit TreeGuardianNews.com to subscribe. For those who want to deepen their understanding of emergency tree care and stay ahead of potential hazards, exploring the broader landscape of emergency tree service solutions can be invaluable. This resource delves into rapid response strategies, the latest industry best practices, and how to build a proactive plan for your property’s safety. By equipping yourself with advanced knowledge, you’ll be better prepared to act decisively when every second counts. Take the next step in safeguarding your home and discover how expert support can make all the difference in a crisis. Don’t risk your property or safety—know the facts, respond fast, and trust only qualified experts for emergency tree removal when it matters most. When facing the urgent need for emergency tree removal, it’s crucial to act swiftly to protect your property and ensure safety. For instance, the City of Portland provides detailed guidelines on handling immediate tree hazards, including the necessity of obtaining retroactive permits within seven days of emergency removal. (portland.gov) Similarly, Seattle Tree Care offers 24/7 emergency services, emphasizing quick response times and comprehensive solutions, from hazard assessment to debris disposal. (seattletreecare.org) Understanding these procedures and having access to professional services can make a significant difference in mitigating risks associated with fallen or hazardous trees.

09.30.2025

Act now: Tree trimming tips to boost your home's curb appeal

Did you know? According to real estate experts, strategically trimmed trees can increase your home’s value by up to 15%. Beyond boosting curb appeal, proper tree trimming protects your investment, enhances safety, and keeps your landscaping vibrant through every season. Whether you’re prepping for a sale or simply want to be the envy of your block, now is the perfect time to learn how tree trimming can transform your property. This comprehensive guide delivers everything you need—from expert techniques to cost-saving tips—to skillfully care for your trees and shrubs. Startling Facts About Tree Trimming and Your Home's Value If you've ever wondered how much of an impact tree trimming makes on your property's value, the answer is significant. Multiple studies show that homes with well-maintained landscapes, especially those with properly pruned trees and shrubs, routinely sell for higher prices and in less time. More than simply removing unsightly or dead branches, effective tree care enhances visibility, draws natural light, and creates the impression of a safe, welcoming home. But it’s not just about aesthetics. Well-timed and skillful pruning cuts also reduce the risk of storm damage and prevent diseases from spreading to otherwise healthy trees and shrubs. By investing in tree trimming annually or biannually, homeowners ensure their landscape remains both beautiful and resilient. As we’ll see, following proven techniques and seasonal guidance will help you avoid common mistakes while boosting your curb appeal and home value. What You’ll Learn About Tree Trimming and Tree Pruning Key differences between tree trimming and tree pruning Optimal times for tree trimming Step-by-step guide to DIY tree trimming Cost factors and expert tips for tree care How proper tree trimming enhances curb appeal and safety Tree Trimming Basics: Understanding Tree Structure and Health Identifying Healthy Branch Structure for Effective Tree Trimming Healthy trees are the foundation of a vibrant landscape, and the branch structure plays a critical role in both appearance and safety. Recognizing which branches to remove ensures your pruning cuts encourage strong, well-balanced growth. Look for robust branches that grow at wide angles (ideally 45 to 60 degrees) from the trunk—these support future growth and withstand storms. Avoid removing major structural limbs unless absolutely necessary, as this can destabilize the tree. Focus your efforts on eliminating diseased branches, water sprouts, and crossing limbs, while always preserving the branch collar—the swollen area at the branch base essential for proper healing after cuts. Correctly assessing and trimming ensures your trees remain safe, healthy, and a lasting asset for your home. Additionally, inspecting trees and shrubs once per season helps you spot issues before they escalate. Weak, infected, or poorly positioned branches (such as those growing downward or rubbing together) are prime candidates for removal—a strategy that not only improves air flow but minimizes risks from broken branches. When performed with the right tools and attention to detail, regular maintenance strengthens both the tree’s structure and its visual impact on your landscape. For those looking to refine their pruning technique and ensure every cut supports healthy growth, you may find it helpful to review expert tips for healthier tree pruning. This resource offers practical advice on making precise cuts and fostering long-term tree vitality. Tree Pruning vs. Tree Trimming: Key Differences You Need to Know Tree Pruning Explained: Goals and Benefits Tree pruning focuses on selectively removing specific branches to maintain tree health, direct growth, and maximize flowering or fruit production. Pruning is typically performed on young trees to establish a strong framework, but it’s equally important for mature trees, especially those near homes or high-traffic areas. The primary goal is proactive care—removing deadwood, damaged limbs, or branches that threaten the tree’s structure. This helps prevent disease spread, increases air circulation, and channels resources into healthy growth. Moreover, strategic pruning cuts encourage a canopy that is both balanced and resilient. For fruit trees and flowering trees, pruning not only shapes but also stimulates new buds, resulting in more robust harvests and blooms. Seasonally timed interventions—typically during the dormant season or early spring—minimize stress on trees and prevent excessive sap loss or pest infestation. In sum, tree pruning is about enhancing vitality, longevity, and utility for both trees and shrubs in your landscape. Tree Trimming Explained: Enhancing Aesthetics and Safety While commonly confused with pruning, tree trimming is primarily concerned with sculpting a tidy, visually appealing landscape. The main objective is to control overgrown branches, maintain a desired shape, and prevent limbs from interfering with houses, power lines, or walkways. Trimming is essential in maintaining both curb appeal and the practical functionality of trees and shrubs, as unchecked growth can become unsightly and pose safety hazards. Frequent tree trimming also deters the development of large branches that may break or damage property during storms. For mature trees, regular trimming preserves clearance for vehicles and pedestrians while sustaining long-term tree health. Remember: while aesthetic maintenance is the main focus, every trim should be a healthy one—never over-prune or remove more than 25% of a tree’s canopy in a single session. Balancing looks and plant well-being ensures your efforts yield lasting, positive results. When to Trim Trees: The Ideal Month and Season for Tree Trimming What Month is Best to Trim Trees? Timing is everything when it comes to tree trimming. Most experts recommend carrying out major trimming in late winter or early spring, just before new buds swell. This dormant period allows trees to heal quickly, reduces the risk of pest infestation, and ensures you won’t remove valuable foliage during the growing season. However, exceptions exist for certain flowering trees—such as dogwoods or fruit trees—which are best pruned immediately after flowering to preserve next year’s blooms. For young trees, formative pruning can often be done in late winter, establishing a strong foundation before the main growing season. Meanwhile, mature trees benefit most from corrective trimming during the dormant season, when their energy is focused on root and trunk health, not leaf production. This careful scheduling helps you avoid unnecessary stress and makes clean, efficient pruning cuts easier. Always check your tree’s specific needs with a certified arborist for optimal timing. Seasonal Tree Trimming: Young Trees vs. Mature Trees Understanding the seasonal needs of young trees versus mature trees will inform your tree care strategy. Young trees usually require formative pruning in their first few years to develop a stable, well-spaced branch structure. Pruning too late in the season or during periods of rapid growth may weaken the tree, leading to soft tissue damage or stunted development. Aim for late winter or very early spring for most species, and always use sharp, sterilized tools for clean pruning cuts. For mature trees, seasonal maintenance is about removing hazards (dead, diseased, or broken branches) and ensuring adequate clearance. Major trimming projects—like removing large branches or reshaping the canopy—are safest during the dormant period, though minor touch-ups for safety or storm damage can be performed as needed. Note that unseasonable trimming or pruning during active growth may reduce vigor or trigger unwanted sprouting. Always tailor your approach to the tree’s age and species for best results. Essential Tools and Safety Tips for DIY Tree Trimming Must-Have Tools for Precise Pruning Cuts Pruning shears Loppers Pole saws Gloves and protective eyewear Proper tools are essential for effective tree trimming and safe pruning cuts. Lightweight but sharp pruning shears are ideal for small branches and twigs, offering precise results for fine shaping and detailed work. For thicker stems up to 2 inches in diameter, loppers provide extra leverage to make clean cuts without tearing bark or crushing living tissue. Reaching higher areas requires a pole saw, which extends your range while keeping feet safely on the ground—a must for mature trees or overhead trimming tasks. Safety gear is equally vital: always wear sturdy gloves to protect against thorns and splinters, plus protective eyewear to shield eyes from falling debris. Regularly sharpen and sanitize your tools to prevent the spread of disease between trees and shrubs. Keep blades clean to ensure cuts are smooth and minimize injury to the plant. For ambitious tasks like removing large branches, use specialized saws or consult a tree care professional to avoid unintentional harm to both the tree and yourself. Safety Precautions for Tree Trimming Homeowners Safety is paramount in every aspect of tree trimming—from equipment selection to cutting technique. Never trim while standing on unstable ladders or near utility lines; for risky or tall jobs, call in certified tree care professionals. Even for smaller jobs, inspect surroundings for pets, children, or obstacles, and clear the work area beforehand. Always cut with steady, controlled motions and maintain good posture to reduce fatigue and the risk of accidental injury. If a branch is larger than 4 inches in diameter or would fall on structures, use a three-cut method: an undercut first, a second cut farther out to remove most of the weight, and a final clean cut near the branch collar. This prevents bark tearing and protects the trunk from unnecessary damage. When in doubt, err on the side of caution and seek expert assistance—potential hospital visits or property damage far outweigh the cost of a professional service. Step-by-Step Guide: How to Trim a Tree Yourself How to Trim a Tree Yourself Assess the tree’s size and health. Select the right branches for pruning. Make clean pruning cuts at the correct angle. Remove large branches safely and correctly. Dispose of debris and perform post-trim care. Taking on tree trimming as a DIY project starts with proper planning. First, survey the entire tree and surrounding trees and shrubs—spotting issues like diseased branches, weak crotches, or overcrowded limbs. Take note of any large limbs overhanging roofs or power lines, which may require professional help or special techniques. Next, select specific branches to trim: choose crossed, inward-growing, or dead limbs first, and always leave healthy, outward-facing buds so growth continues in the right direction. Make each pruning cut just outside the branch collar at a 45-degree downward angle, using clean, sharp tools. Never cut flush with the trunk, as this interrupts the tree’s natural healing process. When removing a large branch, use the three-cut method for best results—preventing unnecessary bark tearing and trauma. Finally, clear away all debris and inspect the tree for wounds. Water the base lightly if necessary, and avoid painting cuts or using wound dressings. With these steps, you’ll maintain strong, beautiful trees that enhance your home’s curb appeal for years to come. Advanced Techniques: Crown Reduction, Crown Raising, and Pruning Large Branches Crown Reduction: Reducing Size Without Harming the Tree Crown reduction is an advanced technique used to decrease a tree’s overall height or spread, especially for large or mature trees growing too close to buildings or other hazards. Unlike topping—which indiscriminately removes upper branches and leaves trees susceptible to disease—proper crown reduction removes select outer branches, maintaining natural form and vitality. The best practice is to trim branches back to lateral limbs at least one-third the diameter of the cut section, stimulating healthy regrowth and avoiding shock. Make cuts at nodes where new growth is already established, and distribute reduction evenly throughout the canopy. For safety and best results, crown reduction should only be attempted with sharp, long-handled saws or loppers, and preferably under the guidance of an arborist. This technique enables mature trees to continue thriving while respecting the spatial needs of your property and adjacent structures. Crown Raising for Clearance and Better Visibility Crown raising involves removing lower branches to create vertical clearance beneath the tree—invaluable for walkways, driveways, and to frame picturesque views across your landscape. This is particularly important for mature trees that may impede pedestrian movement, vehicle access, or block sightlines. Start your crown raising by gradually eliminating lower, less vital branches, moving upward until you reach the desired clearance, but never remove more than one-third of the total branches at a time. Wisely performed, this process redirects the tree’s energy into the upper canopy and lateral branches, while reducing the risk of breakage and increasing light penetration. Avoid injuring the main trunk or leaving large, open wounds. As always, prioritize cuts at the branch collar and consult a professional if the branches exceed a few inches in diameter to preserve both safety and tree health. Best Practices for Pruning Large Branches Safely When it comes to pruning large branches, safety and technique go hand-in-hand. The recommended approach is the three-cut method: first, make a shallow undercut about six inches from the trunk to prevent bark stripping when the branch falls. Next, cut through the limb a few inches farther out, removing the branch’s bulk. Finally, make a clean cut just outside the branch collar to encourage rapid healing. Never attempt to saw large, heavy branches above shoulder level on your own—these tasks are best left to experienced tree care professionals. Additionally, avoid the temptation to reduce crown size by “topping,” which leads to weak regrowth and shortens tree lifespan. For branches that are diseased or broken, act quickly to prevent spread or further damage. Follow these practices to maintain the stable structure, beauty, and longevity of both young and mature trees. The Science of Pruning Cuts: How and Where to Make Them Correct Location for Pruning Cuts on Trees and Shrubs Successful pruning cuts begin with understanding tree anatomy. The branch collar—a swollen area at the base of each branch—is where natural healing takes place. Always make cuts just outside the collar, avoiding flush cuts against the trunk, which inhibit recovery and increase disease vulnerability. For both trees and shrubs, trim only branches that are dead, diseased, or structurally unsound, and use clean, precise motions to avoid tearing bark. Be sure to use the right angle: a slight downward cut helps water run off rather than pooling on the wound, minimizing rot. For shrubs and smaller fruit trees, aim to thin the interior by removing crossing or interior-facing shoots, promoting both airflow and sunlight. Following these guidelines protects plant health and sets the stage for vigorous, sustainable growth season after season. Cost Factors: Why is Tree Pruning So Expensive? Expert Insights into Tree Trimming Costs Tree trimming and pruning costs vary based on species, size, accessibility, and the complexity of the work involved. Large, mature trees are often more costly due to the risks of removing heavy limbs and the need for specialized equipment. Emergency care, like storm damage removal or hazardous limb reduction, may also add to the price. Prices also reflect professional expertise—arborists are trained to make healthy cuts that protect trees and property, while minimizing long-term liabilities. Here’s a glance at average costs for common tree care services: Service Type Average Cost Tree pruning $200 - $1,000 Tree trimming $150 - $900 Large branch removal $300 - $1,500 Emergency tree care $500+ Why is Tree Pruning So Expensive? The elevated cost of expert tree pruning comes down to more than just labor. Certified arborists require years of training to recognize healthy branch structure, identify hazards, and make effective, safety-conscious pruning cuts. The work itself is physically demanding and often performed high above the ground, demanding ropes, harnesses, protective gear, and liability coverage. Moreover, improper cuts or over-pruning can do irreparable harm to your mature trees, leading to expensive removals or property damage down the line. In sum, investing in expert care ensures long-lasting, healthy trees, increases home value, and protects your family and assets. Tree Care Quotes: Professional Insights on Tree Trimming and Tree Pruning "Strategic tree trimming not only beautifies your property, but protects trees and homeowners alike." – Certified Arborist Diana Greene "Proper pruning cuts are the most important step in tree trimming—one wrong cut can jeopardize years of growth." – Master Gardener Tom Willis Best Practices for Pruning Young Trees and Mature Trees Pruning Young Trees: Setting the Foundation First impressions last a lifetime, and young trees benefit immensely from formative pruning in the early years of their growth. Begin by shaping the main trunk and choosing evenly spaced branches at least 18 inches apart. Regularly remove any inward-growing or crossing shoots, as well as competing leaders (main stems), to prevent weak structure. By focusing on healthy, wide-angled branches, you help young trees develop resilience and aesthetic form that endures into maturity. Always avoid excessive pruning and remember that less is more during the initial growing seasons. Schedule primary cuts for late winter or early spring to avoid stress and promote robust regrowth. Use sanitized hand pruners and loppers for the cleanest results. With attentive early intervention, you ensure future canopy strength and long-term landscape beauty. Maintaining Mature Trees With Careful Tree Trimming Mature trees are the crown jewels of every landscape, but their large size and massive branches require extra care and experience. Concentrate on routine removal of dead, diseased, or hazardous branches, and avoid major reshaping unless absolutely necessary. Ongoing tree trimming for mature specimens is seasonal: prioritize the dormant season for significant work, but lightly address broken or dangerous limbs as soon as they appear throughout the year. Maintain a minimum clearance for walkways and homes, and never remove more than 25% of a mature tree’s live canopy in a single session—over-pruning can trigger decline or even death. When large branches (four inches in diameter or more) must be removed, use the three-cut technique and consult an arborist for high-risk or hard-to-reach jobs. With consistent, cautious care, your mature trees will continue providing shade, beauty, and value for decades. Common Mistakes to Avoid When Trimming and Pruning Trees Over-pruning or topping Using dull or inappropriate tools Trimming during the wrong season Ignoring large branch hazards Even seasoned gardeners can make mistakes with tree trimming. One of the most damaging is topping, or indiscriminately cutting back the entire crown—this practice weakens the tree and leaves it susceptible to disease and poor regrowth. Using dull or dirty shears can crush living tissue, increasing the risk of infection, while trimming at the wrong time (during the active growing season for many species) can cause undue stress and sap loss. Lastly, never ignore large, cracked, or decaying branches; they can pose real hazards to people and property. By recognizing and avoiding these pitfalls, your homemade efforts will result in healthier, safer, and more attractive trees. Tree Care for Trees and Shrubs: Additional Landscape Tips Integrating Shrub Trimming into Your Tree Care Routine Smart homeowners know that curb appeal extends beyond just trees—well-maintained shrubs complete the picture of a cared-for home. Incorporate shrub trimming into your routine every spring and late summer, shaping with hand shears for control and only removing older or overcrowded growth. Just as with trees, make cuts above outward-facing buds and keep tools clean to avoid spreading disease. Regular shrub care ensures your planting beds look lush and orderly while complementing the grander forms of mature trees. For mixed borders or privacy screens, alternate between tree pruning and shrub shaping to achieve year-round interest and structural balance. Mulch beds after each care session to lock in moisture and suppress weeds—this not only enhances appearances but also supports the health of your entire landscape. When in doubt, stagger your schedule and prioritize safety and plant longevity above rapid results. FAQs About Tree Trimming, Tree Pruning, and Tree Care What Month is Best to Trim Trees? The ideal time for tree trimming is late winter through early spring, just before buds break. This dormant window minimizes stress on both young and mature trees, and reduces risks of pest infestation. Flowering species may have slightly different timings—always check species-specific guidelines. What is the Difference Between Tree Trimming and Tree Pruning? Tree trimming focuses on controlling shape and size for visual impact and safety, while tree pruning targets specific limbs to improve a tree’s health, structure, or productivity. Both require knowledge of branch structure and proper timing to avoid harm and maximize benefit. Why is Tree Pruning So Expensive? Tree pruning involves skilled labor, specialized equipment, and insurance costs due to inherent dangers. Improper technique can have high costs—removing large branches without expertise risks property and tree damage. Investing in experts ensures safe, quality results. How to Trim a Tree Yourself? Start by inspecting your tree’s health and selecting target branches. Always use clean, sharp tools to make angled, precise cuts just outside the branch collar. Remove branches cautiously using the three-cut method for heavy limbs. Clean up debris when done, and water the tree lightly to support root recovery. Key Takeaways: How Expert Tree Trimming Elevates Curb Appeal Tree trimming boosts real estate value and property safety. Strategic pruning cuts prevent disease and preserve structure. DIY safe practices are essential; know when to call a pro. Next Steps: Grow Your Tree Trimming Expertise Grow your landscaping expertise—call 203-271-7991 or visit TreeGuardianNews.com to subscribe. If you’re inspired to take your outdoor space to the next level, consider exploring a broader range of tree service tips that can transform your entire landscape. From advanced maintenance strategies to creative design ideas, these insights will help you unlock the full potential of your yard. Whether you’re aiming for a lush, inviting garden or a safer, more functional property, there’s always more to discover. Continue your journey toward a healthier, more beautiful home environment by diving into expert guidance tailored for every homeowner. Regular tree trimming offers numerous benefits that enhance both the health of your trees and the overall appeal of your property. By removing dead or diseased branches, you promote healthier growth and prevent potential hazards. Additionally, well-maintained trees can significantly boost your home’s curb appeal, potentially increasing its value. For more detailed insights, consider exploring the following resources: “Tree Care: 9 Incredible Benefits of Tree Trimming” (greentopps.com) “9 Financial Benefits of a Tree Trimming Service” (eduardostree.com) These articles provide comprehensive information on how regular tree trimming can improve tree health, enhance property aesthetics, and even offer financial advantages.

09.29.2025

Unlock the magic of stump grinding for a flawless yard

Have you ever wondered if you could reclaim your yard’s beauty without the heavy lifting of tree stump removal? When a tree is taken down, a stubborn stump can be left behind, ruining curb appeal, inviting pests, and putting a dent in your outdoor enjoyment. But what if you could whisk that eyesore away—quickly, cost-effectively, and without tearing up your yard? Stump grinding is the modern answer, and this guide will illuminate how it can transform patchy, cluttered landscapes into smooth, flawless yards you’ll love to show off. Dive in to discover whether stump grinding is your best way to unlock your property’s true potential. Can Stump Grinding Completely Transform Your Yard? The impact of stump grinding on your yard’s look and functionality is often underestimated. Tree stumps, whether from storm-damaged oaks or planned tree removal, are more than just unsightly—they’re obstacles to mowing, play, and landscaping. With a skilled grinding service, these reminders of past trees are ground down well below ground level, leaving you with a blank canvas for sod, garden beds, or simple grass regrowth. The result? A smooth, accessible, and visually appealing landscape where once there were hazardous, uneven patches. Unlike traditional stump removal, which usually involves digging out the entire stump and major roots, stump grinding uses powerful rotating cutting discs or blades to chip away wood until the trunk is reduced to mulch and fine chips. This approach is faster, less invasive, and doesn’t leave a giant hole to fill. Homeowners who invest in stump grinding often find the transformation is nearly immediate—in just a few hours, what was an eyesore becomes an asset, improving both property value and the use of outdoor space. Investigate the limitations and benefits of stump grinding versus stump removal "Stump grinding is the powerful, precise method that can renew lawn aesthetics instantly—no digging required." What You'll Learn About Stump Grinding The science behind stump grinding and stump removal When and why to choose a stump grinding service Steps to grind a stump safely and efficiently Environmental impacts and aftercare tips Understanding Stump Grinding: Techniques and Benefits What Is Stump Grinding and How Does a Stump Grinder Work? Detailed breakdown of stump grinders, grinder blades, and wood removal Stump grinding is an efficient, advanced method for removing tree stumps after a tree has been cut down. The process uses a specialized stump grinder—a power tool equipped with a robust, rotating cutting disc that chips away the stump and surrounding wood just below ground level. Unlike digging, which can disturb lots of soil and existing roots, grinding focuses on turning stumps into mulch without major upheaval. The grinder's blades or teeth move rapidly in a circular motion, effectively pulverizing the wood into small, manageable chips that can be repurposed as mulch or easily removed from the site. Most stump grinders, whether walk-behind or larger self-propelled units, are designed to tackle a range of stump sizes—from small stumps left after routine tree removal to large, mature tree stumps. The finer the chips, the more quickly the ground can be leveled and integrated back into your yard. This method is preferred by professional arborists not only for its speed and effectiveness but also for the minimal impact on your landscaping. The area can often be replanted, re-sodded, or landscaped the same week as the grinding, making the transition from eyesore to flawless yard nearly seamless. Stump Grinding vs. Stump Removal: Which Is Right for Your Tree Stump? Differences, pros/cons, and cost-efficiency Stump grinding and stump removal both aim to eliminate unwanted tree stumps, but they differ greatly in approach, cost, and how they affect your yard. Stump grinding is favored for its precision and minimal disruption: after the tree removal, a high-powered grinder chips the wood into mulch at or below the surface, typically 4–6 inches deep, leaving the main roots in place to decay naturally. With stump removal, the entire stump and as many roots as possible are excavated—this involves heavy machinery, significant disturbance to the surrounding soil, and usually results in a large hole that needs to be filled and leveled. The pros of grinding include speed, cleanliness, and the opportunity to quickly restore the site with sod or plantings; its main limitation is that large roots remain underground, slowly decomposing. In contrast, full removal is best if you plan to replant a major structure (such as a pool or new tree) at the exact spot, but comes with higher costs, more effort, and greater yard disruption. Homeowners generally opt for grinding because it’s cost-effective, fast, and ideal for restoring lawns or preventing hazards like tripping and pest infestation. Comparison of Cost, Time, and Longevity: Stump Grinding vs. Stump Removal Method Average Cost Time Required Impact on Yard Longevity Stump Grinding $100–$400 per stump 1–2 hours Minimal disturbance; ground level restored quickly Roots decay naturally; spot may settle over months Stump Removal $250–$600 per stump 2–5+ hours Significant soil disruption; large hole to fill No regrowth; instant, permanent removal Tools of the Trade: Selecting the Right Stump Grinder Types of Stump Grinders for Homeowners and Professionals Walk-behind stump grinders, self-propelled models, and heavy-duty options Choosing the correct stump grinder depends on stump size, quantity, and your comfort with machinery. Walk-behind stump grinders are ideal for small stumps or yards with tight access—these are lightweight, maneuverable, and available for rent at many hardware stores. Self-propelled and tow-behind models offer more power and are designed for medium to large stumps, making quick work of older, hard woods or multiple stumps in one session. Heavy-duty and track-mounted grinders are typically used by professionals for the biggest jobs—like clearing construction lots or old-growth tree stumps. Each type features a rotating cutting disc equipped with heavy-duty steel teeth or carbide tipped blades that chip wood with speed and precision. Besides capability, consider the pros and cons of renting versus hiring a stump grinding service. Homeowners may favor a walk-behind unit for one or two smaller stumps, but a professional’s heavy-duty grinder makes sense for safety, speed, and thoroughness—especially for large stumps, roots near structures, or hard-to-access locations. Do You Need a Stump Grinding Service or DIY Stump Grinding? Rental considerations, safety tips, and grinding service recommendations Renting a stump grinder can be economical for a confident DIY-er with one or two smaller stumps and good access. Rental rates typically run $75–$150 per day, but keep in mind the learning curve, physical effort, and risks involved—these are powerful tools that demand strict safety protocols. Always wear protective gear, review safety manuals, and mark the work area with cones or barriers. For larger, older tree stumps, stumps close to foundations, or jobs requiring multiple stumps removed in a day, a professional stump grinding service is a wise investment. Experts have high-powered equipment, proper insurance, and know how to avoid utility lines, nearby plantings, and structures. Many provide extra services like root chasing, chip cleanup, ground leveling, and even replanting recommendations. "Choosing the right stump grinder saves time, energy, and preserves your property’s look." Whether you go DIY or professional, the goal is the same: a yard free of trip hazards, pest magnets, and unwanted reminders of felled trees. Most homeowners appreciate the speed, convenience, and safety of hiring a trusted grinding service to get the job done right. While stump grinding is a highly effective solution, it's important to address stumps promptly to avoid hidden dangers like pest infestations and tripping hazards. For a deeper look at why timely action matters, explore the article on the risks of delaying stump grinding and how it can impact your yard’s safety. Step-by-Step Guide: How to Grind a Stump Safely Preparation: Site Evaluation and Equipment Safety Proper preparation is crucial before you grind a stump. Start with a thorough site evaluation, clearing debris, stones, and branches from around the stump. Mark the work area with safety cones and tape, especially if children or pets are nearby. Call 811 or your local utility locator to ensure no underground utilities cross beneath the stump—grinding can expose or damage buried lines. Gather necessary tools: gloves, rugged boots, goggles, hearing protection, and a dust mask. Stump grinders are loud, and safety is non-negotiable. Inspect the stump grinder for any damage or dull teeth on the cutting disc. Review manuals or online tutorials on machine operation. If renting, ask the attendant for a live demonstration. Clear at least 10-feet around the stump to provide movement space. If the stump is taller than 8 inches, use a chainsaw to trim it close to ground level. With the area clear and tools ready, you’ll minimize risks and create an efficient, smooth workflow for grinding the tree stump. The Grinding Process: Grinding the Tree Stump to Wood Chips With your site prepared and safety gear on, position the stump grinder so the cutting wheel hovers just above one edge of the stump. Engage the grinder’s controls, and slowly lower the rotating cutting disc into the wood, using steady, even pressure. Move the grinder side-to-side, allowing the disc to chip away at the stump, working from one edge to the other. After each pass, lower the cutting wheel another 2–3 inches until you reach the desired depth—usually 4–8 inches below the soil. The grinder’s teeth efficiently turn the wood into fine chips and mulch, which accumulate around the base. Be patient; harder woods or older stumps may require extra passes. For larger stumps or those with surface roots, reposition the grinder as necessary to reach all wood sections. Always keep bystanders at a safe distance and pause periodically to clear away excessive chips if visibility decreases. Once finished, your previously stubborn stump should now be a shallow depression filled with fresh mulch and wood shavings, ready for the final cleanup and restoration phase. Cleanup and Aftercare: What to Do Next After Stump Grinding How to fill and restore the ground after stump removal and stump grinding Post-grinding cleanup is the key to a polished finish. Begin by raking up excess mulch and wood chips—the nutrient-rich wood chips can be repurposed in garden beds or compost piles, or you may opt to have a grinding service haul them away. Next, backfill the remaining depression with topsoil, compacting lightly to prevent future settling. Scatter grass seed over the repaired area if you plan to restore lawn, or lay fresh sod for instant greenery. Water thoroughly to encourage fast root growth and monitor periodically as the ground may continue to settle as residual roots decompose. Proper aftercare prevents the site from becoming a low spot or inviting weeds. Regular maintenance—such as adding more soil if settling occurs or checking for insect activity—is essential for flawless long-term results. With care and patience, a site once marked by a rotting tree stump can soon be indistinguishable from the rest of your yard, primed for new landscaping, play, or whatever vision you hold for your revitalized space. Eco-Friendly Stump Grinding: Sustainability and Yard Health Is Leaving a Stump Bad for Your Yard? Leaving a stump after tree removal may seem harmless at first, but it can create real problems for your yard’s health and beauty. Tree stumps attract unwanted pests like carpenter ants and termites—these can quickly migrate to nearby trees, shrubs, or even your home. Stumps can harbor fungi and disease, which may spread to healthy vegetation. Unsightly and often hazardous, stumps become tripping risks, hampering lawn mowing and outdoor activities. Over time, an unremoved stump will decompose, but the process is slow and unpredictable. As the stump rots, it can leave uneven ground, promote weed growth, and, in wet environments, lead to dangerous fungus growth. Stump grinding offers a sustainable solution: by turning the trunk into mulch, you accelerate decomposition in a controlled way while reclaiming valuable yard space and preventing future problems linked to leaving a stump in place. Tree Removal and Stump Grinding: Environmental Considerations Best practices to minimize yard impact and encourage regrowth Environmentally responsible stump grinding starts with hiring reputable, insured professionals who know how to minimize impact on your soil, grass, and plantings. Modern grinders create much less disturbance than full excavation, preserving and even improving soil quality through the addition of wood chip mulch. Try to grind only as deep as necessary for your landscaping goals, and use wood chips to enrich shady garden beds or compost them for future use. Avoid grinding near delicate root systems when possible to prevent damage to nearby trees and shrubs. After the process, invest in healthy regrowth by adding quality topsoil and reseeding lawn areas. Choose eco-friendly ground covers or native plants to stabilize soil quickly. With careful planning and best practices, tree removal and stump grinding can both refresh and sustain your landscape, supporting healthy regrowth and reducing your yard’s environmental footprint. Costs and Considerations: Investing in Stump Grinding How Much Does It Usually Cost to Grind a Stump? The cost of stump grinding depends on several factors, including stump diameter, wood hardness, accessibility, and whether you hire a professional or take the DIY route. On average, you can expect professional services to charge $100–$400 per stump for small to mid-sized projects. Large stumps or those requiring extra effort (such as those surrounded by surface roots, rocks, or difficult terrain) may increase the price to $500 or more per stump. National averages put single-stump jobs at $250, with discounts per stump for bulk jobs. If opting for a rental, consider the cost of renting a grinder ($75–$150/day), the time and labor involved, and the potential for additional expenses if equipment damages your lawn or utilities. For complex or high-visibility areas, the expertise and efficiency of a professional arborist usually outweigh the extra cost. Always ask for a written quote and full scope of work before beginning a project. Factors Affecting Stump Grinding Pricing Size, location, type of stump, and additional removal needs Stump grinding services base their prices on the diameter and species of the stump (harder woods or larger diameters take longer and wear down blades faster), site accessibility (steep or fenced-in yards can require smaller, more portable grinders or extra labor), and the presence of surface roots or rocks. Tree stumps tangled with utilities or embedded deeply may mean additional charges for hand-digging or custom grinding work. Removal and disposal of mulch, application of topsoil, and site restoration are often extra services but may be included in a professional’s comprehensive quote. Multiple stumps or jobs combined with tree removal can often be discounted. Factor in all variables to choose a package that meets your budget and landscape needs. For homeowners considering future improvements, fully removing all roots and preparing for a permanent installation (like a driveway or pool) may justify the higher up-front cost of full stump removal. For most lawn, play, or garden areas, stump grinding makes the best use of your resources, keeping the process easy, safe, and affordable. Stump Grinding Service: When to Hire the Experts Comparing Grinding Service Options in Your Area With so many grinding service providers, how do you choose the right one? Look for experienced teams with strong reviews, proof of insurance, and modern stump grinders equipped for your stump size and yard conditions. Ask about their disposal policy for wood chips, restoration services, and schedule flexibility. Professional arborists should be willing to answer questions on safety, environmental best practices, and provide a detailed, itemized estimate before starting the job. Getting quotes from multiple companies ensures competitive pricing and helps you gauge the overall value—sometimes, more established companies offer bundled services like tree removal and stump grinding for significant discounts. Request evidence of past work and ensure the contract covers site preparation, grinding depth, cleanup, and post-job soil restoration. The right provider can often transform your yard in just one appointment, giving you instant results with none of the hassle or risk of a DIY attempt. Choosing Between Tree Removal and Stump Grinding Services Some homeowners will need to decide whether to bundle tree removal and stump grinding as a package or to handle each task separately. It’s often more cost effective and time-efficient to book both services with the same professional arborists. Your contractor can coordinate equipment, minimize site disruption, and tailor the grinding depth for everything from small to massive stumps. If you only need a single, existing stump removed, specialized stump grinding services are perfect for quick, hassle-free jobs. When choosing, consider your long-term landscaping plans. If you plan to renovate your yard, plant grass, or construct a patio where the tree stump was, stump grinding is ideal. However, if the project involves new construction or utilities, complete removal and additional excavation may be warranted. Consult a tree expert to assess your site and recommend the most efficient, cost-effective solution for your goals and budget. People Also Ask: Essential Questions About Stump Grinding How much does it usually cost to grind a stump? Overview: National average costs, pricing variables, and sample estimates for stump grinding service Most homeowners spend between $100 and $400 to grind a standard tree stump, according to national averages. Factors such as stump size, wood type, and site accessibility play a major role in determining cost. Difficult jobs—like those involving old, dense hardwoods or limited space—may be priced higher. If you have multiple stumps, many services offer a reduced per-stump rate, sometimes as low as $40–$50 for each additional stump after the first. Is it worth it to grind a stump? Weigh the aesthetic, safety, and long-term lawn health benefits of stump grinding over leaving a stump Yes, for most homeowners, stump grinding delivers excellent value. It rapidly improves curb appeal and removes serious tripping hazards. Additionally, grinding eliminates pest harborage (like carpenter ants and termites), halts disease spread to your yard, and allows immediate replanting or resodding. Compared to the slow, messy process of waiting for a stump to rot, grinding gives you control and a flawless finish in just hours. Can you grind a stump yourself? Safety considerations, required equipment, and expected outcomes when using a stump grinder to grind a stump yourself DIY stump grinding is possible with a rental grinder and proper safety precautions, especially for smaller stumps. You’ll need gloves, goggles, boots, hearing protection, and step-by-step equipment tutorials. However, the machines are powerful and potentially dangerous. For larger stumps, stumps near structures, or multiple removals, hiring a professional is the safest, fastest bet—and often yields the cleanest, most professional results. How to get rid of a stump in 2-3 days naturally? Alternative methods: organic rot, Epsom salt, and natural decay challenges Naturally getting rid of a stump in just a few days is almost impossible. Methods like drilling holes and applying Epsom salt or commercial stump removal products can speed up rot but typically take months to a year to show visible results. Burning is risky and may be prohibited locally. For rapid, guaranteed results, stump grinding or removal by professionals is the only real “instant” option. Chemical and rot methods can be used on small stumps in low-traffic areas with patience and proper safety precautions. FAQs on Stump Grinding, Tree Stump Removal, and Stump Grinders How deep should you grind a stump? Most professionals recommend grinding 4–8 inches below ground level to remove trip hazards and allow planting or sodding. Deeper grinds are possible for construction sites or major landscaping projects. What happens to roots after grinding? The main stump is pulverized, while most roots remain underground to decompose naturally. Over time, they decay and enrich the soil, but any major surface roots can also be ground as needed. Can a stump grinder remove surface roots? Yes, a stump grinder's rotating cutting disc can mulch exposed surface roots as well as the main stump. Inform your contractor if there are roots that create hazards or interfere with landscaping. Should you plant over a ground-out stump spot? Absolutely! With proper aftercare—topsoil, compost, and maybe some time as the roots decay—the site can support grass, flowers, or shrubs. Avoid planting large trees directly atop old roots to reduce future issues. Key Takeaways for Stump Grinding Success Why correct stump grinding is crucial for a flawless yard: It erases obstacles, removes hazards, and restores your lawn’s seamless appearance efficiently. How to assess if you need a professional grinding service: Consider stump size, location, your comfort with machinery, and the finished look you want to achieve. Common pitfalls and how to avoid them: Improper preparation or equipment use can cause injury or yard damage—always follow safety protocols and consult experts when in doubt. Conclusion: Transform Your Outdoor Space with Effective Stump Grinding With the right approach, stump grinding instantly revives your yard, turning an unsightly leftover into new possibilities for landscaping and play. "A flawless yard starts with attention to the details beneath your feet—including that old tree stump." If you’re inspired to elevate your entire landscape beyond just stump removal, there’s a wealth of expert advice available to help you achieve a truly remarkable outdoor space. Discover practical strategies and creative ideas in this comprehensive guide to transforming your yard with professional tree service tips. Whether you’re planning a full garden makeover or simply want to maintain a healthy, beautiful property, these insights will empower you to make the most of every square foot. Take the next step in your landscaping journey and unlock the full potential of your outdoor environment. Grow your landscaping expertise—call 203-271-7991 or visit TreeGuardianNews.com to subscribe. Video of professional stump grinding — focused on a team operating a stump grinder in a suburban backyard, including action of grinding, wood chip ejection, and post-grind site review; visually informative with clear demonstrations of safety procedures and step progression. Stump grinding is an efficient and environmentally friendly method for removing tree stumps, offering several advantages over complete stump removal. By grinding the stump down to several inches below ground level, this technique avoids the extensive excavation required in full stump removal, thereby preserving the surrounding landscape and minimizing soil disturbance. (arboroperations.com.au) One of the primary benefits of stump grinding is its cost-effectiveness. The process is generally quicker and less labor-intensive, making it a more affordable option for homeowners. (fixr.com) Additionally, the wood chips produced during grinding can be repurposed as mulch, providing a natural and beneficial use for the remnants. (ltrc-tree.com) However, it’s important to note that while stump grinding removes the visible portion of the stump, the underlying root system remains. Over time, these roots will decay naturally, which may limit immediate replanting options in the same spot. For projects requiring complete removal of the root system, such as construction or replanting in the exact location, full stump removal might be more appropriate. (angi.com) In summary, stump grinding offers a swift, less invasive, and cost-effective solution for enhancing your yard’s aesthetics and usability. By understanding the process and its benefits, you can make an informed decision that aligns with your landscaping goals.

Terms of Service

Privacy Policy

Core Modal Title

Sorry, no results found

You Might Find These Articles Interesting

T
Please Check Your Email
We Will Be Following Up Shortly
*
*
*