Add Row
Add Element
Tree Guardian News
update
Tree Guardian News
update
Add Element
  • Home
  • Categories
    • Storm Shield
    • Roots & Routes
    • Disease Detective
    • Insurance Intel
    • DIY Arborist
    • Futureproof Foliage
    • Pro-Partner Spotlight
    • Arborist Stories
    • Tree Care Blog
    • Tree Guardian News Blog
SUBSCRIBE TO NEWSLETTER 
  • update
  • update
  • update
  • update
  • update
  • update
  • update
September 18.2025
1 Minute Read

Struggling with leaf spot symptoms? Here's the fix

Did you know that a single infected leaf can unleash a spot disease outbreak capable of destroying an entire garden in just two weeks? Leaf spot symptoms often sneak up on even the most attentive gardeners, presenting issues that can quickly escalate from a few blemishes to severe leaf loss in trees and shrubs. Whether you’re a homeowner, landscaper, or plant enthusiast, detecting, treating, and preventing leaf spot disease early is essential for protecting plant health and landscape investments. This comprehensive guide strips away the confusion around leaf spot symptoms, spot diseases, and their treatment, so you can confidently restore your plants to their healthiest state.

Uncovering the Scope: Surprising Facts About Leaf Spot Symptoms

Leaf spot symptoms are among the most widespread and easily misdiagnosed plant health problems, affecting countless species of trees and shrubs around the world. Reports show that over 70% of garden plant losses are connected to diseases like leaf spot or spot and melting—issues commonly triggered by fungal spores, bacterial leaf pathogens, and even some viruses. Many gardeners are shocked to learn that spot diseases do not always present visible signs until significant damage has occurred, allowing spot pathogens to spread silently during wet weather or early spring. Distinguishing leaf spot symptoms from simple environmental stress, such as drought stress or nutrient deficiency, is therefore crucial.

The real risk lies in how quickly these spot diseases can escalate under the right conditions—think dense planting, poor air circulation, or unchecked wet weather. Host plants may look perfectly healthy until leaf tissue shows brown or black specks, which then rapidly expand as fungal or bacterial leaf spot pathogens take hold. As a result, understanding and identifying spot diseases early can make the difference between a quick recovery and costly landscape damage throughout the growing season.

Green leaf with small brown and yellow spots examined by gardener, illustrating leaf spot symptoms in trees and shrubs

What You'll Learn About Leaf Spot Symptoms

  • How to recognize common leaf spot symptoms
  • Key differences between leaf spot disease and other spot diseases
  • Effective chemical and natural control methods
  • Step-by-step diagnosis techniques
  • Preventive strategies for trees and shrubs

Understanding Leaf Spot: What is Leaf Spot Disease?

Leaf spot disease refers to a broad group of spot diseases caused by different spot pathogens, chiefly fungi, bacteria, and viruses. These pathogens infect the leaf tissue of a host plant, leading to small, round, or angular discolorations that can grow, merge, and sometimes cause the entire leaf to decay—also known as leaf spot and melting. Spot pathogens take hold when conditions are favorable, like periods of high humidity, abundant moisture, and weak cultural practice in garden hygiene. Spot fungi (such as Cercospora or Septoria) and bacterial leaf spot agents (Xanthomonas or Pseudomonas species) are especially common culprits.

Spot diseases not only mar the appearance of leaves but can result in severe leaf loss, stunted growth, and reduced photosynthetic ability in host plants, especially in susceptible trees and shrubs. Spot pathogens can overwinter in debris, fallen leaves, or soil, making consistent yard maintenance vital. Many homeowners discover spot disease when the damage is already extensive, highlighting the need for early detection and ongoing monitoring of plant health for effective treatment and prevention of future outbreaks.

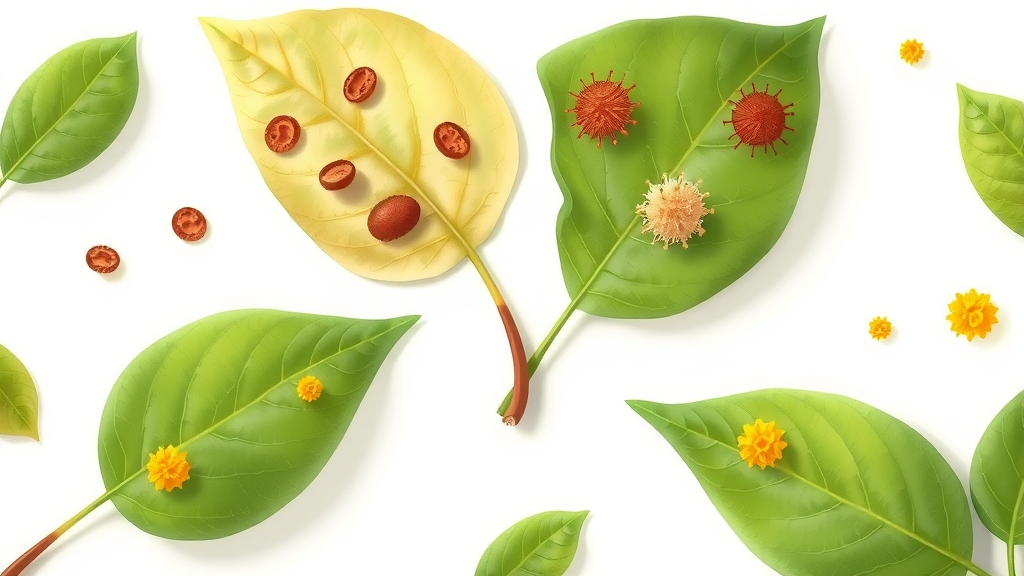
Types of Leaf Spot Diseases and Spot Pathogens

  • Fungal leaf spot pathogens
  • Bacterial leaf spot
  • Viral spot diseases
"Early intervention is key to managing leaf spot symptoms and protecting plant health." – TreeGuardianNews expert

Illustration of leaves showing fungal, bacterial, and viral leaf spot symptoms

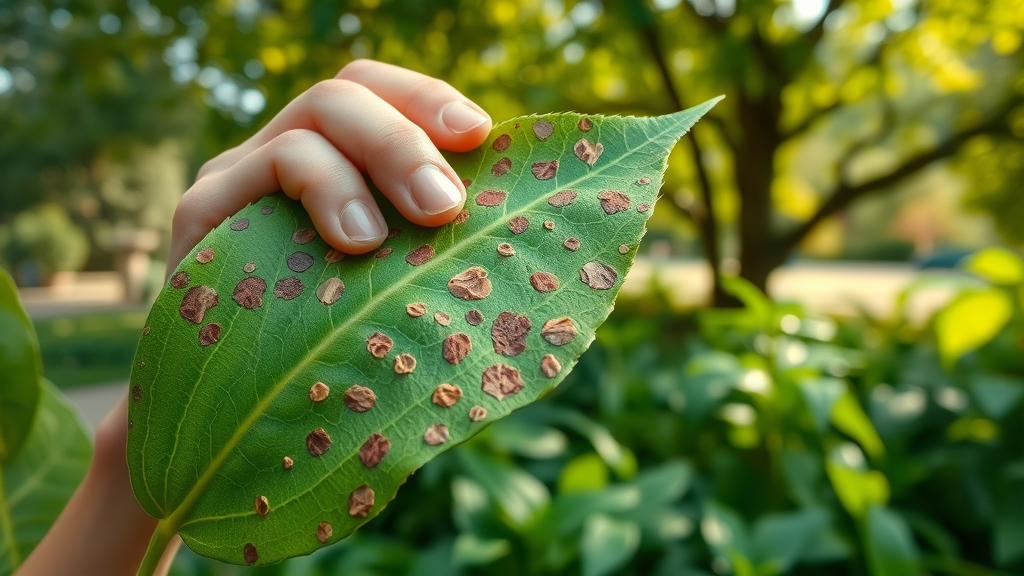
Identifying Leaf Spot Symptoms in Trees and Shrubs

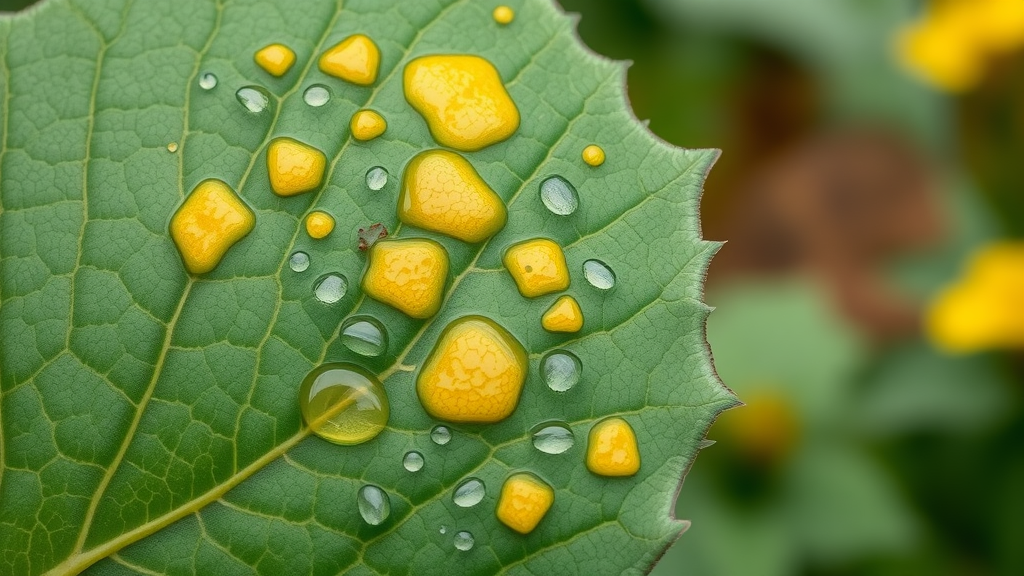
Leaf spot symptoms manifest in many ways, making accurate identification crucial for prompt and effective management. Classic leaf spots usually start as tiny brown or black dots on leaf surfaces, which may enlarge and coalesce into bigger patches as the disease advances. You might observe water-soaked lesions, areas where leaf tissue appears wet or shiny, likely indicating bacterial infection, especially after periods of wet weather. In other cases, leaf spot fungi create dry, papery spots often surrounded by yellow halos—a distinguishing trait among fungal leaf spot diseases. Key signs include:

  • Discoloration: Spots range from tan and brown to black or yellow, sometimes with concentric rings
  • Shape & texture: Round, oval, or irregular (angular) spots that may be sunken or flat
  • Spread pattern: Groups of spots, sometimes merging, and potentially leading to 'melting' or holes if untreated

Differentiating between leaf spot disease and other spot diseases, such as nutrient deficiencies or sun scorch, hinges on careful observation of these symptoms and knowledge of the plant's environment. Early detection can mean the difference between a thriving landscape and ongoing problems with spot pathogens destroying your trees and shrubs.

Detailed Table: Distinguishing Leaf Spot Symptoms Versus Other Problems

Symptom Leaf Spot Disease Bacterial Leaf Spot Fungal Spot Disease
Discolored Spots Yes Yes Yes
Water-soaked Lesions Sometimes Yes Rarely
Leaf Melting/Decay Sometimes No Sometimes
Raised/Pitted Spots No Sometimes No

Botanist inspecting tree leaves for leaf spot disease symptoms with magnifying glass

Common Causes of Leaf Spot Symptoms

Leaf spot symptoms can arise due to a combination of biological and environmental factors. Most spot diseases are triggered when spot fungi or bacterial leaf pathogens take advantage of weak or wounded leaf tissue. For example, overwatering creates a consistently moist environment that encourages fungal spores to germinate and spread, especially during wet weather. Similar conditions make it easier for bacterial leaf spot agents to penetrate through injuries or leaf surfaces softened by rain or irrigation splash. The main causes include:

  • Fungal spores
  • Bacterial entry points (wounds/injuries)
  • Inadequate air circulation
  • Overwatering or excess humidity

Other aggravating factors are overcrowding of trees and shrubs (limiting airflow and trapping moisture), failing to remove fallen leaves (a reservoir for spot pathogens), and planting susceptible host plants during high-risk seasons like early spring. By addressing these causes and understanding your landscape's unique risk profile, you can proactively reduce the recurrence and spread of spot diseases.

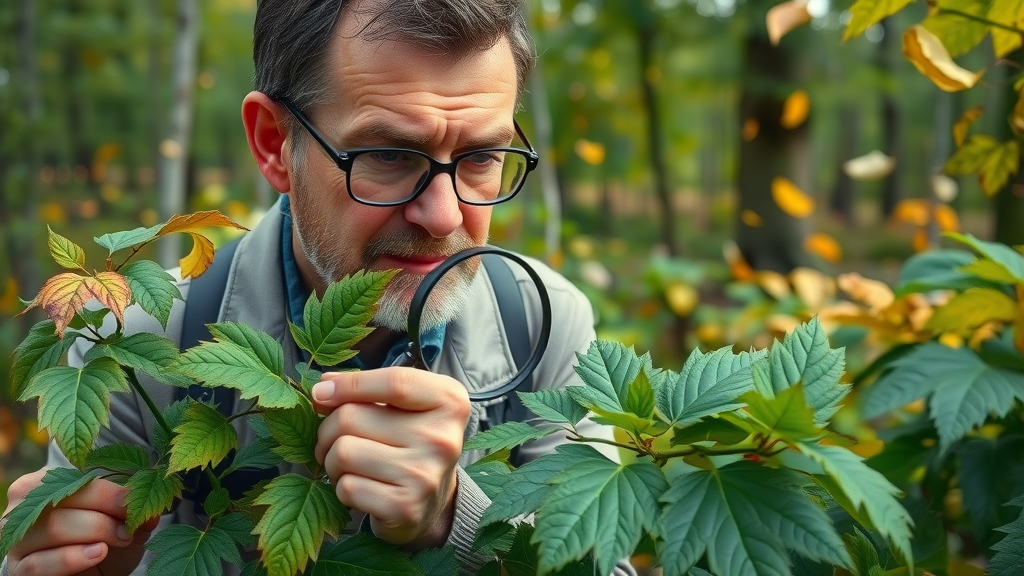
How to Diagnose Leaf Spot: Step-by-Step Spot Pathogen Identification

An effective spot disease diagnosis begins with a thorough inspection and comparison of symptoms against common reference points. Many spot pathogens produce similar leaf symptoms, so a systematic approach improves accuracy and helps you select the right treatment. Here’s a reliable, stepwise method for diagnosing leaf spot symptoms and their underlying spot pathogen types:

  1. Inspect leaves on all plant surfaces for lesions: Look at both upper and lower leaf surfaces and check for hidden spots or signs of decay.
  2. Note the color, size, and pattern of leaf spots: Document whether spots are round or angular, and if they have a yellow halo or water-soaked appearance. Fungal leaf spot often shows dry, papery spots, while bacterial leaf spot is more likely to appear wet or greasy.
  3. Check for watery or dry textures: Bacterial spots are typically slimy or water-soaked, whereas fungal spots are dry and may have concentric rings or a target-like pattern.
  4. Examine nearby plants for similar symptoms: Spot disease spreads via air, rain splash, or contaminated tools, so look for a pattern within plant groups.
  5. Consult extension resources or diagnostic labs: When in doubt, take a sample to your local cooperative extension or a professional lab for a definitive spot pathogen ID.

Meticulous diagnosis helps distinguish leaf spot disease from other spot diseases and stresses—ensuring the chemical control or natural remedy you choose addresses the true spot pathogen for best results.

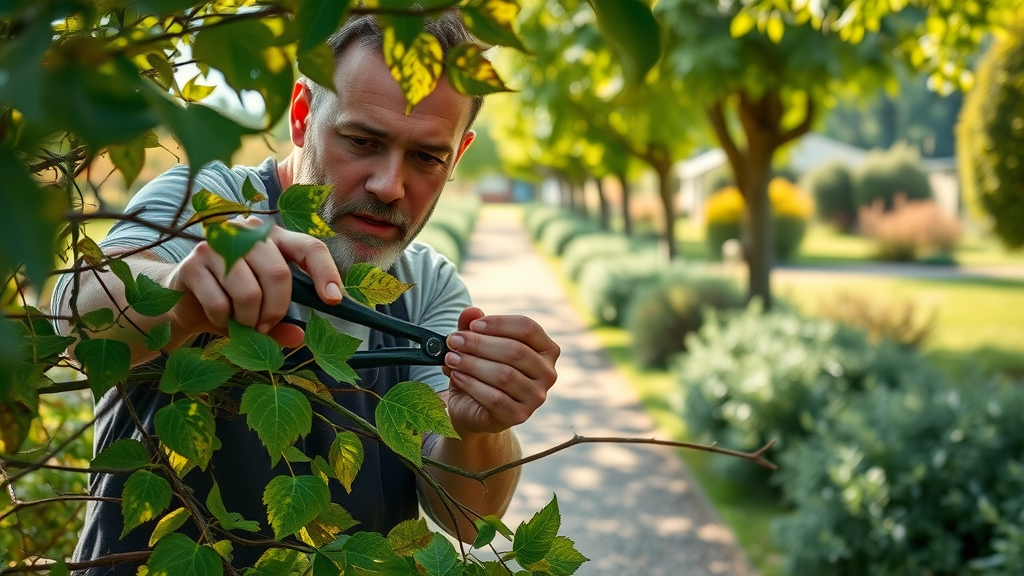
Effective Treatments: Best Ways to Manage Leaf Spot Symptoms

Managing leaf spot symptoms successfully requires a blend of prompt removal, chemical control, and cultural practice improvements. Start by pruning and disposing of visibly infected leaves and branches—this breaks the cycle by removing active spot pathogens before they can spread further, particularly in trees and shrubs with severe leaf spot or melting. Once physical removal is complete, decide on treatment: chemical control methods like fungicidal sprays and bactericides, or natural options such as neem oil or copper-based solutions. These tackle the root cause—be it fungal spores, bacterial entry, or a mix of spot diseases.

Don’t forget the role of prevention in your overall strategy: boosting airflow by thinning crowded shrubs, watering at soil level to minimize splash, and cleaning tools are key cultural practices that limit future infections. Most importantly, apply any treatment promptly—delays can let spots enlarge, spreading spot pathogens to previously healthy foliage. For ongoing management, monitor plant health and adjust your strategy based on observed results, keeping in mind that a mix of chemical and cultural controls is usually most effective against persistent spot diseases.

Gardener carefully pruning leaves showing visible leaf spot symptoms on trees and shrubs

Chemical Control vs. Natural Remedies

  • Fungicidal sprays and bactericides
  • Neem oil applications
  • Copper-based solutions
  • Pruning for improved airflow

Chemical control can offer swift relief for severe leaf spot outbreaks, particularly on valuable or at-risk trees and shrubs. Products containing chlorothalonil or copper are effective against many fungal and bacterial spot pathogens, though repeated or improper use may impact beneficial insects. For those seeking sustainable alternatives, neem oil offers broad-spectrum spot disease suppression with less environmental risk, while improved cultural practices (like regular pruning and debris cleanup) prevent most new infections.

Always follow product labels, avoid spraying during pollinator activity, and alternate between chemical classes when possible to slow resistance in spot pathogens. Combining chemical control with good garden hygiene and prompt pruning is the best approach to maintaining healthy foliage and limiting severe leaf spot or spot and melting symptoms.

Watch a professional arborist demonstrate how to identify leaf spot disease, inspect leaves step by step, and apply both chemical and natural remedies right in a home garden. This hands-on — and visually detailed — guide brings the entire process to life and makes spot disease treatment straightforward for gardeners of any experience level.

Prevention: How to Reduce the Risk of Leaf Spot in Trees and Shrubs

Preventing new outbreaks of leaf spot symptoms is every gardener’s goal, especially if you’ve already dealt with spot diseases in your landscape. The most effective prevention strategies combine sound cultural practice with careful plant selection and ongoing monitoring. Choose resistant plant varieties when possible; plant breeders are continually releasing cultivars less susceptible to leaf spot pathogens. Proper watering—aimed at the soil, not leaves—reduces moisture on foliage that can harbor spot fungi and bacteria. Thoughtful spacing and regular pruning ensure good air circulation, which speeds drying and makes conditions less hospitable to pathogens.

  • Use resistant plant varieties
  • Ensure proper watering techniques
  • Space plants for air movement
  • Clean up debris and fallen leaves to reduce spot disease pathogens

Regularly scout for symptom flare-ups and never leave fallen leaves or infected debris beneath trees and shrubs—this is a prime source for spot disease reinfection. Mulch can help moderate moisture, but don’t allow it to touch tree trunks or shrub crowns, as this encourages fungal growth. Consistency and vigilance are the best prevention against leaf spot and melting and wider spot disease outbreaks.

Healthy, vibrant green trees and shrubs widely spaced in a sunlit garden with clean mulch and no leaf spot symptoms

People Also Ask About Leaf Spot Symptoms

What are the symptoms of leaf spot?

Leaf spot presents as small, round to irregular brown, black, or yellow patches on leaf surfaces, often with concentric rings or yellow halos. In advanced cases, spots enlarge or merge, causing areas of the leaf to melt, collapse, or develop holes. Bacterial leaf spot sometimes forms water-soaked, greasy lesions, while fungal leaf spots are typically dry and papery. Dropping leaves, especially on trees and shrubs with severe infections, is also common. Spot disease symptoms tend to appear first in damp, shaded areas or after prolonged wet weather.

Can plants recover from leaf spot?

Yes, most healthy plants can recover from moderate leaf spot symptoms once the conditions encouraging the spot disease are corrected. Pruning affected foliage, applying proper fungicidal or natural treatments, and improving plant care (like watering and air circulation) all help. Severe leaf loss or repeated outbreaks may weaken the host plant, but with swift and appropriate intervention, trees and shrubs often regrow fresh, healthy leaves in the next growth cycle. Persistent spot pathogens should be managed with ongoing monitoring and cultural practice improvements.

What is the best treatment for leaf spot?

The best treatment for leaf spot integrates timely removal of infected leaves, targeted sprays with either fungicidal or bactericidal products, and natural approaches such as neem oil. Early action—before spots enlarge or cover significant portions of foliage—yields the highest success. Combine chemical control or natural remedies with environmental fixes: prune for airflow, clean up all debris, and avoid overhead watering. For severe or recurring issues, consult a professional for tailored spot disease management.

What are the signs of bacterial leaf spot?

Bacterial leaf spot symptoms are typically angular, water-soaked or greasy-looking lesions, sometimes bordered by yellow halos. Unlike most fungal spots, bacterial spots may ooze or glisten under morning light and can coalesce rapidly under humid conditions. A distinguishing characteristic is that these lesions rarely have the dry, papery texture of fungal leaf spot. Watch for clusters of spots that follow main leaf veins or congregation on new growth, indicating active bacterial spot pathogens.

Macro image of a leaf showing angular bacterial spots with yellow halos, typical leaf spot symptoms

FAQs: Quick Answers About Leaf Spot Symptoms

  • Can leaf spot affect all plants? Leaf spot can impact a wide range of host plants, but some species are more susceptible due to genetics or environmental conditions.
  • Are spot diseases seasonal? Most spot diseases are more frequent during the wet weather and high humidity of spring and early summer, but outbreaks can occur at any time given suitable conditions.
  • Will chemical control harm beneficial insects? While many targeted fungicides and bactericides are safe if used correctly, always read labels and avoid spraying during peak pollinator activity to protect beneficial insects.
  • Is spot and melting a cause for concern? Spot and melting can cause severe leaf loss if ignored. Address symptoms early to prevent extensive damage and help your plants recover.

Key Takeaways: Managing Leaf Spot Symptoms Successfully

  • Early identification of leaf spot symptoms minimizes plant loss
  • Combine chemical and cultural controls for best results
  • Regular monitoring prevents spot disease outbreaks

Conclusion: Take Action Against Leaf Spot Symptoms Today

"Healthy leaves are the foundation of a vibrant garden. Understanding leaf spot symptoms gives you the upper hand." – TreeGuardianNews Horticulture Team

Ready to Tackle Leaf Spot Symptoms?

Grow your landscaping expertise—call 203-271-7991 or visit TreeGuardianNews.com to subscribe.

To deepen your understanding of leaf spot symptoms and their management, consider exploring the following resources:

  • “Fungal Leaf Spots of Trees and Ornamentals”: This resource provides detailed information on the symptoms, causes, and control measures for fungal leaf spots affecting various trees and ornamental plants. (portal.ct.gov)

  • “Signs and Symptoms of Plant Disease: Is it Fungal, Viral or Bacterial?”: This article offers insights into distinguishing between fungal, viral, and bacterial plant diseases, aiding in accurate diagnosis and treatment. (canr.msu.edu)

By consulting these resources, you can gain a comprehensive understanding of leaf spot diseases and implement effective strategies to protect your plants.

Roots & Routes

105 Views

0 Comments

Write A Comment

*
*
Related Posts All Posts
11.10.2025

DIY Stump Removal Tricks for Quick Success

Ever stared at a stubborn tree stump in your yard and wondered, “Is there a fast, safe, and simple way to get rid of this eyesore myself?” DIY stump removal isn’t just possible—it’s practical, efficient, and can transform your outdoor space. In this comprehensive guide, we’ll unpack expert tools, insider tricks, and little-known methods to remove a tree stump with results you’ll love. Whether you want a lush lawn or simply peace of mind, these techniques put success at your fingertips. Ready to reclaim your yard? Let’s dig in! Curious About DIY Stump Removal? Discover the Truth Behind Quick and Effective Techniques If you’re seeking diy stump removal tricks that actually work, you’re not alone. Tree stumps are more than inconvenient—they can be tripping hazards, attract pests, and derail your landscaping plans. Thankfully, you don’t need costly tree removal companies or complicated equipment to tackle the job. This article reveals how to remove a tree stump quickly and safely, whether you choose hands-on effort, a stump grinder, or eco-friendly solutions like epsom salt and potassium nitrate. You’ll gain vital insights on how to match methods to stump size, understand time and cost trade-offs, and operate safely for best results. With smart planning and the right tools, even large stumps become manageable. We’ll walk you step by step through every approach, showcase what to expect from mechanical vs. all-natural options, and arm you with safety tips and post-removal cleanup pointers. It’s time to debunk myths and share proven strategies you can apply today—because in the world of stump removal, knowledge is power and time is money. What You'll Learn About DIY Stump Removal How to choose the best diy stump removal method Insider tricks for removing a tree stump quickly Comparison of natural versus mechanical stump removal Expert guidance on safety and environmental impact Why Remove a Tree Stump? Hidden Hazards and Benefits Keeping a tree stump in your yard might seem harmless, but the consequences go deeper than appearance. Tree stumps can become unexpected tripping hazards, especially on busy lawns or areas where children play. They often serve as breeding grounds for pests like termites and carpenter ants, potentially threatening nearby trees or even your home’s foundation if the stump remains unchecked. Ignoring a stump can also create an unsightly focal point, undermining curb appeal and reducing your property’s value over time. Aside from safety risks, leftover tree stumps can impede lawn maintenance. Running over a stump with a lawnmower can damage equipment and leave ragged patches of dead grass. If you’re planning enhancements, such as installing a patio, garden bed, or electric fence, the stump becomes an obstacle requiring removal. Understanding these hidden hazards highlights why stump removal is often more than a cosmetic concern—it’s a smart step in home improvement and effective landscape management. Tree Stump and Tripping Hazard Risks in Your Yard Leaving a tree stump in your yard introduces a persistent tripping hazard. This risk is especially pronounced around walkways, playgrounds, or active family areas. During the day, grass may grow up around the stump, camouflaging it and increasing the likelihood of an accident. At night or in low-light conditions, the hazard becomes even more pronounced. The consequences? Skinned knees, twisted ankles, or worse injuries, all from a stump that could have easily been removed. Beyond physical risk, stumps provide shelter for wildlife and insects that can disrupt a healthy lawn, and moisture around the stump may contribute to fungal growth, further increasing safety risks for children and pets. Mitigating tripping hazards is a top priority for families seeking a safe, accessible outdoor space. Neighborhoods where outdoor activity on this service is common, such as playing catch or maintaining a charcoal grill, can see stumps increase insurance liability and hazard potential. Removing a tree stump isn’t just a visual improvement—it’s a practical way to avoid personal injury and costly claims. Prioritize removing old stumps to ensure both beauty and safety in your landscape. Benefits of Stump Removal for Lawn Health and Curb Appeal The benefits of tree stump removal stretch far beyond hazard reduction. A cleared yard enhances curb appeal instantly, making your property more inviting and marketable. Your lawn becomes safer for children, pets, and guests, while mowing and maintaining the grass are much easier. Additionally, removing the stump helps prevent the regrowth of unwanted shoots, maintaining a uniform lawn that’s easier to landscape or upgrade with features like a garden, play area, or electric fence. Without a stump, you can even out your yard, reseed grass, or lay sod—restoring the area to its natural beauty. This process eliminates pest habitats and helps halt the slow decay that might otherwise attract fungi or wood-boring insects. If you’re considering selling your home or simply want peace of mind and a healthier outdoor environment, stump removal is a clear win. Whether you choose to remove a tree stump yourself or hire a tree service, this upgrade pays off in both short-term enjoyment and long-term property value. "Neglecting a tree stump isn’t just an eyesore—it’s a tripping hazard and an invitation for pests. DIY stump removal saves frustration and transforms your yard." Top DIY Stump Removal Methods: Stump Grinders, Natural Solutions, and More There are several effective DIY stump removal methods to choose from, each with its unique strengths. Selecting the right option depends on your stump size, timeline, and resources. Manual methods like digging work best for small stumps, while treatments like epsom salt and potassium nitrate dissolve medium and large stumps over time. For fast results on big stumps, nothing beats a mechanical stump grinder. Let’s break down each approach—so you can match your project with the perfect solution and avoid a tree removal headache. The method you choose also impacts your labor, the tools required, and the environmental footprint of your stump removal. If you’re torn between renting a stump grinder or harnessing nature’s chemistry, this section will point you in the right direction with honest, actionable comparisons. For those looking to optimize their yard maintenance beyond stump removal, integrating seasonal tree care can make a significant difference. Discover practical strategies in these fall tree trimming tips that most homeowners overlook to keep your landscape healthy and hazard-free year-round. How to Remove a Tree Stump by Hand Tools required for manual diy stump removal Best for small tree stumps Step-by-step removal process Manual removal is an effective approach for small tree stumps and gives you complete control over the process. Start by gathering essential tools: a sturdy shovel, a digging bar, a mattock or pickaxe, and (for stubborn roots) an axe to chop through thick wood. Select a day with soft soil—ideally after rain. Begin by digging a trench around the stump to expose major roots. Use the digging bar and shovel to widen the trench, then swing the axe or use a hand saw to cut through roots as you encounter them. By rocking the stump gently and clearing outsoil, you can eventually pry it free. This method requires patience but offers clear results, especially if you need to avoid a tree service bill or want to control disposal of chips and debris. The manual approach is best when the stump’s diameter is less than 12 inches and is not located near obstructions like a fence or utility lines. While labor-intensive, it’s a low-cost way to remove a tree stump and grants a sense of accomplishment and peace of mind knowing the job is thoroughly done. Using a Stump Grinder for DIY Stump Removal Choosing the right stump grinder Safety tips and personal protective equipment Efficient operation for large stumps For medium to large stumps, a stump grinder offers unmatched efficacy and speed. Renting a stump grinder from a local hardware store is usually more economical than buying, unless you anticipate frequent use. When selecting a grinder, ensure the cutting wheel is suited to your stump’s size and your yard’s terrain. Safety is paramount—always wear the recommended PPE: gloves, goggles, sturdy boots, and ear protection. Before operation, clear the area of rocks, toys, or debris to avoid injuries or damage to the blade. Read the manufacturer’s instructions thoroughly and check local fire restrictions if grinding generates sparks. Position the grinder over the stump and slowly lower the cutting wheel, moving it back and forth to grind the wood to below ground level. Continue until the stump is fully reduced to mulch, about 8-10 inches below the surface. This method quickly handles big jobs, with most grinders capable of tackling large tree stumps in under two hours. Grinding is fast but generates a lot of chips and dust—plan for cleanup and proper disposal. Despite the higher initial effort, this approach combines efficiency with satisfying results, turning a massive stump into usable mulch while avoiding the cost of a professional tree stump removal service. Natural Solutions: Remove a Tree Stump with Epsom Salt or Potassium Nitrate Scientific principles behind Epsom salt and potassium nitrate Step-by-step guide to chemically rotting a tree stump quickly If physical labor or heavy equipment isn’t an option, consider natural chemical methods to remove a tree stump. Common products include epsom salt (magnesium sulfate) and potassium nitrate, both of which speed up stump decomposition. Begin by drilling deep holes (8–10 inches) into the top and sides of the stump. (Tip: The more holes you drill, the faster decomposition occurs—use a wide drill bit for best results.) Fill the holes with your chosen chemical—a full cup per hole for optimal effect. Cover the stump with a tarp to retain moisture, then wait several weeks. These natural solutions work by drawing moisture out and disrupting cellular processes, effectively starving the wood. Potassium nitrate, commonly sold as a commercial stump remover, can reduce a large stump to soft, crumbly wood in 4–8 weeks. Epsom salt is slower but safer for surrounding soil and easier to source. Both methods minimize environmental impact and are excellent when you need a low-labor, gradual approach—just set your expectations, as even the fastest results take a few weeks. For added speed, cover the stump and keep it moist, turning your patience into success over time. Table: DIY Stump Removal Methods Compared Method Best For Time to Remove Tools Needed Hand Digging Small tree stumps 2–6 hours Shovel, axe Stump Grinder Large stumps 1–2 hours Stump grinder, PPE Epsom Salt Moderate size 8–12 weeks Drill, Epsom salt Potassium Nitrate Large tree stumps 4–8 weeks Drill, potassium nitrate Step-by-Step: How to Remove a Tree Stump Safely Removing a stump safely requires preparation and methodical execution. Whether you choose manual, mechanical, or natural methods, always begin by surveying for underground utilities and clearing the work area. Wear gloves and eye protection for every approach, and keep children and pets away from the site until the job is complete. For larger stumps, assess the soil and stump stability, especially if you need to avoid a tree shift that could endanger nearby structures or fences. Organize your tools before starting, and plan for breaks in physical tasks to prevent overexertion. Prioritize safe tool handling and appropriate storage during and after use for peace of mind. Once the stump is removed, backfill the hole with soil and debris, level the area, and reseed or replant grass to encourage swift recovery. Many DIYers cover the spot with mulch or sod for an instant facelift. These clean-up steps help restore your landscape while eliminating tripping hazards or pest-attracting debris that may remain after removal. Regardless of the method you select, following safety best practices ensures your project ends successfully and injury-free. Preparation for Stump Removal A successful diy stump removal starts with careful planning. Walk around your yard to identify any obstacles, such as rocks, pipes, or power lines—contact utility services if you’re unsure. Gather all required tools, including shovels, mattocks, saws, and personal protective equipment (PPE). For chemical methods, source high-quality epsom salt or potassium nitrate, and check product labels for safety information. Schedule your removal project on a day with favorable weather for comfort and visibility. If you’re using a grinder, reserve rental equipment in advance and ensure you have a safe path for delivery and movement. Remove decorative items, hoses, or electric fence components near your work zone to avoid damage. Place necessary items within easy reach but away from active digging or grinding for safety. With good preparation, you’ll make steady, efficient progress and set the stage for a hazard-free project. Protecting Yourself and Your Yard Safety during stump removal is non-negotiable. Always wear gloves to protect your hands from blisters, sharp roots, or splinters. Sturdy boots shield feet from heavy tools and prevent slips, while long sleeves and safety goggles minimize risk from flying debris and wood chips. If you’re operating a stump grinder, mandatory PPE includes ear protection, a face shield, and snug-fitting clothing to avoid accidents. Mark boundaries around your removal area using cones or rope—this keeps children, pets, and bystanders at a safe distance during the process. If using chemical methods, prevent children and pets from accessing the treated stump. Place a visible marker or cover the site with a tarp, and always store chemicals in a secure location away from heat or sparks. Even when relying solely on hand tools, keep a first aid kit and phone handy in case of minor injuries or emergencies. Prioritizing protective steps is essential for achieving peace of mind and smooth, incident-free completion of your diy stump removal project. Final Cleanup After DIY Stump Removal With the stump gone, it’s cleanup time! Start by removing coarse wood chips, root fragments, and any leftover chemical containers. Use a rake to smooth the soil and fill in low spots; compost or dispose of organic debris according to local guidelines. If large holes remain after removing a tree stump, backfill with topsoil and tamp it down to promote healthy regrowth. For a professional finish, reseed the affected area or lay down fresh sod—this step restores appearance and prevents weeds. Double-check for lingering hazards, such as exposed roots or tool fragments, and store all equipment securely for future use. If you’ve reused chips as mulch, spread them evenly to aid moisture retention elsewhere in your garden. Post-removal cleanup delivers that final touch: a safe, attractive, and renewed yard where you can relax, entertain, or simply enjoy the fruits of your successful project. Congratulations—you’ve mastered every aspect of diy stump removal. Cost and Time: Evaluating the Best DIY Stump Removal Approach Choosing how to remove a tree stump is often about balancing time, money, and effort. Manual methods cost very little (mostly sweat equity), but require several hours of labor. Renting a stump grinder starts at around $100–$150 per day, which makes sense for large stumps or multiple removals. Chemical options have a low up-front cost ($10–$30), but take weeks to see effects—perfect if you’re not in a rush. Don’t forget to factor in costs for PPE and replacement hand tools. While it’s tempting to choose the cheapest solution, “time is money”; sometimes paying a little more for speed pays off, especially if you want to enjoy your refreshed yard sooner. Compare each method closely: manual for small stumps, mechanical for urgency or extensive tree stump removal, and chemical for low-hassle, long-term results. No approach is universally “best”—align your choice with your needs, timeline, and willingness to work, and you’ll get satisfying results without busting your budget. Cost Comparison: Manual, Chemical, and Stump Grinder Manual digging is the most affordable route, costing nothing if you already own common yard tools. Renting a stump grinder for a day averages $100–$200 (plus delivery if needed), but the time savings can be substantial for large stumps. Chemical options, such as epsom salt or potassium nitrate, run $10–$35 for enough product to treat one sizable stump—making them a favorite for patient DIYers. Don’t forget PPE costs (gloves, goggles, boots) and tool wear, which can add $20–$50 if starting from scratch. When you add it up, the most cost-effective method may be a blend: dig by hand for small jobs, use natural decomposition for medium stumps, and rent a grinder if you have multiple or especially tough stumps in your yard. If you’re overwhelmed or short on time, hiring a tree service averages $75–$350 per stump, with prices climbing for hard-to-access or very large projects. Even so, many homeowners find DIY options provide better value and personal satisfaction, especially with proper planning and preparation. Expected Timeframe for DIY Stump Removal Time is a critical factor in the method you choose for diy stump removal. Hand digging takes 2–6 hours, varying with soil, root complexity, and stump diameter. A stump grinder can transform large tree stumps into chips within 1–2 hours, though setup and cleanup may add extra time. Epsom salt and potassium nitrate, while minimal effort, require patience: expect 4–12 weeks for full decomposition, with potassium nitrate acting a bit faster. To accelerate these processes, drill more holes and keep the stump moist under a tarp, but be realistic about natural limitations. Ultimately, your timeframe depends on urgency, project scope, and your own energy level. Plan ahead if you want the job complete before a big event, or start chemical treatment in the off-season for lawn makeovers come spring. Flexibility ensures you don’t sacrifice safety or lawn quality in pursuit of speed. People Also Ask: Expert Answers on DIY Stump Removal What is the fastest way to get rid of a tree stump? The fastest way to remove a tree stump is to use a stump grinder. Renting a stump grinder allows you to reduce most large stumps to mulch in just 1–2 hours. Before grinding, clear the area, wear full PPE, and follow machine instructions closely. Grinding is ideal for speed and efficiency compared to manual or chemical methods, which take much longer—making stump grinders the preferred solution when “time is money.” How to get rid of a stump in 2-3 days naturally? While most natural methods take weeks, the only way to see significant progress in 2–3 days is to combine several tactics: drill holes deeply into the stump, fill them with epsom salt or potassium nitrate, saturate with hot water, and cover with a tarp to lock in heat and moisture. Though this can accelerate internal decay, complete removal will still require additional time. For true removal within days, mechanical grinding remains the only truly quick method. How long does it take Epsom salt to dissolve a tree stump? Using epsom salt for diy stump removal takes about 8–12 weeks to fully decompose a standard-sized stump. The process depends on weather, stump size, and the frequency of chemical application. Drilling additional holes and keeping the area moist and covered will speed up results, but patience is necessary. Epsom salt is best for those who want a low-effort and environmentally gentle approach. What will rot a tree stump quickly? Potassium nitrate is the most effective and fastest rotting agent for tree stumps available to homeowners. Drill holes, fill with potassium nitrate, pour in hot water, and wait 4–8 weeks for substantial softening. Afterward, the stump can be broken apart with an axe or buried. Covering the area and keeping it damp ensures the process moves as quickly as possible. Answers to People Also Ask Speed and ease depend on the method you choose: stump grinders for fast removal, epsom salt for gradual decomposition, and potassium nitrate for the quickest chemical breakdown. Manual digging is labor-intensive but cost-free, while chemical options are safer for pets and children if properly contained and monitored. Prioritize safety and match technique to your timeline and yard environment for best DIY stump removal results. DIY Stump Removal Video Tutorial: Watch Step-by-Step Methods Watch our easy-to-follow explainer covering manual removal, chemical techniques, and safe use of a stump grinder—all demonstrated in a real backyard setting. Essential Tools and Equipment for DIY Stump Removal Stump grinder Shovel Mattock Chainsaw Hand saw PPE (gloves, goggles, boots) Key Takeaways: DIY Stump Removal Success Match removal method to stump size for best efficiency and safety Prioritize PPE and careful planning before starting your project Manual, mechanical, and chemical options suit different budgets and timelines Effective cleanup and restoration ensure a beautiful, stump-free yard Patience and preparation go hand-in-hand for lasting results Frequently Asked Questions About DIY Stump Removal Can I remove a tree stump without heavy equipment? Yes. Small to medium tree stumps can be removed with hand tools such as shovels, mattocks, and axes. This approach is cost-free but requires time and effort. Chemical methods using epsom salt or potassium nitrate allow removal without machinery, but take longer to complete. Are chemical methods safe for pets and children? Chemical stump removers are generally safe when used as directed. Always prevent direct contact with treated stumps, keep pets and children away, and properly mark or cover the area during decomposition. After the process is complete, thoroughly remove and dispose of any remaining chemicals to return your yard to safe, regular use. Conclusion: Take Control—Master DIY Stump Removal Today With the right knowledge, tools, and safety tips, you can achieve fast and effective DIY stump removal and reclaim your outdoor space—no professional needed! If you’re ready to elevate your landscaping skills even further, consider exploring broader tree care strategies that go hand-in-hand with stump removal. Our guide on fall tree trimming tips that most homeowners miss offers valuable insights for maintaining healthy, beautiful trees throughout the year. By combining smart stump removal with seasonal trimming, you’ll create a safer, more attractive yard and set the stage for long-term landscape success. Ready to Tackle DIY Stump Removal? Grow your landscaping expertise—call 203-271-7991 or visit TreeGuardianNews.com to subscribe.

11.09.2025

Tree Stump Extraction Made Easy: What Works Best

Did you realize that over a third of homeowners leave tree stumps behind, exposing themselves to pest infestations and dipping property values? Understanding tree stump extraction isn't just about tidying up your yard—it's critical for safety and curb appeal. This guide breaks down easy, expert-backed ways to banish tree stumps for good, helping you make the best decision for your landscape and budget. The Surprising Truth Behind Tree Stump Extraction in Modern Landscaping Tree stump extraction is often overlooked in modern landscaping, yet the presence of lingering tree stumps can cause more problems than many realize. Whether you're striving for a pristine front yard or trying to maintain healthy trees, learning about the actual impact of tree stumps is crucial. Not only do stumps detract visually, but they also pose significant hazards to people and property. Choosing when and how to remove a tree stump isn't just about looks—it's about fostering a safe, pest-free, and thriving yard. Did You Know? A Startling Statistic on Tree Stump Extraction "Around 36% of property owners surveyed admitted to leaving tree stumps behind, risking pest infestations and lower curb appeal." – National Landscape Association What You'll Learn About Tree Stump Extraction The differences between tree stump extraction, stump removal, and stump grinding Pros and cons of each stump removal method How to select the best tree stump extraction technique for your landscape Key considerations in tree care and tree service planning Expert tips for achieving a healthy, stump-free lawn Why Tree Stump Extraction Matters: Enhancing Your Property Value Leaving tree stumps scattered throughout your yard can significantly detract from your home's curb appeal—and more importantly, from its overall value. Real estate experts and tree service professionals agree: a yard dotted with old stumps signals neglect and may turn away potential buyers. Proper tree stump extraction not only makes your landscape more attractive, but can have practical implications for your finances and property safety. Investing in stump removal or stump grinding is a direct investment in your home's worth and your family's well-being. The Impact of Tree Stumps on Safety and Aesthetics Common hazards caused by leftover tree stumps Tree stumps as a pest and fungi attractor Evaluating the impact on property appearance Leftover tree stumps are more than just unsightly—they're potential tripping hazards, especially for children and visitors. Decaying stumps can also harbor destructive pests, such as termites and carpenter ants, or dangerous fungi that threaten both healthy trees and people. Visually, an old tree stump can make even the most carefully maintained lawn look unfinished, reducing the perceived value of the entire landscape. For homeowners looking to maintain a healthy and attractive yard year-round, it's also important to consider seasonal tree care practices. Incorporating strategies from fall tree trimming tips that most homeowners miss can help prevent future stump issues and support the overall vitality of your landscape. Methods of Tree Stump Extraction: Comparing Stump Removal and Stump Grinding When deciding on the best tree stump extraction method, two main professional options stand out: stump removal and stump grinding. Understanding the differences, costs, and implications of each technique helps determine which suits your landscape needs and long-term plans. Factors such as the stump's size, the local tree species, root system complexity, and the surrounding area will all impact your choice. Here's a comparative look: Method Effectiveness Cost Estimate Time Required Resulting Landscape Impact Stump Removal High $$$ 1-2 hours Large hole, roots extracted Stump Grinding Medium-High $$ 1 hour Mulch remains, roots left Chemical Solutions Medium $ Several days Gradual decomposition Natural Methods Low-Medium $ 2-3 days Environmentally friendly, gradual Stump Removal: Uprooting the Problem When stump removal is most effective Equipment needed Steps in the stump removal process Stump removal is the most comprehensive way to handle tree stump extraction. This process is best for larger tree stumps with extensive root systems, problematic locations, or when planning to replant in the same spot. Professionals use heavy equipment like excavators or winches to unearth the entire root ball and roots attached. The key steps include digging around the stump, cutting major tree roots, and pulling everything from the soil. While it leaves a significant hole that must be refilled, stump removal ensures no regrowth or hidden rot issues later, making it ideal for complete land restoration or construction projects. Stump Grinding: An Efficient Solution How stump grinding works Benefits for tree care and landscaping When to opt for stump grinding over full removal Stump grinding offers a quicker and less invasive approach to tree stump extraction. Using a powerful, spinning grinder, professional tree services shred the exposed tree stump down to ground level, turning it into mulch or wood chips. This method leaves most roots in place and creates minimal disturbance to the surrounding landscape, making it an excellent option for established lawns or areas where minimal disruption is important. Stump grinding is especially useful for smaller trees or when budget is a concern, but remember, deep roots may persist underground and could decompose over a long time. Tree Stump Extraction and the Role of Tree Services How professional tree services approach extraction Common tools and technologies used by tree service providers Top-rated tree service providers tailor their extraction method to the size, species, and condition of your tree stumps. They are trained in tree care best practices and use specialized gear: stump grinders, chainsaws, digging bars, and cranes for challenging root systems. Their expertise ensures minimal risk to healthy trees, reduces soil damage, and promotes proper site restoration. Engaging professionals means quicker results, advanced safety, and peace of mind that your landscape is handled according to local codes and tree care standards. Natural and Chemical Tree Stump Extraction Methods: What Works Fast? Chemical accelerants for decomposing tree stumps Eco-friendly, manual approaches to remove a tree stump Natural ways to get rid of tree stumps without heavy equipment If you want to extract a tree stump without heavy machinery, there are both natural and chemical options. Chemical solutions—such as potassium nitrate or commercial stump removers—work by speeding up the decomposition process. After drilling holes into the stump, pour in the chemical agent, keep the area moist, and wait several days for the stump to soften and begin breaking down. For eco-friendly, natural methods, simply cover the stump with mulch and soil, or use Epsom salt to attract moisture and encourage decay. These options take longer but are gentler on surrounding healthy trees and the environment. Should You Leave the Stump or Remove It? The decision to leave the stump or remove it depends on both functional and aesthetic goals. While it might be tempting to keep a stump that's low to the ground, experts agree that leaving the stump in place can seriously backfire—leading to rotting wood, regrowth of shoots, or creating habitats for unwanted pests. These risks can extend under the surface, threatening the root system of healthy trees and the broader landscape. Consequences of Leaving Tree Stumps in Place Soil quality, regrowth, and pest risks Impact on healthy trees and overall tree care Leaving a tree stump behind can have long-term drawbacks. Decaying stumps affect soil quality by fostering fungal growth and inviting unwanted critters—carpenter ants, termites, and beetles—directly into your yard. Over time, a decaying stump may compete with healthy trees for nutrients and water, or cause unpredictable regrowth by sprouting new shoots. For optimal tree care and a truly healthy landscape, proactive tree stump extraction is the safer choice. Step-by-Step Guide: DIY Tree Stump Extraction Methods Assess the tree stump size and location Gather stump grinding or removal tools Follow safety protocols outlined by tree care experts Execute the chosen extraction method Dispose or recycle the remnants If you decide on a DIY approach to tree stump extraction, there are clear steps to follow for safety and success. First, measure the size of your tree stump and consider its proximity to structures or healthy trees. For stump removal, you’ll need tools like a shovel, digging bar, chainsaw, and possibly a winch for large root balls. Stump grinding requires renting specialized equipment. Always follow safety protocols: wear gloves, goggles, and sturdy footwear, and keep bystanders at a safe distance. Once you cut the stump, dig or grind it out, dispose of the debris responsibly, and fill the hole with quality soil for a seamless finish. Professional Tree Services vs. DIY Tree Stump Extraction While it's tempting to save money with a DIY tree stump extraction, professional tree services offer unmatched expertise, advanced tools, and streamlined safety measures. For particularly stubborn or massive stumps—especially with widespread root systems—professional help is highly recommended. When to Call a Tree Service for Stump Grinding or Removal Tree service expertise: advanced tools and safety measures Cost-benefit comparison of hiring a professional Consider calling in the pros when facing a larger tree, stumps tangled close to structures, or when you lack experience with heavy equipment. Tree service companies use industrial-grade stump grinding machines and can guarantee both speed and thoroughness. Although the cost is higher, this is often offset by minimized risk, faster site restoration, and superior long-term outcomes. Think of it as investing in a headache-free, healthy landscape. Short cinematic explainer: Compare tree stump extraction methods featuring animated demos for removal, grinding, chemical and natural options. Key Considerations for Safe and Effective Tree Stump Extraction Permitting and local regulations for tree stump removal Environmental impact and sustainable tree care Site restoration for healthy trees post-extraction Before any tree stump removal or stump grinding, check local permitting requirements. Some municipalities require permission for major landscape changes or disposal of large root systems. Choosing eco-friendly methods and protecting surrounding healthy trees is also vital. After extraction, restoring your site—by filling holes, leveling soil, and possibly planting grass or new trees—ensures your yard remains vibrant and hazard-free. People Also Ask: Tree Stump Extraction FAQs How much does stump removal typically cost? The cost for tree stump extraction varies based on the stump size, location, and whether you choose a tree service or do it yourself. On average, professional stump removal ranges from $75 to $350 per stump; multiple stumps or difficult jobs may cost more. What is the easiest way to remove a tree stump? Stump grinding is often considered the easiest method for tree stump extraction, especially when performed by a professional tree service. For small stumps, chemical treatments or digging out the roots can also work. How to get rid of a stump in 2-3 days naturally? Use Epsom salt or commercial stump remover products to accelerate decomposition. Drill holes in the tree stump, fill with these agents, and keep the area moist. While not instant, it can show results in 2-3 days under ideal circumstances. Why shouldn't you leave a tree stump in the ground? Leaving a tree stump invites pests, fungus, and may cause unwanted new tree growth. For optimal tree care and landscape safety, most experts recommend tree stump extraction as part of responsible tree service. Expert Quotes on Tree Stump Extraction and Tree Care "Proper tree stump extraction is crucial for landscape health and prevents long-term issues like insect infestations and root disease." – Dr. Elena Cruz, Certified Arborist Key Takeaways: Making Tree Stump Extraction Simple Tree stump extraction can improve safety and property value Stump grinding and removal are both viable, depending on the situation Consult with a reputable tree service before starting major extraction work Environmental and regulatory factors are important in tree care plans Ready to Tackle Tree Stump Extraction? Grow your landscaping expertise—call 203-271-7991 or visit TreeGuardianNews.com to subscribe. If you’re ready to elevate your landscape beyond just stump extraction, consider how ongoing seasonal maintenance can make a lasting difference. Proactive care, such as strategic trimming in the fall, not only prevents future issues but also enhances the health and beauty of your trees year after year. Discover expert advice and overlooked techniques in fall tree trimming tips that most homeowners miss to keep your property thriving. By integrating these advanced insights into your routine, you’ll ensure your yard remains safe, vibrant, and a true asset to your home. Take the next step in your landscaping journey and unlock the full potential of your outdoor space.

11.08.2025

Stump Grinding Secrets Pros Don’t Tell You

Did you know that more than 80% of homeowners make critical mistakes during stump grinding that can cause lasting yard damage and unnecessary costs? When it comes to removing an unsightly tree stump from your yard, there’s a lot more beneath the surface than meets the eye. Stump grinding, while seemingly straightforward, holds many secrets that tree service professionals wish you knew. In this comprehensive guide, you’ll discover the game-changing techniques, essential mistakes to avoid, and insider insights that separate flawless stump removal from expensive disasters. Whether you’re considering hiring a pro, renting a stump grinder yourself, or just curious about the stump grinding process, this article delivers all the facts to help you make informed, cost-effective decisions for your landscape. Unlocking the Truth Behind Stump Grinding: Surprising Facts and Figures "More than 80% of homeowners are unaware of the critical mistakes made during a typical stump grinding job—leading to unnecessary risks and long-term yard damage." – Arbor Industry Analyst Many people assume that stump grinding is simply about making an old tree stump disappear, but the reality is far more complex. Industry research reveals that careless grinding can affect soil health, compromise future landscaping, and even enable pests or fungal regrowth. Professional tree services regularly encounter yards where improper stump grinding has led to uneven ground levels, lingering roots, and environmental hazards. What often goes unsaid is how the type of stump grinder used, the grind depth, and the cleanup of wood chips can significantly alter your yard’s long-term health and appearance. Whether you’re facing a large stump or just want to avoid common mistakes, understanding the real facts—and not just the sales pitch—can prevent you from being among the majority who pay for preventable issues. What You'll Learn About Stump Grinding The key steps of efficient stump grinding Choosing between stump grinder types Stump removal alternatives and long-term results How to avoid costly stump grinding mistakes Tips from tree service professionals What Exactly Is Stump Grinding and Why Is It Important? Stump grinding is the process of using powerful, specialized equipment—a stump grinder—to shred the remnants of a tree stump down below ground level. Unlike complete stump removal, which involves extracting the entire stump and its major roots, stump grinding focuses on grinding the stump into wood chips and fine debris until it’s flush with or below the surrounding ground. This method effectively eliminates visible remnants, facilitates landscaping, and avoids the heavy labor and soil disruption of full extraction. Why is stump grinding crucial? First, old stumps can harbor pests like termites or carpenter ants and provide a breeding ground for fungi that threaten healthy trees nearby. Second, leaving a tree stump disrupts lawn care, creates a trip hazard, and makes landscaping tricky. Efficient stump grinding prevents these issues, saves you money in the long run, and ensures a safer, more attractive outdoor space. The process also yields helpful wood chips for mulching or compost, turning waste into a gardening asset. Stump Grinding vs. Stump Removal The debate between stump grinding and stump removal comes down to invasiveness and landscape goals. While stump grinding uses a stump grinder to reduce the tree stump to ground level and below, it leaves the larger roots in place to decay naturally. By contrast, stump removal involves extracting both the stump and major roots, which requires heavy machinery, causes more yard disruption, and often leads to higher costs. Stump grinding is typically preferred for residential yards because it offers a less disruptive, faster, and more affordable option. However, for situations where new construction, paving, or deep-rooted planting is planned, complete stump removal may be necessary. Understanding these differences ensures you select the right tree service for your needs, whether you want low-impact landscaping or a fresh slate below the soil. The Role of the Stump Grinder in Modern Tree Service In today's tree service industry, the stump grinder is indispensable. Modern stump grinders come in various sizes, from compact units for narrow access backyards to powerful machines designed to tackle large stumps left after mature tree removal. These machines use rotating cutting wheels with carbide teeth to chip away at the wood until it’s transformed into mulch or wood chip debris. Innovations in stump grinder design have made the process safer, quicker, and less damaging to the surrounding landscape. A skilled operator can safely grind a stump to the desired depth, usually 4–16 inches below ground level, preventing regrowth. Using a professional-grade stump grinder also minimizes the risk of injury and ensures compliance with safety standards, making it a staple for tree services and homeowners alike. Types of Stump Grinder: Which One Should You Use? Selecting the right stump grinder for your job is a vital step that’s often overlooked. There are several types of stump grinder: hand-guided, walk-behind, and larger self-propelled machines. Each type serves a different purpose, depending on the size of the tree stump, access to the yard, and the desired end result. The choice also impacts time, cost, and the level of effort needed, so understanding the pros and cons can mean the difference between a simple Saturday project and a costly headache. For small backyards or tight spots, a compact or hand-held stump grinder gets the job done with minimal disturbance. For large stumps or multiple stumps, a wheeled, heavy-duty or vertical stump grinder could be the best solution. The decision can also depend on whether you’re hiring a pro—who may have access to specialized equipment—or tackling the project yourself. Matching the grinder to the job ensures safe, thorough, and efficient stump grinding. Vertical Stump Grinder vs. Standard Stump Grinder A vertical stump grinder is engineered for speed and effectiveness with deeply rooted or especially tough tree stumps. Unlike standard grinders that operate horizontally by chipping away across the surface, vertical grinders attack from above, drilling deeper and reducing massive stumps more rapidly. This makes them ideal for commercial or professional tree services tackling particularly stubborn or oversized stumps after tree removal. On the other hand, standard walk-behind or self-propelled grinders are more versatile for most residential needs. They shine for average-size stumps where ground disruption should be minimal and clean up is a concern. Your choice depends on the types of stump encountered and the width, depth, and accessibility of the stump site. When in doubt, consulting a professional ensures the right machine is selected for your specific project. Suitability of Stump Grinders for Different Tree Stump Situations Not all stump grinders and tree stump scenarios are created equal. For smaller, weathered stumps or tight urban settings, a compact or handheld grinder usually suffices. However, fresh tree stumps—especially from large hardwoods—require powerful, self-propelled machines or vertical grinders that penetrate deeper and work faster. The soil type, location (such as near fences or utility lines), and the presence of stones or roots also influence which grinder should be used. Professionals factor in risks like potential regrowth or residual roots that could compromise future landscaping. If you’re removing a large stump after tree removal, or dealing with multiple stumps, commercial-grade grinders offer efficiency and thoroughness that smaller units can’t match. Understanding these suitability guidelines means you’ll spend less time and money, and enjoy better long-term results from your stump grinding project. Comparison of Stump Grinder Types: Features, Costs, Efficiency Type of Stump Grinder Best For Average Rental Cost (Per Day) Pros Cons Handheld/Compact Small stumps, tight spaces $75–$125 Affordable, easy to maneuver Limited depth, slow on large stumps Walk-behind/Standard Average residential stumps $95–$200 Efficient, widely available Requires physical effort, not suited for massive stumps Self-Propelled/Commercial Large stumps, multiple stumps $250–$400 Powerful, deep grinding, professional results Expensive, larger learning curve Vertical Stump Grinder Deep-rooted or very large stumps Special order/pro only Deep penetration, very efficient for big jobs Not for DIY, usually only with tree services The Step-by-Step Stump Grinding Process Explained Initial assessment of the tree stump: Begin by evaluating the tree stump for size, type, age, and condition. Determine how deep to grind and check for rocks or obstructions around and beneath the stump. Look for nearby trees, garden beds, or infrastructure that could be affected. Preparation and safety checks: Clear the area of debris, mark utilities, and establish protective barriers. Don’t forget essential protective equipment—helmet, gloves, and safety glasses—to safeguard against flying wood chips and machine mishaps. Using the stump grinder effectively: Position the grinder over the stump and operate according to the manufacturer’s instructions. Work in slow, sweeping arcs to chip down inches at a time, aiming to reach the recommended depth below ground level. Continually check for hidden roots or objects that might jam the grinder. Debris management after stump grinding: Once complete, shovel away the mound of wood chips and sawdust. You can use them for mulch or compost, or have them hauled away by your tree service. Fill the hole with fresh soil for a seamless yard finish and to support future landscaping. Each step requires patience and attention to detail for both safety and landscape integrity. Skipping preparation, misusing equipment, or neglecting cleanup is how most issues—and homeowner regrets—arise during stump grinding. For a deeper dive into how stump grinding can transform your yard and the specific hazards it helps you avoid, you might find it helpful to review the key reasons not to delay stump grinding and the hidden dangers it prevents. This resource offers practical insights that complement the step-by-step process outlined here. Top Secrets Professionals Don’t Share About Stump Grinding Hidden risks in improper stump grinding: Shallow grinding risks regrowth or, worse, fungal infestations that may jeopardize nearby plants. Many homeowners are surprised when mushrooms or shoots appear months later—an avoidable outcome with thorough grinding. Soil, root, and regrowth considerations: Pros always assess how the roots of a removed tree connect with the surrounding landscape. Sometimes, grinding too shallow leaves root remnants that encourage pest activity or destabilize soil structure. Best times for efficient stump removal: Most professionals recommend grinding in late fall or early spring when the ground is firm but not frozen, reducing mess and ensuring machinery runs smoothly. Stump grinding tips from leading tree services: Experienced arborists rotate grinder teeth frequently and avoid wet weather to ensure finer wood chip debris and less yard disruption. "The techniques we use today in stump grinding prevent issues that can show up years later in your landscape." – Certified Arborist Essential Safety Tips for Effective Stump Removal Protective gear for operators: Always wear sturdy boots, gloves, a helmet, and high-quality eye protection. Using the right protective equipment shields you from flying wood chips and machine debris. Safe stump grinder handling procedures: Read all operational manuals. Use both hands on controls, keep bystanders away, and always power down before servicing or repositioning the grinder. Never attempt to dislodge jammed wood chips with the machine active. Managing potential hazards around the worksite: Clear stones, glass, and metal from the zone, and mark all underground utility lines before grinding. Creating an organized, hazard-free area around the tree stump drastically lowers injury risk and equipment damage, whether you’re a do-it-yourselfer or hiring a professional. Should You Hire a Pro or DIY Your Stump Grinding? Deciding between hiring a pro or tackling stump grinding as a DIY project hinges on cost, expertise, and risk tolerance. Professionals bring specialized equipment, years of experience, and full insurance coverage—meaning faster, safer results and protection from accidental property damage. DIY options save on labor but often result in rental and transportation fees, and expose you to learning curves and safety hazards. For small or accessible stumps, a competent homeowner can rent a stump grinder from a local supplier and finish the job with some effort. For complex removals, multiple tree stumps, or scenarios near structures or underground utilities, hiring a professional arborist or tree service is the safer choice. Always compare rental and service quotes, factoring in equipment size and your own risk comfort. Pros and Cons: Hiring a Pro vs. DIY Stump Grinding Hiring a pro ensures the fastest, cleanest, and least risky outcome—with the added benefit of professional cleanup and soil restoration. Professional tree services know how to match grinder types to each unique tree stump situation, reducing the chances of overlooked roots or soil problems. DIY stump grinding can be rewarding and budget-friendly for smaller jobs, but mishandling machinery or misjudging grinding depth can result in lingering stumps, regrowth, or personal injury. Remember, stump grinders are powerful machines that demand respect, focus, and proper protective equipment. Average Costs for Stump Grinding Services The average national cost to grind a stump ranges between $100 and $400 for a single, accessible stump. Prices may rise to $600 or more for large stumps or if extensive root systems or hard-to-reach areas are involved. Variables include the size of the tree, site accessibility, root complexity, and the specific services offered (such as wood chip removal or ground restoration). By comparison, DIY stump grinder rentals cost on average $100–$400 per day, plus transport and potential damage deposits. Be sure to factor in your time and possible rework due to inexperience or equipment limitations. For multiple tree stumps or those in sensitive locations, professional tree service is often worth the investment due to efficiency, speed, and peace of mind. DIY vs. Professional Stump Grinding: Time, Cost, Expertise Solution Average Time (Per Stump) Estimated Cost Skill Required Risk Level DIY Rental 2–6 hours $100–$400/day Moderate—must read all instructions and practice safety Medium to High Pro Tree Service 30 min–2 hours $100–$600+ None (leave it to professionals) Low Stump Grinding Aftercare: What Comes Next? How to use stump remover for complete removal: For any persistent root fragments or leftover wood, applying a chemical stump remover can help break down material that a grinder couldn’t reach. Just follow all manufacturer and environmental guidelines for safe and responsible use. Preventing tree stump regrowth: To stop the return of unwanted shoots, be sure the grinding removes the stump at least 6–12 inches below ground level, and check the site for active root growth. Occasionally, using a root barrier or targeted herbicide is warranted, especially near lawns or gardens. Landscaping options post-stump removal: Once the hole is backfilled, you can replant grass, create a flower bed, or install a new tree in the cleared spot. Fresh wood chips can be used as mulch elsewhere—but be mindful they decompose over time, altering soil nitrogen levels. Healthy aftercare ensures your yard fully recovers and looks better than ever. People Also Ask: Stump Grinding Questions Answered How much does it usually cost to grind a stump? Professional stump grinding services typically cost $100–$400 per stump, depending on the size of the tree, accessibility, and depth. Difficult or extensive root systems, multiple tree stumps, or removal of large wood chip debris can push prices higher. Always request detailed quotes from multiple tree service providers before making a decision. Can you grind a stump yourself? Yes, you can grind a stump yourself by renting a stump grinder from a hardware or garden center. While it’s cost-effective for small, accessible stumps, it requires strength, careful safety practice, and a willingness to learn. Be mindful that mishandling equipment or underestimating the project can result in injury or incomplete stump removal. Is stump grinding worth the cost? For most homeowners, stump grinding is absolutely worth the investment. It eliminates eyesores, prevents pest and fungal problems, and increases yard usability. Professional grinders work faster and deeper than most rental units, ensuring lasting results and preserving your landscape’s value. Is it better to grind or dig out stumps? It depends on your goals. Grinding is usually best for average yards—it’s cleaner, less disruptive, and affordable. Digging out stumps removes all roots and is best when replanting large trees or constructing foundations, but it’s labor-intensive and can damage the surrounding area. Most homeowners find stump grinding the best all-around solution. Stump Grinding FAQs for Homeowners How deep should the stump be ground? Grind at least 6–12 inches below ground level for effective prevention of regrowth and future landscaping ease. Do stump grinders remove all roots? No, stump grinders mainly target the wood above ground and just below surface level. Major roots remain and decay over time, though deeper grinding can address more root material. Is there an eco-friendly way to do stump removal? Yes! Use the wood chips as mulch, let roots decompose naturally, and avoid chemical stump removers unless absolutely necessary for regrowth control. What risks are involved in improper stump grinding? Regrowth, fungal infestations, pest attraction, soil instability, and even damage to underground utilities—all can result from hasty or shallow grinding. Follow safety protocols and hire pros when in doubt. Key Takeaways From Stump Grinding Secrets Thorough planning and the right stump grinder are crucial for safe, efficient removal. Professional stump grinding offers efficiency and safety, saving time and reducing risk. Long-term benefits depend on expert techniques that prevent regrowth and soil issues. If you’re ready to take your landscaping results to the next level, there’s even more to discover about achieving a flawless yard after stump removal. Explore how the magic of stump grinding can unlock new possibilities for your outdoor space—from advanced aftercare to creative landscaping ideas. This next step will help you maximize the value of your investment and ensure your yard remains healthy, beautiful, and hazard-free for years to come. Dive deeper and transform your landscape with expert-backed strategies and inspiration. Grow Your Landscaping Expertise—Call 203-271-7991 or Visit TreeGuardianNews.com to Subscribe

Terms of Service

Privacy Policy

Core Modal Title

Sorry, no results found

You Might Find These Articles Interesting

T
Please Check Your Email
We Will Be Following Up Shortly
*
*
*