Add Row
Add Element
Tree Guardian News
update
Tree Guardian News
update
Add Element
  • Home
  • Categories
    • Storm Shield
    • Roots & Routes
    • Disease Detective
    • Insurance Intel
    • DIY Arborist
    • Futureproof Foliage
    • Pro-Partner Spotlight
    • Arborist Stories
    • Tree Care Blog
    • Tree Guardian News Blog
SUBSCRIBE TO NEWSLETTER 
  • update
  • update
  • update
  • update
  • update
  • update
  • update
September 14.2025
1 Minute Read

Struggling with leaf spot disease? Here’s the fix

Did you know that leaf spot disease plagues over 3,000 plant species worldwide, inflicting billions in crop losses each year? If your beloved trees and shrubs are showing mysterious spots, you’re not alone. This comprehensive guide tackles leaf spot disease from the ground up so you can identify, manage, and prevent it—restoring the beauty and health of your garden.

Unveiling the Leaf Spot Disease Crisis: How Widespread Is It?

“Over 3,000 plant species are affected globally by leaf spot disease, causing billions in crop losses annually.”

Leaf spot disease represents a major challenge for gardeners, landscapers, and farmers alike. Affecting trees and shrubs across continents, these spot diseases undermine agricultural yields, urban green spaces, and our personal landscapes. The prevalence of leaf spot pathogens—including both fungi and bacteria—means that virtually any region with sufficient humidity and a susceptible plant population may experience outbreaks. From Kentucky bluegrass and perennial ryegrass to broadleaf ornamentals, spot and melting symptoms threaten a vast array of host plants by weakening their leaf tissue and sometimes leading to severe leaf drop.

What’s alarming is not just the frequency but also the speed at which leaf spot disease spreads. In wet weather, pathogens flourish, attacking leaf blades and creating unsightly brown or black spots. If left unchecked, these infections can progress, expanding to cover large portions of the foliage and triggering cascading issues such as drought stress, increased disease development, and weakened crowns and roots. In short, almost every gardener will encounter spot diseases at some point—making early recognition and targeted intervention crucial for maintaining the vitality of your landscape.

Vivid close-up of tree leaves heavily affected by leaf spot disease, showing brown and yellow lesions, natural appearance, stillness, Photorealistic High Fidelity Lifelike, outdoor garden environment with blurred healthy foliage in background, highly detailed, visible water droplets, soft natural daylight, vibrant greens and browns, shot with a macro lens. Leaf spot disease on tree leaves

What You’ll Learn About Leaf Spot Disease

  • Essential facts and identification tips for leaf spot disease
  • Key differences between leaf spot, spot disease, and other spot diseases
  • Comprehensive management strategies for leaf spot diseases
  • When and how to use chemical and organic control methods
  • Tips to prevent future outbreaks of leaf spot and melting in your trees and shrubs

Understanding Leaf Spot Disease: Symptoms, Causes, and Impact

What is Leaf Spot Disease? Defining Spot Diseases on Trees and Shrubs

Highly detailed illustration of a tree next to a shrub with labeled diagrams showing different types of leaf spot symptoms, educational, neutral expression, Photorealistic High Fidelity Lifelike, botanical garden setting, detailed leaf textures with visible disease markings, dynamic light filtering through upper foliage, sharp high resolution, vibrant greens, natural daylight, shot with a wide-angle lens. Leaf spot and spot diseases differences

Leaf spot disease is an umbrella term for a range of fungal and bacterial infections that cause distinct, often circular, discolored areas (spots) on the leaves of trees and shrubs. These spot diseases vary by the spot pathogen involved—most commonly fungal species like Cercospora, Septoria, and Phyllosticta—but share a common mode of attack: they invade leaf tissue, disrupt photosynthesis, and, if uncontrolled, lead to leaf melting and premature drop. Leaf blades targeted by a leaf spot pathogen usually show initial symptoms as small, water-soaked lesions that may have yellow halos.

The complexity of spot diseases lies in their diversity and adaptability. Some only target specific species, like the infamous leaf spot disease in Kentucky bluegrass, while others affect a broad range of host plants. The resulting stress can trigger widespread spot and melting, which—beyond aesthetics—reduces the plant’s vigor, exposes it to further attacks, and, in severe cases, may kill it outright. Recognizing the specific signs of these diseases is the first step in successful intervention and landscape recovery.

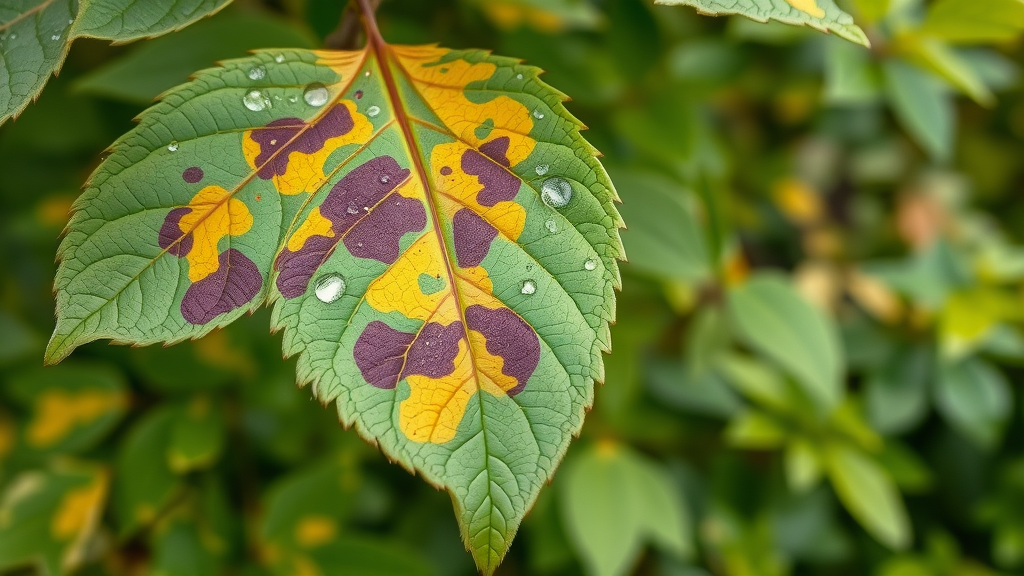
Recognizing Leaf Spots: Visible Symptoms and Patterns

To catch leaf spot disease early, you need to know its visual signatures. Leaf spots generally start as small, clearly defined lesions, often brown or black in color, that appear on the upper surface of the leaf blade. Over time, these leaf spots may merge to form larger blotches, particularly if the plant is under environmental stress or if the weather remains wet. Some spot diseases are distinct in presentation; for example, Septoria spots usually have a grayish center and a dark margin, while Cercospora lesions appear as small, angular spots that readily enlarge during periods of high humidity.

As the spots enlarge, the affected leaf tissue may turn yellow, wilt, and eventually die. In more advanced cases, entire leaves can melt away, a process exacerbated by secondary infections or persistent poor weather. The pattern of these symptoms can help pinpoint the causal fungus or bacteria involved and identify the susceptible host plant. If spotted early enough, targeted intervention can prevent significant damage and keep your trees and shrubs looking their best throughout the season.

The Science Behind Spot Pathogens: Common Leaf Spot Pathogens and Disease Development

Most leaf spot pathogens are fungi or bacteria that overwinter in fallen leaves, soil, or infected plant debris, ready to re-infect when warm, humid conditions return. Fungi such as Colletotrichum, Alternaria, and various Pseudomonas species are infamous for their rapid disease development under favorable conditions. These pathogens enter through wounds or natural openings in the leaf blade, disrupting water regulation, nutrient uptake, and weakening the plant’s defenses against drought stress and secondary invaders. The cycle of infection usually begins with wet weather in spring or early summer, when spores or bacteria splash onto healthy foliage.

Each plant-pathogen pairing has its own set of vulnerabilities and tendencies. Some pathogens affect only certain species—classic examples include the leaf spot pathogen attacking Kentucky bluegrass or perennial ryegrass—while others are generalists. Understanding which organisms are at play in your landscape helps determine the most effective control strategies, as well as practical steps for disrupting their lifecycle and reducing future outbreaks. This scientific insight lays the groundwork for both immediate relief and long-term disease management.

Common Leaf Spot Pathogens vs. Associated Plant Hosts
Pathogen Description/Type Typical Host Plants
Cercospora spp. Fungus Trees, shrubs, broadleaf ornamentals
Septoria spp. Fungus Perennials, tomatoes, poplars, bluegrass
Colletotrichum spp. (Anthracnose) Fungus Maples, oaks, fruit trees, lawns
Pseudomonas spp. Bacteria Various shrubs, vegetable crops
Alternaria spp. Fungus Roses, fruit trees, annuals

Risk Assessment: When Does Leaf Spot Disease Become a Serious Problem?

Factors Promoting Leaf Spot and Melting in Different Species

Certain species of trees and shrubs are more vulnerable to leaf spot and melting due to traits like thin cuticles, dense canopies, or poor air circulation. Host plants with lush, compact foliage retain moisture, creating an environment ripe for spot pathogens to thrive. Kentucky bluegrass and perennial ryegrass, for example, commonly experience severe leaf spot in cool, moist springs, while ornamental maples may see spot diseases peak during summer humidity. Gardeners might also observe that repeated outbreaks occur in locations with heavy shade, excessive irrigation, or under-fertilized soils—all of which stress plants and compromise their ability to fend off leaf spot pathogens.

Human practices can inadvertently contribute to the risk. Planting species that are highly susceptible to a particular leaf spot pathogen or failing to remove fallen leaves (which harbor the causal fungus) creates a persistent cycle of infection and reinfection. Overcrowding, lack of selective pruning, and infrequent inspection also make it easier for spot diseases to take hold. Knowing these risk factors empowers you to adjust your landscape maintenance strategies and choose more resilient plant varieties, ultimately reducing disease severity and recurrence over time.

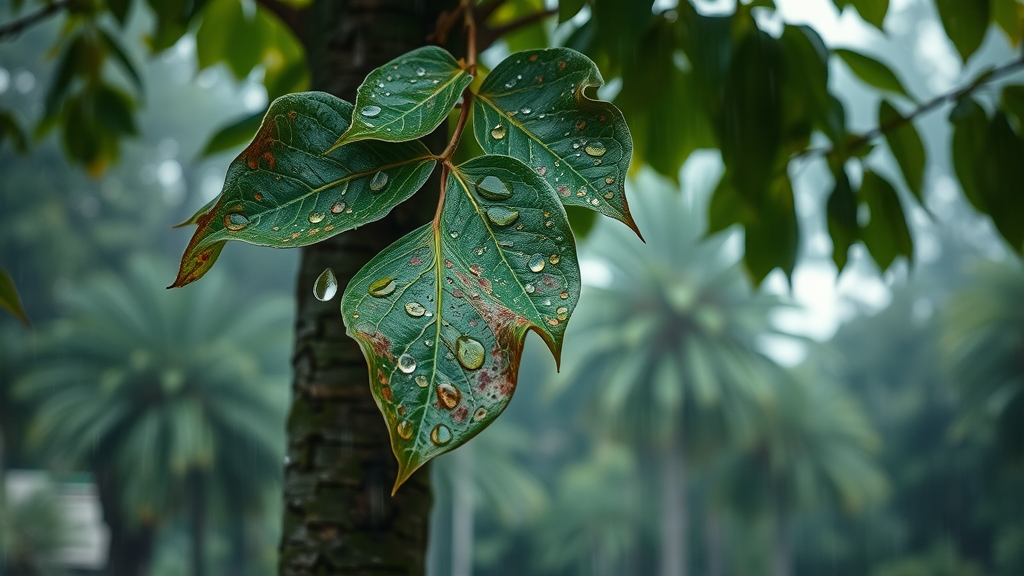
Disease Development and Environmental Triggers

The disease development of leaf spot is tightly linked to environmental conditions. Warm, wet weather accelerates the spread of spot pathogens by splashing spores from infected leaves to healthy ones, while cool nights and prolonged leaf wetness further favor infection. These patterns explain why outbreaks often follow heavy rainfall or persistent humidity. Periods of drought stress weaken plant defenses, ironically increasing vulnerability to opportunistic pathogens once moisture returns. In contrast, dry spells may slow disease progression but do little to eliminate the underlying threat, as spores can remain viable on plant debris and soil until conditions once again become favorable.

Natural resources—including air, soil, and water quality—also play a role in the spread and management of spot diseases. Pollution, improper irrigation, and unsanitary gardening practices accelerate disease cycles and reduce the efficacy of both chemical and cultural controls. In essence, understanding the key environmental triggers of leaf spot disease allows you to time your interventions more effectively and protect both the productivity and aesthetics of your green spaces throughout the year.

Dramatic scene of a tree during a humid, rainy season showing the progression of leaf spot disease, concerned natural expression, water droplets forming and splashing, Cinematic, lush but misty park landscape background, highly detailed rainfall and wet surfaces, dynamic elements with motion blur from falling raindrops, deep greens and earth tones, diffuse overcast lighting, shot with a 50mm lens. Leaf spot disease in wet weather

Complete Leaf Spot Disease Management: Step-by-Step Guide

Immediate Actions: What to Do When You Spot Disease on Leaves

  1. Isolate affected trees and shrubs. Prevent disease spread by creating a buffer space between infected and healthy plants.
  2. Remove and safely destroy infected leaves. Promptly collect fallen leaves and prune away diseased foliage, taking care not to spread spores to healthy leaf blades.
  3. Disinfect pruning tools to prevent spread. Use a 10% bleach solution or rubbing alcohol between cuts to kill residual spot pathogens on equipment.

Gardener carefully pruning and removing diseased leaves from a shrub, focused expression, gently handling pruners, Photorealistic High Fidelity Lifelike, garden workspace background with visible bag for disposal, highly detailed hands and tools, subtle movement of leaves, earthy colors, soft sunlight, shot with a standard lens. Removing leaf spot disease leaves

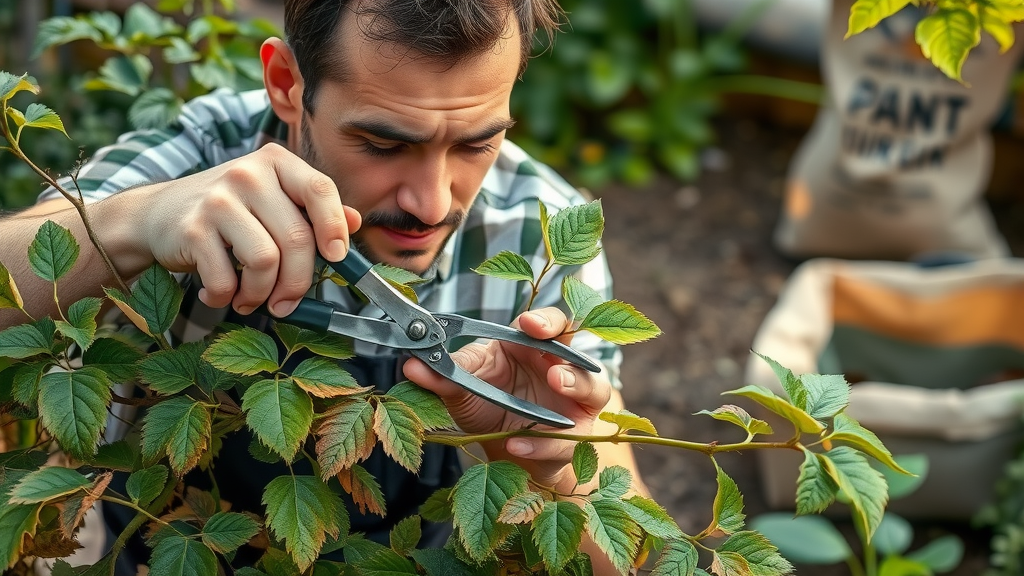
Speed is critical when dealing with leaf spot disease. The first step is to contain the infection by isolating or removing diseased trees and shrubs from direct contact with healthy ones. Next, collect every visible fallen leaf and destroy it—never compost infected material, as this will only spread the causal fungus. Prune affected areas with sharp, sanitized tools and bag debris for landfill disposal. If chemical control is needed, wait until conditions are dry, and apply according to label instructions to maximize efficacy and minimize environmental harm. Regular sanitation breaks the infection cycle and lays the foundation for further integrated management.

Effective Chemical Control: Fungicides for Leaf Spot Disease

Chemical control is often necessary for outbreaks of leaf spot diseases that threaten large or valuable plantings. Fungicides containing chlorothalonil, copper, or mancozeb are standard for most spot pathogens, but always check that your product is compatible with your host plant species. Timing and coverage are vital: apply treatments at the first sign of spot disease, and re-treat as rainfall or rapid new growth dictates. Be mindful, however, that chemical control should be part of a holistic approach—it will suppress the current outbreak but cannot eliminate spores resting on plant debris or soil. Always follow cooperative extension or manufacturer guidelines regarding dosage and re-entry intervals for safe, effective applications.

Organic alternatives, such as neem oil or potassium bicarbonate, may help prevent new infections but are less effective for severe leaf spot or melting. Regardless of your chosen intervention, combine topical treatments with cultural changes—such as improved airflow and sanitation—to maximize results and keep your landscape on the road to recovery.

Preventive Measures: Cultural Practices for Spot Diseases Control

  • Proper watering techniques. Water at the base of plants in the morning, avoiding wetting the foliage to deter leaf spot pathogens.
  • Adequate plant spacing for airflow. Ensure enough room between trees and shrubs to improve breeze and reduce leaf wetness.
  • Soil health optimization. Improve drainage and structure by adding organic matter, reducing susceptibility to disease development and root-dwelling pathogens.
  • Selecting resistant varieties. Choose plants bred for resistance to common leaf spot pathogens to minimize future outbreaks.

Adopting these preventive practices is vital to breaking the cycle of spot diseases. Adjust irrigation systems, avoid overhead sprinklers, and mulch beds with composted material to boost plant immunity. For long-term site health, test your soil annually and correct nutrient deficiencies. When replacing plants or expanding beds, research and select cultivars known for their tolerance to the prevailing leaf spot disease threats in your area, as advised by local cooperative extension services. These simple, science-backed strategies work together to reduce reliance on fungicides and ensure your landscape remains vibrant season after season.

Long-Term Strategy for Leaf Spot and Melting Prevention

Sustainable Solutions for Managing Spot Pathogens

To curtail spot and melting cycles into the future, embrace sustainability as a core landscape principle. Start by fostering biodiversity in your plantings—diverse gardens are less likely to undergo devastating outbreaks, since spot pathogens have fewer concentrated targets. Integrate cover crops or companion plants that repel fungal spores, and take advantage of beneficial microbes that suppress leaf spot pathogens at the soil level. Rotate plant families seasonally and prioritize organic amendments to create a resilient ecosystem that naturally resists disease development.

Mulch not only conserves moisture and regulates temperature, but also forms a physical barrier that minimizes splash dispersal of infectious spores after rainfall. Commit to regular, holistic care—pruning, watering, and feeding—for your trees and shrubs and you’ll promote natural resources that tip the balance towards plant health and away from chronic spot disease problems. Education and prevention go hand in hand: the more you understand your landscape, the better equipped you’ll be to outwit leaf spot and its microbial army.

Monitoring Trees and Shrubs: Early Detection of Leaf Spot Diseases

Consistent, proactive monitoring is the cornerstone of leaf spot disease management. Schedule weekly checks during peak seasons, focusing on the lower and inner canopy where humidity and pathogen pressure are highest. Early detection of isolated leaf spots allows for immediate action—removing affected foliage, disinfecting tools, or applying fungicides before disease development reaches a tipping point. Document symptoms and weather patterns in a garden journal for reference in future years.

Aerial view of a diverse healthy garden interspersed with occasional trees with subtle leaf spot symptoms, hopeful tone, seasonal change in foliage, High Fantasy, park-like landscape with winding paths and visible maintenance staff, highly detailed, natural breeze moving branches, fresh spring colors, early morning golden-hour lighting, shot with a drone camera. Monitoring leaf spot disease in garden

Collaborate with local cooperative extension or community gardening groups to identify emerging pathogens and share management tips. Leverage diagnostic guides or mobile apps for rapid identification if new or unusual symptoms arise. By embedding disease monitoring into your gardening routine, you’ll ensure your trees and shrubs remain healthy, productive, and beautiful all year long.

People Also Ask About Leaf Spot Disease

How do you get rid of leaf spot disease?

Eliminating leaf spot disease requires a combined strategy. Start by removing and destroying all infected foliage to reduce spore load. Apply a fungicide labeled for your plant species at the first sign of symptoms, following manufacturer directions closely. Maintain excellent garden hygiene—clean fallen leaves, disinfect tools, and minimize overhead watering. Finally, bolster your plants’ resistance with proper fertilization, adequate spacing, and by selecting resistant varieties where possible. Keeping up with these steps not only gets rid of visible leaf spots but also stops future outbreaks in their tracks.

Can you save a plant with a leaf spot?

Yes, most plants with leaf spot disease can be saved if you act quickly. Prompt removal of diseased leaves, application of appropriate fungicides, and correction of underlying care issues (such as poor drainage or nutrient deficiencies) will help the plant recover. However, if severe leaf spot has already compromised more than half the foliage or spread to the crowns and roots, recovery may be slower or incomplete. Ongoing support, such as improved watering practices and regular feeding, encourages robust regrowth and fortifies the plant against recurrence.

Is leaf spot disease contagious?

Absolutely—spot pathogens can easily be transferred from plant to plant by splashing water, insect activity, or even contaminated gardening tools. This is why sanitation and prompt isolation of infected trees and shrubs is so important. Take care not to work among wet, diseased foliage, and always sterilize pruning equipment between plants to reduce the risk of spreading leaf spot pathogens throughout your landscape.

Which fungicide is used for leaf spot?

Several fungicides are effective for most leaf spot diseases. Common active ingredients include chlorothalonil, maneb, mancozeb, copper compounds, and some organic options like neem oil. Product selection should depend on your plant species, disease severity, and local recommendations. Thoroughly read all product labels and, if in doubt, consult your cooperative extension for guidance on chemical control and best practices for your host plants.

Expert Quotes on Managing Leaf Spot Diseases

“Regular monitoring and prompt foliar management go a long way in controlling leaf spot pathogens before serious damage occurs.” — Dr. Aria Fields, Plant Pathologist

Key Takeaways: Mastering Leaf Spot Disease Solutions

  • Leaf spot disease can be soothed and managed with prompt intervention
  • Both chemical and non-chemical strategies are vital
  • Guided prevention and early monitoring safeguard trees and shrubs

Inspiring visual of a revitalized garden with disease-free, vibrant foliage on trees and shrubs, satisfied gardener in background, smiling and watering plants, Cinematic, well-maintained residential backyard, highly detailed leaves and healthy plants, soft breeze moving branches, bright saturated greens, early afternoon sunlight, shot with a portrait lens. Healthy trees and shrubs after leaf spot disease control

FAQs About Leaf Spot Disease and Spot Diseases

What are the first signs of leaf spot diseases?

First signs include small, round or elliptical spots on the leaf surface, usually brown, black, or gray with a defined margin. Leaf blades may display yellow halos or become water-soaked around the lesions. These symptoms often emerge after periods of high humidity or rainfall, signaling that spot pathogens are beginning their infection cycle. Early identification of these symptoms is critical to quick intervention and prevention of widespread spot and melting damage.

Are all trees and shrubs equally susceptible to spot disease?

No—susceptibility varies greatly by species and even among cultivars. Some trees and shrubs, like maples, dogwoods, and Kentucky bluegrass, are more frequently targeted by certain leaf spot pathogens. Others have natural defenses or have been bred for resistance. Local environmental factors like air circulation, moisture, and soil health also influence how readily a plant may develop spot disease. Choosing the right species for your site and using cultural controls can markedly reduce risk.

Can spot pathogens survive winter?

Yes, most spot pathogens overwinter in fallen leaves, stems, or plant debris, as well as soil. They survive as spores or dormant structures, reactivating when mild, wet weather returns. This is why good autumn sanitation—removing and destroying all plant litter—is crucial for minimizing next year’s outbreak.

Is there a permanent cure for leaf spot disease?

Unfortunately, no single permanent cure exists for leaf spot disease. However, integrating good cultural practices, prompt removal of infected material, using resistant varieties, and strategic chemical or organic treatments provides lasting, effective control. Ongoing vigilance and management are your best defense against this persistent garden adversary.

Conclusion: Beat Leaf Spot Disease and Restore Plant Vitality

With proactive care, timely intervention, and smart landscape choices, you can control leaf spot disease and enjoy lush, healthy trees and shrubs year-round.

Grow Your Landscaping Expertise: Next Steps

Grow your landscaping expertise—call 203-271-7991 or visit TreeGuardianNews.com to subscribe.

Leaf spot disease is a prevalent issue affecting a wide range of plants, leading to unsightly foliage and potential plant health decline. To effectively manage and prevent this disease, it’s essential to understand its causes and implement appropriate control measures.

Understanding Leaf Spot Disease

Leaf spot diseases are caused by various fungal and bacterial pathogens that thrive in moist conditions. Symptoms typically include small, discolored spots on leaves, which can merge and lead to significant leaf damage or premature drop. The disease cycle often begins with pathogens overwintering in fallen leaves or plant debris, becoming active during wet weather when spores are splashed onto healthy foliage. (missouribotanicalgarden.org)

Management and Prevention Strategies

Effective management of leaf spot disease involves a combination of cultural practices and, when necessary, chemical treatments:

  • Cultural Practices:
  • Sanitation: Regularly remove and destroy fallen leaves and infected plant material to reduce the source of inoculum. (missouribotanicalgarden.org)
  • Watering Techniques: Water plants at the base to avoid wetting the foliage, and irrigate early in the day to allow leaves to dry before nightfall. (missouribotanicalgarden.org)
  • Air Circulation: Prune plants to improve air flow and reduce humidity around foliage, creating an environment less conducive to pathogen growth. (missouribotanicalgarden.org)
  • Resistant Varieties: When available, select plant varieties that are resistant to leaf spot diseases. (umass.edu)

  • Chemical Control:

  • In cases of severe infection, fungicides may be applied as a preventive measure. It’s important to identify the specific pathogen to choose an effective fungicide and to apply treatments early in the disease cycle for optimal results. (missouribotanicalgarden.org)

By integrating these strategies, gardeners and landscapers can effectively manage leaf spot diseases, preserving the health and aesthetics of their plants.

Roots & Routes

37 Views

0 Comments

Write A Comment

*
*
Related Posts All Posts
11.10.2025

DIY Stump Removal Tricks for Quick Success

Ever stared at a stubborn tree stump in your yard and wondered, “Is there a fast, safe, and simple way to get rid of this eyesore myself?” DIY stump removal isn’t just possible—it’s practical, efficient, and can transform your outdoor space. In this comprehensive guide, we’ll unpack expert tools, insider tricks, and little-known methods to remove a tree stump with results you’ll love. Whether you want a lush lawn or simply peace of mind, these techniques put success at your fingertips. Ready to reclaim your yard? Let’s dig in! Curious About DIY Stump Removal? Discover the Truth Behind Quick and Effective Techniques If you’re seeking diy stump removal tricks that actually work, you’re not alone. Tree stumps are more than inconvenient—they can be tripping hazards, attract pests, and derail your landscaping plans. Thankfully, you don’t need costly tree removal companies or complicated equipment to tackle the job. This article reveals how to remove a tree stump quickly and safely, whether you choose hands-on effort, a stump grinder, or eco-friendly solutions like epsom salt and potassium nitrate. You’ll gain vital insights on how to match methods to stump size, understand time and cost trade-offs, and operate safely for best results. With smart planning and the right tools, even large stumps become manageable. We’ll walk you step by step through every approach, showcase what to expect from mechanical vs. all-natural options, and arm you with safety tips and post-removal cleanup pointers. It’s time to debunk myths and share proven strategies you can apply today—because in the world of stump removal, knowledge is power and time is money. What You'll Learn About DIY Stump Removal How to choose the best diy stump removal method Insider tricks for removing a tree stump quickly Comparison of natural versus mechanical stump removal Expert guidance on safety and environmental impact Why Remove a Tree Stump? Hidden Hazards and Benefits Keeping a tree stump in your yard might seem harmless, but the consequences go deeper than appearance. Tree stumps can become unexpected tripping hazards, especially on busy lawns or areas where children play. They often serve as breeding grounds for pests like termites and carpenter ants, potentially threatening nearby trees or even your home’s foundation if the stump remains unchecked. Ignoring a stump can also create an unsightly focal point, undermining curb appeal and reducing your property’s value over time. Aside from safety risks, leftover tree stumps can impede lawn maintenance. Running over a stump with a lawnmower can damage equipment and leave ragged patches of dead grass. If you’re planning enhancements, such as installing a patio, garden bed, or electric fence, the stump becomes an obstacle requiring removal. Understanding these hidden hazards highlights why stump removal is often more than a cosmetic concern—it’s a smart step in home improvement and effective landscape management. Tree Stump and Tripping Hazard Risks in Your Yard Leaving a tree stump in your yard introduces a persistent tripping hazard. This risk is especially pronounced around walkways, playgrounds, or active family areas. During the day, grass may grow up around the stump, camouflaging it and increasing the likelihood of an accident. At night or in low-light conditions, the hazard becomes even more pronounced. The consequences? Skinned knees, twisted ankles, or worse injuries, all from a stump that could have easily been removed. Beyond physical risk, stumps provide shelter for wildlife and insects that can disrupt a healthy lawn, and moisture around the stump may contribute to fungal growth, further increasing safety risks for children and pets. Mitigating tripping hazards is a top priority for families seeking a safe, accessible outdoor space. Neighborhoods where outdoor activity on this service is common, such as playing catch or maintaining a charcoal grill, can see stumps increase insurance liability and hazard potential. Removing a tree stump isn’t just a visual improvement—it’s a practical way to avoid personal injury and costly claims. Prioritize removing old stumps to ensure both beauty and safety in your landscape. Benefits of Stump Removal for Lawn Health and Curb Appeal The benefits of tree stump removal stretch far beyond hazard reduction. A cleared yard enhances curb appeal instantly, making your property more inviting and marketable. Your lawn becomes safer for children, pets, and guests, while mowing and maintaining the grass are much easier. Additionally, removing the stump helps prevent the regrowth of unwanted shoots, maintaining a uniform lawn that’s easier to landscape or upgrade with features like a garden, play area, or electric fence. Without a stump, you can even out your yard, reseed grass, or lay sod—restoring the area to its natural beauty. This process eliminates pest habitats and helps halt the slow decay that might otherwise attract fungi or wood-boring insects. If you’re considering selling your home or simply want peace of mind and a healthier outdoor environment, stump removal is a clear win. Whether you choose to remove a tree stump yourself or hire a tree service, this upgrade pays off in both short-term enjoyment and long-term property value. "Neglecting a tree stump isn’t just an eyesore—it’s a tripping hazard and an invitation for pests. DIY stump removal saves frustration and transforms your yard." Top DIY Stump Removal Methods: Stump Grinders, Natural Solutions, and More There are several effective DIY stump removal methods to choose from, each with its unique strengths. Selecting the right option depends on your stump size, timeline, and resources. Manual methods like digging work best for small stumps, while treatments like epsom salt and potassium nitrate dissolve medium and large stumps over time. For fast results on big stumps, nothing beats a mechanical stump grinder. Let’s break down each approach—so you can match your project with the perfect solution and avoid a tree removal headache. The method you choose also impacts your labor, the tools required, and the environmental footprint of your stump removal. If you’re torn between renting a stump grinder or harnessing nature’s chemistry, this section will point you in the right direction with honest, actionable comparisons. For those looking to optimize their yard maintenance beyond stump removal, integrating seasonal tree care can make a significant difference. Discover practical strategies in these fall tree trimming tips that most homeowners overlook to keep your landscape healthy and hazard-free year-round. How to Remove a Tree Stump by Hand Tools required for manual diy stump removal Best for small tree stumps Step-by-step removal process Manual removal is an effective approach for small tree stumps and gives you complete control over the process. Start by gathering essential tools: a sturdy shovel, a digging bar, a mattock or pickaxe, and (for stubborn roots) an axe to chop through thick wood. Select a day with soft soil—ideally after rain. Begin by digging a trench around the stump to expose major roots. Use the digging bar and shovel to widen the trench, then swing the axe or use a hand saw to cut through roots as you encounter them. By rocking the stump gently and clearing outsoil, you can eventually pry it free. This method requires patience but offers clear results, especially if you need to avoid a tree service bill or want to control disposal of chips and debris. The manual approach is best when the stump’s diameter is less than 12 inches and is not located near obstructions like a fence or utility lines. While labor-intensive, it’s a low-cost way to remove a tree stump and grants a sense of accomplishment and peace of mind knowing the job is thoroughly done. Using a Stump Grinder for DIY Stump Removal Choosing the right stump grinder Safety tips and personal protective equipment Efficient operation for large stumps For medium to large stumps, a stump grinder offers unmatched efficacy and speed. Renting a stump grinder from a local hardware store is usually more economical than buying, unless you anticipate frequent use. When selecting a grinder, ensure the cutting wheel is suited to your stump’s size and your yard’s terrain. Safety is paramount—always wear the recommended PPE: gloves, goggles, sturdy boots, and ear protection. Before operation, clear the area of rocks, toys, or debris to avoid injuries or damage to the blade. Read the manufacturer’s instructions thoroughly and check local fire restrictions if grinding generates sparks. Position the grinder over the stump and slowly lower the cutting wheel, moving it back and forth to grind the wood to below ground level. Continue until the stump is fully reduced to mulch, about 8-10 inches below the surface. This method quickly handles big jobs, with most grinders capable of tackling large tree stumps in under two hours. Grinding is fast but generates a lot of chips and dust—plan for cleanup and proper disposal. Despite the higher initial effort, this approach combines efficiency with satisfying results, turning a massive stump into usable mulch while avoiding the cost of a professional tree stump removal service. Natural Solutions: Remove a Tree Stump with Epsom Salt or Potassium Nitrate Scientific principles behind Epsom salt and potassium nitrate Step-by-step guide to chemically rotting a tree stump quickly If physical labor or heavy equipment isn’t an option, consider natural chemical methods to remove a tree stump. Common products include epsom salt (magnesium sulfate) and potassium nitrate, both of which speed up stump decomposition. Begin by drilling deep holes (8–10 inches) into the top and sides of the stump. (Tip: The more holes you drill, the faster decomposition occurs—use a wide drill bit for best results.) Fill the holes with your chosen chemical—a full cup per hole for optimal effect. Cover the stump with a tarp to retain moisture, then wait several weeks. These natural solutions work by drawing moisture out and disrupting cellular processes, effectively starving the wood. Potassium nitrate, commonly sold as a commercial stump remover, can reduce a large stump to soft, crumbly wood in 4–8 weeks. Epsom salt is slower but safer for surrounding soil and easier to source. Both methods minimize environmental impact and are excellent when you need a low-labor, gradual approach—just set your expectations, as even the fastest results take a few weeks. For added speed, cover the stump and keep it moist, turning your patience into success over time. Table: DIY Stump Removal Methods Compared Method Best For Time to Remove Tools Needed Hand Digging Small tree stumps 2–6 hours Shovel, axe Stump Grinder Large stumps 1–2 hours Stump grinder, PPE Epsom Salt Moderate size 8–12 weeks Drill, Epsom salt Potassium Nitrate Large tree stumps 4–8 weeks Drill, potassium nitrate Step-by-Step: How to Remove a Tree Stump Safely Removing a stump safely requires preparation and methodical execution. Whether you choose manual, mechanical, or natural methods, always begin by surveying for underground utilities and clearing the work area. Wear gloves and eye protection for every approach, and keep children and pets away from the site until the job is complete. For larger stumps, assess the soil and stump stability, especially if you need to avoid a tree shift that could endanger nearby structures or fences. Organize your tools before starting, and plan for breaks in physical tasks to prevent overexertion. Prioritize safe tool handling and appropriate storage during and after use for peace of mind. Once the stump is removed, backfill the hole with soil and debris, level the area, and reseed or replant grass to encourage swift recovery. Many DIYers cover the spot with mulch or sod for an instant facelift. These clean-up steps help restore your landscape while eliminating tripping hazards or pest-attracting debris that may remain after removal. Regardless of the method you select, following safety best practices ensures your project ends successfully and injury-free. Preparation for Stump Removal A successful diy stump removal starts with careful planning. Walk around your yard to identify any obstacles, such as rocks, pipes, or power lines—contact utility services if you’re unsure. Gather all required tools, including shovels, mattocks, saws, and personal protective equipment (PPE). For chemical methods, source high-quality epsom salt or potassium nitrate, and check product labels for safety information. Schedule your removal project on a day with favorable weather for comfort and visibility. If you’re using a grinder, reserve rental equipment in advance and ensure you have a safe path for delivery and movement. Remove decorative items, hoses, or electric fence components near your work zone to avoid damage. Place necessary items within easy reach but away from active digging or grinding for safety. With good preparation, you’ll make steady, efficient progress and set the stage for a hazard-free project. Protecting Yourself and Your Yard Safety during stump removal is non-negotiable. Always wear gloves to protect your hands from blisters, sharp roots, or splinters. Sturdy boots shield feet from heavy tools and prevent slips, while long sleeves and safety goggles minimize risk from flying debris and wood chips. If you’re operating a stump grinder, mandatory PPE includes ear protection, a face shield, and snug-fitting clothing to avoid accidents. Mark boundaries around your removal area using cones or rope—this keeps children, pets, and bystanders at a safe distance during the process. If using chemical methods, prevent children and pets from accessing the treated stump. Place a visible marker or cover the site with a tarp, and always store chemicals in a secure location away from heat or sparks. Even when relying solely on hand tools, keep a first aid kit and phone handy in case of minor injuries or emergencies. Prioritizing protective steps is essential for achieving peace of mind and smooth, incident-free completion of your diy stump removal project. Final Cleanup After DIY Stump Removal With the stump gone, it’s cleanup time! Start by removing coarse wood chips, root fragments, and any leftover chemical containers. Use a rake to smooth the soil and fill in low spots; compost or dispose of organic debris according to local guidelines. If large holes remain after removing a tree stump, backfill with topsoil and tamp it down to promote healthy regrowth. For a professional finish, reseed the affected area or lay down fresh sod—this step restores appearance and prevents weeds. Double-check for lingering hazards, such as exposed roots or tool fragments, and store all equipment securely for future use. If you’ve reused chips as mulch, spread them evenly to aid moisture retention elsewhere in your garden. Post-removal cleanup delivers that final touch: a safe, attractive, and renewed yard where you can relax, entertain, or simply enjoy the fruits of your successful project. Congratulations—you’ve mastered every aspect of diy stump removal. Cost and Time: Evaluating the Best DIY Stump Removal Approach Choosing how to remove a tree stump is often about balancing time, money, and effort. Manual methods cost very little (mostly sweat equity), but require several hours of labor. Renting a stump grinder starts at around $100–$150 per day, which makes sense for large stumps or multiple removals. Chemical options have a low up-front cost ($10–$30), but take weeks to see effects—perfect if you’re not in a rush. Don’t forget to factor in costs for PPE and replacement hand tools. While it’s tempting to choose the cheapest solution, “time is money”; sometimes paying a little more for speed pays off, especially if you want to enjoy your refreshed yard sooner. Compare each method closely: manual for small stumps, mechanical for urgency or extensive tree stump removal, and chemical for low-hassle, long-term results. No approach is universally “best”—align your choice with your needs, timeline, and willingness to work, and you’ll get satisfying results without busting your budget. Cost Comparison: Manual, Chemical, and Stump Grinder Manual digging is the most affordable route, costing nothing if you already own common yard tools. Renting a stump grinder for a day averages $100–$200 (plus delivery if needed), but the time savings can be substantial for large stumps. Chemical options, such as epsom salt or potassium nitrate, run $10–$35 for enough product to treat one sizable stump—making them a favorite for patient DIYers. Don’t forget PPE costs (gloves, goggles, boots) and tool wear, which can add $20–$50 if starting from scratch. When you add it up, the most cost-effective method may be a blend: dig by hand for small jobs, use natural decomposition for medium stumps, and rent a grinder if you have multiple or especially tough stumps in your yard. If you’re overwhelmed or short on time, hiring a tree service averages $75–$350 per stump, with prices climbing for hard-to-access or very large projects. Even so, many homeowners find DIY options provide better value and personal satisfaction, especially with proper planning and preparation. Expected Timeframe for DIY Stump Removal Time is a critical factor in the method you choose for diy stump removal. Hand digging takes 2–6 hours, varying with soil, root complexity, and stump diameter. A stump grinder can transform large tree stumps into chips within 1–2 hours, though setup and cleanup may add extra time. Epsom salt and potassium nitrate, while minimal effort, require patience: expect 4–12 weeks for full decomposition, with potassium nitrate acting a bit faster. To accelerate these processes, drill more holes and keep the stump moist under a tarp, but be realistic about natural limitations. Ultimately, your timeframe depends on urgency, project scope, and your own energy level. Plan ahead if you want the job complete before a big event, or start chemical treatment in the off-season for lawn makeovers come spring. Flexibility ensures you don’t sacrifice safety or lawn quality in pursuit of speed. People Also Ask: Expert Answers on DIY Stump Removal What is the fastest way to get rid of a tree stump? The fastest way to remove a tree stump is to use a stump grinder. Renting a stump grinder allows you to reduce most large stumps to mulch in just 1–2 hours. Before grinding, clear the area, wear full PPE, and follow machine instructions closely. Grinding is ideal for speed and efficiency compared to manual or chemical methods, which take much longer—making stump grinders the preferred solution when “time is money.” How to get rid of a stump in 2-3 days naturally? While most natural methods take weeks, the only way to see significant progress in 2–3 days is to combine several tactics: drill holes deeply into the stump, fill them with epsom salt or potassium nitrate, saturate with hot water, and cover with a tarp to lock in heat and moisture. Though this can accelerate internal decay, complete removal will still require additional time. For true removal within days, mechanical grinding remains the only truly quick method. How long does it take Epsom salt to dissolve a tree stump? Using epsom salt for diy stump removal takes about 8–12 weeks to fully decompose a standard-sized stump. The process depends on weather, stump size, and the frequency of chemical application. Drilling additional holes and keeping the area moist and covered will speed up results, but patience is necessary. Epsom salt is best for those who want a low-effort and environmentally gentle approach. What will rot a tree stump quickly? Potassium nitrate is the most effective and fastest rotting agent for tree stumps available to homeowners. Drill holes, fill with potassium nitrate, pour in hot water, and wait 4–8 weeks for substantial softening. Afterward, the stump can be broken apart with an axe or buried. Covering the area and keeping it damp ensures the process moves as quickly as possible. Answers to People Also Ask Speed and ease depend on the method you choose: stump grinders for fast removal, epsom salt for gradual decomposition, and potassium nitrate for the quickest chemical breakdown. Manual digging is labor-intensive but cost-free, while chemical options are safer for pets and children if properly contained and monitored. Prioritize safety and match technique to your timeline and yard environment for best DIY stump removal results. DIY Stump Removal Video Tutorial: Watch Step-by-Step Methods Watch our easy-to-follow explainer covering manual removal, chemical techniques, and safe use of a stump grinder—all demonstrated in a real backyard setting. Essential Tools and Equipment for DIY Stump Removal Stump grinder Shovel Mattock Chainsaw Hand saw PPE (gloves, goggles, boots) Key Takeaways: DIY Stump Removal Success Match removal method to stump size for best efficiency and safety Prioritize PPE and careful planning before starting your project Manual, mechanical, and chemical options suit different budgets and timelines Effective cleanup and restoration ensure a beautiful, stump-free yard Patience and preparation go hand-in-hand for lasting results Frequently Asked Questions About DIY Stump Removal Can I remove a tree stump without heavy equipment? Yes. Small to medium tree stumps can be removed with hand tools such as shovels, mattocks, and axes. This approach is cost-free but requires time and effort. Chemical methods using epsom salt or potassium nitrate allow removal without machinery, but take longer to complete. Are chemical methods safe for pets and children? Chemical stump removers are generally safe when used as directed. Always prevent direct contact with treated stumps, keep pets and children away, and properly mark or cover the area during decomposition. After the process is complete, thoroughly remove and dispose of any remaining chemicals to return your yard to safe, regular use. Conclusion: Take Control—Master DIY Stump Removal Today With the right knowledge, tools, and safety tips, you can achieve fast and effective DIY stump removal and reclaim your outdoor space—no professional needed! If you’re ready to elevate your landscaping skills even further, consider exploring broader tree care strategies that go hand-in-hand with stump removal. Our guide on fall tree trimming tips that most homeowners miss offers valuable insights for maintaining healthy, beautiful trees throughout the year. By combining smart stump removal with seasonal trimming, you’ll create a safer, more attractive yard and set the stage for long-term landscape success. Ready to Tackle DIY Stump Removal? Grow your landscaping expertise—call 203-271-7991 or visit TreeGuardianNews.com to subscribe.

11.09.2025

Tree Stump Extraction Made Easy: What Works Best

Did you realize that over a third of homeowners leave tree stumps behind, exposing themselves to pest infestations and dipping property values? Understanding tree stump extraction isn't just about tidying up your yard—it's critical for safety and curb appeal. This guide breaks down easy, expert-backed ways to banish tree stumps for good, helping you make the best decision for your landscape and budget. The Surprising Truth Behind Tree Stump Extraction in Modern Landscaping Tree stump extraction is often overlooked in modern landscaping, yet the presence of lingering tree stumps can cause more problems than many realize. Whether you're striving for a pristine front yard or trying to maintain healthy trees, learning about the actual impact of tree stumps is crucial. Not only do stumps detract visually, but they also pose significant hazards to people and property. Choosing when and how to remove a tree stump isn't just about looks—it's about fostering a safe, pest-free, and thriving yard. Did You Know? A Startling Statistic on Tree Stump Extraction "Around 36% of property owners surveyed admitted to leaving tree stumps behind, risking pest infestations and lower curb appeal." – National Landscape Association What You'll Learn About Tree Stump Extraction The differences between tree stump extraction, stump removal, and stump grinding Pros and cons of each stump removal method How to select the best tree stump extraction technique for your landscape Key considerations in tree care and tree service planning Expert tips for achieving a healthy, stump-free lawn Why Tree Stump Extraction Matters: Enhancing Your Property Value Leaving tree stumps scattered throughout your yard can significantly detract from your home's curb appeal—and more importantly, from its overall value. Real estate experts and tree service professionals agree: a yard dotted with old stumps signals neglect and may turn away potential buyers. Proper tree stump extraction not only makes your landscape more attractive, but can have practical implications for your finances and property safety. Investing in stump removal or stump grinding is a direct investment in your home's worth and your family's well-being. The Impact of Tree Stumps on Safety and Aesthetics Common hazards caused by leftover tree stumps Tree stumps as a pest and fungi attractor Evaluating the impact on property appearance Leftover tree stumps are more than just unsightly—they're potential tripping hazards, especially for children and visitors. Decaying stumps can also harbor destructive pests, such as termites and carpenter ants, or dangerous fungi that threaten both healthy trees and people. Visually, an old tree stump can make even the most carefully maintained lawn look unfinished, reducing the perceived value of the entire landscape. For homeowners looking to maintain a healthy and attractive yard year-round, it's also important to consider seasonal tree care practices. Incorporating strategies from fall tree trimming tips that most homeowners miss can help prevent future stump issues and support the overall vitality of your landscape. Methods of Tree Stump Extraction: Comparing Stump Removal and Stump Grinding When deciding on the best tree stump extraction method, two main professional options stand out: stump removal and stump grinding. Understanding the differences, costs, and implications of each technique helps determine which suits your landscape needs and long-term plans. Factors such as the stump's size, the local tree species, root system complexity, and the surrounding area will all impact your choice. Here's a comparative look: Method Effectiveness Cost Estimate Time Required Resulting Landscape Impact Stump Removal High $$$ 1-2 hours Large hole, roots extracted Stump Grinding Medium-High $$ 1 hour Mulch remains, roots left Chemical Solutions Medium $ Several days Gradual decomposition Natural Methods Low-Medium $ 2-3 days Environmentally friendly, gradual Stump Removal: Uprooting the Problem When stump removal is most effective Equipment needed Steps in the stump removal process Stump removal is the most comprehensive way to handle tree stump extraction. This process is best for larger tree stumps with extensive root systems, problematic locations, or when planning to replant in the same spot. Professionals use heavy equipment like excavators or winches to unearth the entire root ball and roots attached. The key steps include digging around the stump, cutting major tree roots, and pulling everything from the soil. While it leaves a significant hole that must be refilled, stump removal ensures no regrowth or hidden rot issues later, making it ideal for complete land restoration or construction projects. Stump Grinding: An Efficient Solution How stump grinding works Benefits for tree care and landscaping When to opt for stump grinding over full removal Stump grinding offers a quicker and less invasive approach to tree stump extraction. Using a powerful, spinning grinder, professional tree services shred the exposed tree stump down to ground level, turning it into mulch or wood chips. This method leaves most roots in place and creates minimal disturbance to the surrounding landscape, making it an excellent option for established lawns or areas where minimal disruption is important. Stump grinding is especially useful for smaller trees or when budget is a concern, but remember, deep roots may persist underground and could decompose over a long time. Tree Stump Extraction and the Role of Tree Services How professional tree services approach extraction Common tools and technologies used by tree service providers Top-rated tree service providers tailor their extraction method to the size, species, and condition of your tree stumps. They are trained in tree care best practices and use specialized gear: stump grinders, chainsaws, digging bars, and cranes for challenging root systems. Their expertise ensures minimal risk to healthy trees, reduces soil damage, and promotes proper site restoration. Engaging professionals means quicker results, advanced safety, and peace of mind that your landscape is handled according to local codes and tree care standards. Natural and Chemical Tree Stump Extraction Methods: What Works Fast? Chemical accelerants for decomposing tree stumps Eco-friendly, manual approaches to remove a tree stump Natural ways to get rid of tree stumps without heavy equipment If you want to extract a tree stump without heavy machinery, there are both natural and chemical options. Chemical solutions—such as potassium nitrate or commercial stump removers—work by speeding up the decomposition process. After drilling holes into the stump, pour in the chemical agent, keep the area moist, and wait several days for the stump to soften and begin breaking down. For eco-friendly, natural methods, simply cover the stump with mulch and soil, or use Epsom salt to attract moisture and encourage decay. These options take longer but are gentler on surrounding healthy trees and the environment. Should You Leave the Stump or Remove It? The decision to leave the stump or remove it depends on both functional and aesthetic goals. While it might be tempting to keep a stump that's low to the ground, experts agree that leaving the stump in place can seriously backfire—leading to rotting wood, regrowth of shoots, or creating habitats for unwanted pests. These risks can extend under the surface, threatening the root system of healthy trees and the broader landscape. Consequences of Leaving Tree Stumps in Place Soil quality, regrowth, and pest risks Impact on healthy trees and overall tree care Leaving a tree stump behind can have long-term drawbacks. Decaying stumps affect soil quality by fostering fungal growth and inviting unwanted critters—carpenter ants, termites, and beetles—directly into your yard. Over time, a decaying stump may compete with healthy trees for nutrients and water, or cause unpredictable regrowth by sprouting new shoots. For optimal tree care and a truly healthy landscape, proactive tree stump extraction is the safer choice. Step-by-Step Guide: DIY Tree Stump Extraction Methods Assess the tree stump size and location Gather stump grinding or removal tools Follow safety protocols outlined by tree care experts Execute the chosen extraction method Dispose or recycle the remnants If you decide on a DIY approach to tree stump extraction, there are clear steps to follow for safety and success. First, measure the size of your tree stump and consider its proximity to structures or healthy trees. For stump removal, you’ll need tools like a shovel, digging bar, chainsaw, and possibly a winch for large root balls. Stump grinding requires renting specialized equipment. Always follow safety protocols: wear gloves, goggles, and sturdy footwear, and keep bystanders at a safe distance. Once you cut the stump, dig or grind it out, dispose of the debris responsibly, and fill the hole with quality soil for a seamless finish. Professional Tree Services vs. DIY Tree Stump Extraction While it's tempting to save money with a DIY tree stump extraction, professional tree services offer unmatched expertise, advanced tools, and streamlined safety measures. For particularly stubborn or massive stumps—especially with widespread root systems—professional help is highly recommended. When to Call a Tree Service for Stump Grinding or Removal Tree service expertise: advanced tools and safety measures Cost-benefit comparison of hiring a professional Consider calling in the pros when facing a larger tree, stumps tangled close to structures, or when you lack experience with heavy equipment. Tree service companies use industrial-grade stump grinding machines and can guarantee both speed and thoroughness. Although the cost is higher, this is often offset by minimized risk, faster site restoration, and superior long-term outcomes. Think of it as investing in a headache-free, healthy landscape. Short cinematic explainer: Compare tree stump extraction methods featuring animated demos for removal, grinding, chemical and natural options. Key Considerations for Safe and Effective Tree Stump Extraction Permitting and local regulations for tree stump removal Environmental impact and sustainable tree care Site restoration for healthy trees post-extraction Before any tree stump removal or stump grinding, check local permitting requirements. Some municipalities require permission for major landscape changes or disposal of large root systems. Choosing eco-friendly methods and protecting surrounding healthy trees is also vital. After extraction, restoring your site—by filling holes, leveling soil, and possibly planting grass or new trees—ensures your yard remains vibrant and hazard-free. People Also Ask: Tree Stump Extraction FAQs How much does stump removal typically cost? The cost for tree stump extraction varies based on the stump size, location, and whether you choose a tree service or do it yourself. On average, professional stump removal ranges from $75 to $350 per stump; multiple stumps or difficult jobs may cost more. What is the easiest way to remove a tree stump? Stump grinding is often considered the easiest method for tree stump extraction, especially when performed by a professional tree service. For small stumps, chemical treatments or digging out the roots can also work. How to get rid of a stump in 2-3 days naturally? Use Epsom salt or commercial stump remover products to accelerate decomposition. Drill holes in the tree stump, fill with these agents, and keep the area moist. While not instant, it can show results in 2-3 days under ideal circumstances. Why shouldn't you leave a tree stump in the ground? Leaving a tree stump invites pests, fungus, and may cause unwanted new tree growth. For optimal tree care and landscape safety, most experts recommend tree stump extraction as part of responsible tree service. Expert Quotes on Tree Stump Extraction and Tree Care "Proper tree stump extraction is crucial for landscape health and prevents long-term issues like insect infestations and root disease." – Dr. Elena Cruz, Certified Arborist Key Takeaways: Making Tree Stump Extraction Simple Tree stump extraction can improve safety and property value Stump grinding and removal are both viable, depending on the situation Consult with a reputable tree service before starting major extraction work Environmental and regulatory factors are important in tree care plans Ready to Tackle Tree Stump Extraction? Grow your landscaping expertise—call 203-271-7991 or visit TreeGuardianNews.com to subscribe. If you’re ready to elevate your landscape beyond just stump extraction, consider how ongoing seasonal maintenance can make a lasting difference. Proactive care, such as strategic trimming in the fall, not only prevents future issues but also enhances the health and beauty of your trees year after year. Discover expert advice and overlooked techniques in fall tree trimming tips that most homeowners miss to keep your property thriving. By integrating these advanced insights into your routine, you’ll ensure your yard remains safe, vibrant, and a true asset to your home. Take the next step in your landscaping journey and unlock the full potential of your outdoor space.

11.08.2025

Stump Grinding Secrets Pros Don’t Tell You

Did you know that more than 80% of homeowners make critical mistakes during stump grinding that can cause lasting yard damage and unnecessary costs? When it comes to removing an unsightly tree stump from your yard, there’s a lot more beneath the surface than meets the eye. Stump grinding, while seemingly straightforward, holds many secrets that tree service professionals wish you knew. In this comprehensive guide, you’ll discover the game-changing techniques, essential mistakes to avoid, and insider insights that separate flawless stump removal from expensive disasters. Whether you’re considering hiring a pro, renting a stump grinder yourself, or just curious about the stump grinding process, this article delivers all the facts to help you make informed, cost-effective decisions for your landscape. Unlocking the Truth Behind Stump Grinding: Surprising Facts and Figures "More than 80% of homeowners are unaware of the critical mistakes made during a typical stump grinding job—leading to unnecessary risks and long-term yard damage." – Arbor Industry Analyst Many people assume that stump grinding is simply about making an old tree stump disappear, but the reality is far more complex. Industry research reveals that careless grinding can affect soil health, compromise future landscaping, and even enable pests or fungal regrowth. Professional tree services regularly encounter yards where improper stump grinding has led to uneven ground levels, lingering roots, and environmental hazards. What often goes unsaid is how the type of stump grinder used, the grind depth, and the cleanup of wood chips can significantly alter your yard’s long-term health and appearance. Whether you’re facing a large stump or just want to avoid common mistakes, understanding the real facts—and not just the sales pitch—can prevent you from being among the majority who pay for preventable issues. What You'll Learn About Stump Grinding The key steps of efficient stump grinding Choosing between stump grinder types Stump removal alternatives and long-term results How to avoid costly stump grinding mistakes Tips from tree service professionals What Exactly Is Stump Grinding and Why Is It Important? Stump grinding is the process of using powerful, specialized equipment—a stump grinder—to shred the remnants of a tree stump down below ground level. Unlike complete stump removal, which involves extracting the entire stump and its major roots, stump grinding focuses on grinding the stump into wood chips and fine debris until it’s flush with or below the surrounding ground. This method effectively eliminates visible remnants, facilitates landscaping, and avoids the heavy labor and soil disruption of full extraction. Why is stump grinding crucial? First, old stumps can harbor pests like termites or carpenter ants and provide a breeding ground for fungi that threaten healthy trees nearby. Second, leaving a tree stump disrupts lawn care, creates a trip hazard, and makes landscaping tricky. Efficient stump grinding prevents these issues, saves you money in the long run, and ensures a safer, more attractive outdoor space. The process also yields helpful wood chips for mulching or compost, turning waste into a gardening asset. Stump Grinding vs. Stump Removal The debate between stump grinding and stump removal comes down to invasiveness and landscape goals. While stump grinding uses a stump grinder to reduce the tree stump to ground level and below, it leaves the larger roots in place to decay naturally. By contrast, stump removal involves extracting both the stump and major roots, which requires heavy machinery, causes more yard disruption, and often leads to higher costs. Stump grinding is typically preferred for residential yards because it offers a less disruptive, faster, and more affordable option. However, for situations where new construction, paving, or deep-rooted planting is planned, complete stump removal may be necessary. Understanding these differences ensures you select the right tree service for your needs, whether you want low-impact landscaping or a fresh slate below the soil. The Role of the Stump Grinder in Modern Tree Service In today's tree service industry, the stump grinder is indispensable. Modern stump grinders come in various sizes, from compact units for narrow access backyards to powerful machines designed to tackle large stumps left after mature tree removal. These machines use rotating cutting wheels with carbide teeth to chip away at the wood until it’s transformed into mulch or wood chip debris. Innovations in stump grinder design have made the process safer, quicker, and less damaging to the surrounding landscape. A skilled operator can safely grind a stump to the desired depth, usually 4–16 inches below ground level, preventing regrowth. Using a professional-grade stump grinder also minimizes the risk of injury and ensures compliance with safety standards, making it a staple for tree services and homeowners alike. Types of Stump Grinder: Which One Should You Use? Selecting the right stump grinder for your job is a vital step that’s often overlooked. There are several types of stump grinder: hand-guided, walk-behind, and larger self-propelled machines. Each type serves a different purpose, depending on the size of the tree stump, access to the yard, and the desired end result. The choice also impacts time, cost, and the level of effort needed, so understanding the pros and cons can mean the difference between a simple Saturday project and a costly headache. For small backyards or tight spots, a compact or hand-held stump grinder gets the job done with minimal disturbance. For large stumps or multiple stumps, a wheeled, heavy-duty or vertical stump grinder could be the best solution. The decision can also depend on whether you’re hiring a pro—who may have access to specialized equipment—or tackling the project yourself. Matching the grinder to the job ensures safe, thorough, and efficient stump grinding. Vertical Stump Grinder vs. Standard Stump Grinder A vertical stump grinder is engineered for speed and effectiveness with deeply rooted or especially tough tree stumps. Unlike standard grinders that operate horizontally by chipping away across the surface, vertical grinders attack from above, drilling deeper and reducing massive stumps more rapidly. This makes them ideal for commercial or professional tree services tackling particularly stubborn or oversized stumps after tree removal. On the other hand, standard walk-behind or self-propelled grinders are more versatile for most residential needs. They shine for average-size stumps where ground disruption should be minimal and clean up is a concern. Your choice depends on the types of stump encountered and the width, depth, and accessibility of the stump site. When in doubt, consulting a professional ensures the right machine is selected for your specific project. Suitability of Stump Grinders for Different Tree Stump Situations Not all stump grinders and tree stump scenarios are created equal. For smaller, weathered stumps or tight urban settings, a compact or handheld grinder usually suffices. However, fresh tree stumps—especially from large hardwoods—require powerful, self-propelled machines or vertical grinders that penetrate deeper and work faster. The soil type, location (such as near fences or utility lines), and the presence of stones or roots also influence which grinder should be used. Professionals factor in risks like potential regrowth or residual roots that could compromise future landscaping. If you’re removing a large stump after tree removal, or dealing with multiple stumps, commercial-grade grinders offer efficiency and thoroughness that smaller units can’t match. Understanding these suitability guidelines means you’ll spend less time and money, and enjoy better long-term results from your stump grinding project. Comparison of Stump Grinder Types: Features, Costs, Efficiency Type of Stump Grinder Best For Average Rental Cost (Per Day) Pros Cons Handheld/Compact Small stumps, tight spaces $75–$125 Affordable, easy to maneuver Limited depth, slow on large stumps Walk-behind/Standard Average residential stumps $95–$200 Efficient, widely available Requires physical effort, not suited for massive stumps Self-Propelled/Commercial Large stumps, multiple stumps $250–$400 Powerful, deep grinding, professional results Expensive, larger learning curve Vertical Stump Grinder Deep-rooted or very large stumps Special order/pro only Deep penetration, very efficient for big jobs Not for DIY, usually only with tree services The Step-by-Step Stump Grinding Process Explained Initial assessment of the tree stump: Begin by evaluating the tree stump for size, type, age, and condition. Determine how deep to grind and check for rocks or obstructions around and beneath the stump. Look for nearby trees, garden beds, or infrastructure that could be affected. Preparation and safety checks: Clear the area of debris, mark utilities, and establish protective barriers. Don’t forget essential protective equipment—helmet, gloves, and safety glasses—to safeguard against flying wood chips and machine mishaps. Using the stump grinder effectively: Position the grinder over the stump and operate according to the manufacturer’s instructions. Work in slow, sweeping arcs to chip down inches at a time, aiming to reach the recommended depth below ground level. Continually check for hidden roots or objects that might jam the grinder. Debris management after stump grinding: Once complete, shovel away the mound of wood chips and sawdust. You can use them for mulch or compost, or have them hauled away by your tree service. Fill the hole with fresh soil for a seamless yard finish and to support future landscaping. Each step requires patience and attention to detail for both safety and landscape integrity. Skipping preparation, misusing equipment, or neglecting cleanup is how most issues—and homeowner regrets—arise during stump grinding. For a deeper dive into how stump grinding can transform your yard and the specific hazards it helps you avoid, you might find it helpful to review the key reasons not to delay stump grinding and the hidden dangers it prevents. This resource offers practical insights that complement the step-by-step process outlined here. Top Secrets Professionals Don’t Share About Stump Grinding Hidden risks in improper stump grinding: Shallow grinding risks regrowth or, worse, fungal infestations that may jeopardize nearby plants. Many homeowners are surprised when mushrooms or shoots appear months later—an avoidable outcome with thorough grinding. Soil, root, and regrowth considerations: Pros always assess how the roots of a removed tree connect with the surrounding landscape. Sometimes, grinding too shallow leaves root remnants that encourage pest activity or destabilize soil structure. Best times for efficient stump removal: Most professionals recommend grinding in late fall or early spring when the ground is firm but not frozen, reducing mess and ensuring machinery runs smoothly. Stump grinding tips from leading tree services: Experienced arborists rotate grinder teeth frequently and avoid wet weather to ensure finer wood chip debris and less yard disruption. "The techniques we use today in stump grinding prevent issues that can show up years later in your landscape." – Certified Arborist Essential Safety Tips for Effective Stump Removal Protective gear for operators: Always wear sturdy boots, gloves, a helmet, and high-quality eye protection. Using the right protective equipment shields you from flying wood chips and machine debris. Safe stump grinder handling procedures: Read all operational manuals. Use both hands on controls, keep bystanders away, and always power down before servicing or repositioning the grinder. Never attempt to dislodge jammed wood chips with the machine active. Managing potential hazards around the worksite: Clear stones, glass, and metal from the zone, and mark all underground utility lines before grinding. Creating an organized, hazard-free area around the tree stump drastically lowers injury risk and equipment damage, whether you’re a do-it-yourselfer or hiring a professional. Should You Hire a Pro or DIY Your Stump Grinding? Deciding between hiring a pro or tackling stump grinding as a DIY project hinges on cost, expertise, and risk tolerance. Professionals bring specialized equipment, years of experience, and full insurance coverage—meaning faster, safer results and protection from accidental property damage. DIY options save on labor but often result in rental and transportation fees, and expose you to learning curves and safety hazards. For small or accessible stumps, a competent homeowner can rent a stump grinder from a local supplier and finish the job with some effort. For complex removals, multiple tree stumps, or scenarios near structures or underground utilities, hiring a professional arborist or tree service is the safer choice. Always compare rental and service quotes, factoring in equipment size and your own risk comfort. Pros and Cons: Hiring a Pro vs. DIY Stump Grinding Hiring a pro ensures the fastest, cleanest, and least risky outcome—with the added benefit of professional cleanup and soil restoration. Professional tree services know how to match grinder types to each unique tree stump situation, reducing the chances of overlooked roots or soil problems. DIY stump grinding can be rewarding and budget-friendly for smaller jobs, but mishandling machinery or misjudging grinding depth can result in lingering stumps, regrowth, or personal injury. Remember, stump grinders are powerful machines that demand respect, focus, and proper protective equipment. Average Costs for Stump Grinding Services The average national cost to grind a stump ranges between $100 and $400 for a single, accessible stump. Prices may rise to $600 or more for large stumps or if extensive root systems or hard-to-reach areas are involved. Variables include the size of the tree, site accessibility, root complexity, and the specific services offered (such as wood chip removal or ground restoration). By comparison, DIY stump grinder rentals cost on average $100–$400 per day, plus transport and potential damage deposits. Be sure to factor in your time and possible rework due to inexperience or equipment limitations. For multiple tree stumps or those in sensitive locations, professional tree service is often worth the investment due to efficiency, speed, and peace of mind. DIY vs. Professional Stump Grinding: Time, Cost, Expertise Solution Average Time (Per Stump) Estimated Cost Skill Required Risk Level DIY Rental 2–6 hours $100–$400/day Moderate—must read all instructions and practice safety Medium to High Pro Tree Service 30 min–2 hours $100–$600+ None (leave it to professionals) Low Stump Grinding Aftercare: What Comes Next? How to use stump remover for complete removal: For any persistent root fragments or leftover wood, applying a chemical stump remover can help break down material that a grinder couldn’t reach. Just follow all manufacturer and environmental guidelines for safe and responsible use. Preventing tree stump regrowth: To stop the return of unwanted shoots, be sure the grinding removes the stump at least 6–12 inches below ground level, and check the site for active root growth. Occasionally, using a root barrier or targeted herbicide is warranted, especially near lawns or gardens. Landscaping options post-stump removal: Once the hole is backfilled, you can replant grass, create a flower bed, or install a new tree in the cleared spot. Fresh wood chips can be used as mulch elsewhere—but be mindful they decompose over time, altering soil nitrogen levels. Healthy aftercare ensures your yard fully recovers and looks better than ever. People Also Ask: Stump Grinding Questions Answered How much does it usually cost to grind a stump? Professional stump grinding services typically cost $100–$400 per stump, depending on the size of the tree, accessibility, and depth. Difficult or extensive root systems, multiple tree stumps, or removal of large wood chip debris can push prices higher. Always request detailed quotes from multiple tree service providers before making a decision. Can you grind a stump yourself? Yes, you can grind a stump yourself by renting a stump grinder from a hardware or garden center. While it’s cost-effective for small, accessible stumps, it requires strength, careful safety practice, and a willingness to learn. Be mindful that mishandling equipment or underestimating the project can result in injury or incomplete stump removal. Is stump grinding worth the cost? For most homeowners, stump grinding is absolutely worth the investment. It eliminates eyesores, prevents pest and fungal problems, and increases yard usability. Professional grinders work faster and deeper than most rental units, ensuring lasting results and preserving your landscape’s value. Is it better to grind or dig out stumps? It depends on your goals. Grinding is usually best for average yards—it’s cleaner, less disruptive, and affordable. Digging out stumps removes all roots and is best when replanting large trees or constructing foundations, but it’s labor-intensive and can damage the surrounding area. Most homeowners find stump grinding the best all-around solution. Stump Grinding FAQs for Homeowners How deep should the stump be ground? Grind at least 6–12 inches below ground level for effective prevention of regrowth and future landscaping ease. Do stump grinders remove all roots? No, stump grinders mainly target the wood above ground and just below surface level. Major roots remain and decay over time, though deeper grinding can address more root material. Is there an eco-friendly way to do stump removal? Yes! Use the wood chips as mulch, let roots decompose naturally, and avoid chemical stump removers unless absolutely necessary for regrowth control. What risks are involved in improper stump grinding? Regrowth, fungal infestations, pest attraction, soil instability, and even damage to underground utilities—all can result from hasty or shallow grinding. Follow safety protocols and hire pros when in doubt. Key Takeaways From Stump Grinding Secrets Thorough planning and the right stump grinder are crucial for safe, efficient removal. Professional stump grinding offers efficiency and safety, saving time and reducing risk. Long-term benefits depend on expert techniques that prevent regrowth and soil issues. If you’re ready to take your landscaping results to the next level, there’s even more to discover about achieving a flawless yard after stump removal. Explore how the magic of stump grinding can unlock new possibilities for your outdoor space—from advanced aftercare to creative landscaping ideas. This next step will help you maximize the value of your investment and ensure your yard remains healthy, beautiful, and hazard-free for years to come. Dive deeper and transform your landscape with expert-backed strategies and inspiration. Grow Your Landscaping Expertise—Call 203-271-7991 or Visit TreeGuardianNews.com to Subscribe

Terms of Service

Privacy Policy

Core Modal Title

Sorry, no results found

You Might Find These Articles Interesting

T
Please Check Your Email
We Will Be Following Up Shortly
*
*
*